Pretend
From Script to Screen
Pretend lets you tell your story.
Pretend helps create and develop stories from writing to rough cut.
You have a story idea. Great, now what? Going from a concept to a finished piece is a complex journey for anyone.
First, visualize the story for yourself. Even if you have a completed script, you still need to visualize the final result. Words on a page aren't images and sound on a screen.
Next, communicate the story vision to others such as cast and crew. The script alone isn't enough, they need to see what you want in order to help you make your story. Making a movie is a collaborative art, not individual like writing or painting.
A good director has the whole film visualized in their head or on paper or, ideally, in some digital form that is easily shared. That vision can change. You have a great idea on set or the scene isn't working or maybe the weather isn't cooperating. But having a story visualized gives you a starting point for both you and your crew.
Pretend aligns creative teams with the story's vision. And aligned teams are more efficient which keeps budgets in line.
So how does Pretend work?
Pretend combines story development with post-production tools into a single story-based production application.
Start with an outline and write the story while Pretend auto-formats the screenplay. You can also add notes and plan shots in the screenplay editor.
As you write the story, your project organizes itself using the story structure. You can then add reference material, storyboard art, clips, and website links to each scene or shot. Make storyboard videos with temp audio or edit full video rough cuts. You even have titling and effects tools for color-correction or animation. Then render your final piece out to file, Vimeo or Youtube.
Pretend keeps the story as the backbone of the project throughout production for both those creating it and those making it.
"Anyone can create something everyone can watch."
- Robert Kyncle, YouTube
Pretend lets you develop your story from screenplay to rough cut and beyond. From films to branded content, you and your team can make better stories with a more efficient production.
Growing a Story
Make the story the center of every creative decision for you and your team.
The core of Pretend is story, and to help you with the development of your own story, Pretend has established a process through the use of Story Groups.
Story Groups help you organize and compartmentalize your plots and story assets. This makes it easier to focus on specific components of your story throughout the chaos of production.
What are Groups and Story Groups?
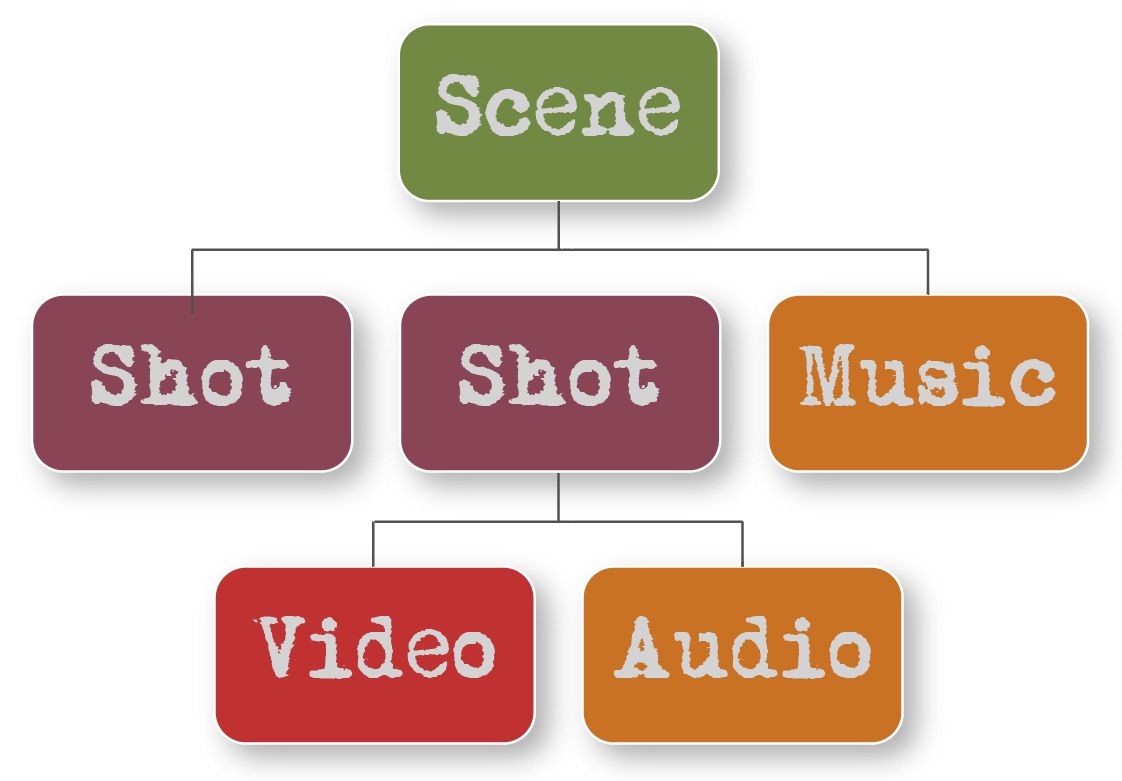
Story Groups are containers that hold story elements. These elements can be scenes, sequences, video and audio clips, storyboards, and they can even contain another Story Group. You can even create Groups to add related items like reference material, web links or 3rd party files. This results in a hierarchical structure of different groups. A common one is the Show/Sequence/Scene/Shot structure as seen below.
Common show structure

A scene with shots and overall scene music
Any group, story or not, has its own timeline. These timelines can be opened by double clicking on any Group in the library.
Although Groups can be created for many reasons, the main ones are Story Groups. The main Story Groups include Shows, Scenes, and Shots. Other Story Groups are built from these so let’s examine them.
Shows
The Show Group is the highest group in Pretend’s hierarchical structure. It’s special in that it is meant to contain your entire narrative. By double clicking on this group in your library, you’ll be able to view your entire story. Every show has a screenplay associated with it, whether it is blank or not.
In the show’s inspector, you can see story information like synopsis and logline as well as setup information like resolution and frame rate.
Scenes
In Pretend, just like in most scripts, a scene is an event where characters interact over time.
When you load a screenplay in the screenplay editor, the scenes are sequentially added as story groups in your library (under your show). These Scene Groups each have their own timeline, which you can access by double clicking on a Scene in your library. You can also view all of your scenes’ timelines in sequential order by double clicking on your Show in the library.
Shots
Shots Groups are represented by containers within a Scene Group. Although available, you don’t have to use Shot Groups. You can simply use video clips on their own if you’d like. So why use shot groups?
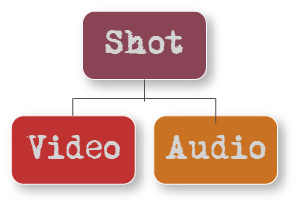
Shot Groups are more than a video clip in Pretend. It’s a story container that can hold anything associated with that shot.
Shot with video and audio clips
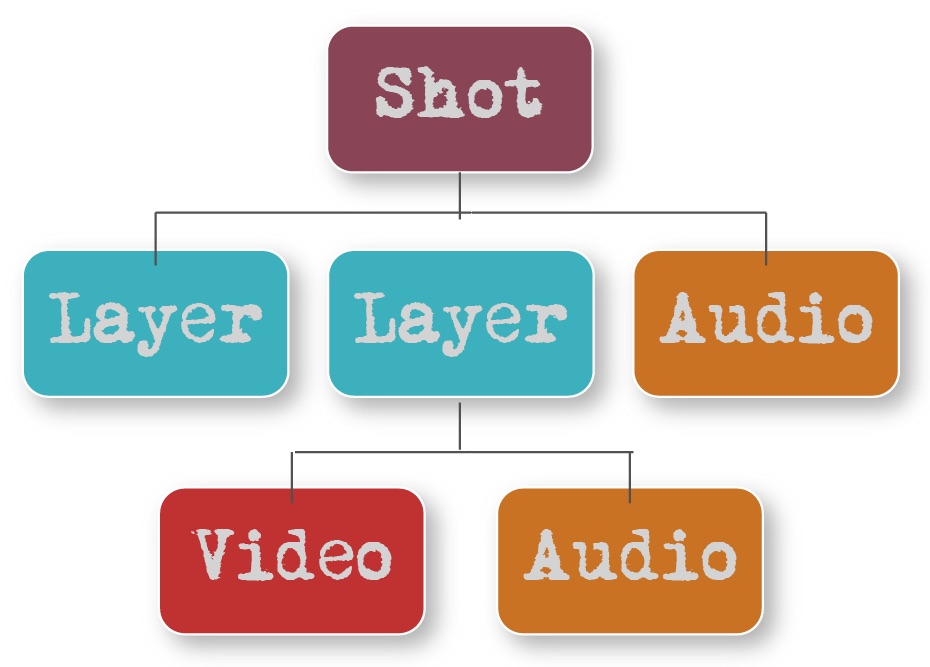
Shot with multiple layers and audio clips
In its simplest form, a Shot Group contains a single video clip. If that’s all you want, you’re better off using the video clip by itself and skip the Shot Group.
A Shot Group is useful if you have several takes of a shot. You can then use your Shot Group to contain all your takes, rate them, and only display your favorite take in the timeline.
A Shot Group is also useful for linking audio clips specific to the shot, like footsteps sounds synched to a video clip of someone walking. If you move the Shot Group around in the timeline, you can rest assured that all of your synched audio will move with the video clip.
A Shot Group can be used to stack clips as layers in a composite shot. Open the Shot Group in the timeline to adjust timing or place one clip over another.
You can also use a Shot Group to contain reference material along with your clips for that shot.
Shots Groups can automatically display a clip when added to a timeline
A Shot Group in the library can hold anything associated with the shot. However, when that Shot Group is added to a Scene Group’s timeline, you need to choose which item will be seen in the final edit.
To speed this along, a Shot Group added to a timeline will automatically take the highest rated video clip, or still image if there’s no clip, and add it to the Shot Group’s timeline. Audio clips are not considered for the default clip.
If no ratings are available, the 1st clip added to the Shot Group will be used. If multiple clips have the same rating, the 1st clip in is the tiebreaker.
The duration of your Shot Group in the timeline will match the duration of the default clip. This is just a starting point that you can change as you like, just as you can replace the default clip with any other clip.
You can turn off this "first-in" default under Preferences. A shot added to the timeline will then be empty until you add items from the library.
Using Story Groups as organizers
You can also add a general story group wherever you like. A Story Group can be used to organize your story into acts, sequences or even series and seasons. For example, add a story group below a Show Group and use it as an Act Group or Sequence Group to hold Scene Groups. Or add a story group above a Show Group and use it to hold other Show Groups from that season.
What about plain old Groups?
Groups are like Story Groups except they have no story-related features. A Group can be used as a folder in the library to hold a bunch of notes and reference material for a specific part of your show, for example. Or label the Group as “Rejected” to hold the rejected clips of a scene.
Even though a Group can hold library items as a folder would, they also have timelines. You can open a Group’s timeline in the timeline panel by double clicking on that Group in the library. You can use the Group’s timeline to rearrange media assets. You might make a “Dailies” Group, then open it as a timeline to add takes from the day’s shoot to render out for review.
Another example could be a company logo with a sound effect that you want to drop in over an opening scene. Drag the Group with the media from the library down to the timeline on a track above a Scene Group to do so.
A Quick Tour of Pretend
Lets begin by seeing how you work with Pretend.
The Interface
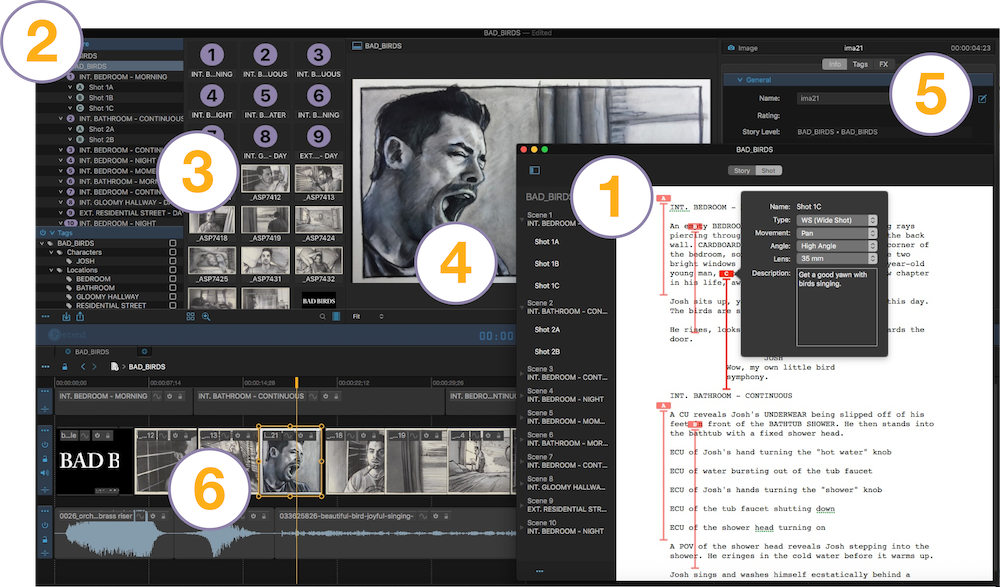
- The Screenplay Editor The Screenplay Editor allows you to write your script directly in Pretend. If you already have a script written, you can import it as a Fountain file (Fountain files are the most common type of script file formats and are available for exports in almost every screenplay interface). The Screenplay Editor also helps you by auto-formatting your script and by using your scene headings to create Story Groups in your Library. Learn More
- The Editing Window The Editing Window contains all of the items listed below.
- The Library The Library is where you will be able to find all of your Groups as well as organize all of your media assets for your project. It uses your story structure to help you organize all of your media. Learn More
- The Viewer The Viewer allows you to view your project and media assets. It also allows you to view the different color channels of a video clip, as well as modify text, transforms and crops. Learn More
- The Inspector The Inspector allows you to review and modify your Library’s assets. You can add effects to your footage using the saturation controls or even animate transitions between different clips. Learn More
- The Timeline The Timeline is used to edit your project using all of the different editing tools. You can even add a story arc in your timeline to keep track of your plot points and character progression throughout your story. Learn More
A Quick Tour of Pretend
Installing Pretend
Brief Overview
Story Groups
The Project Browser
The Timeline – Part 1: A Single Timeline
The Timeline – Part 2: Editing with Story Groups
Transitions
The Screenplay Editor
The Story Structure Panel
The Tags Panel
Importing Media
Importing Scripts
The FX Panel
Titles and Text
Exporting to Other Video Editors
Getting Started
First things first - logging in and setting up your project.
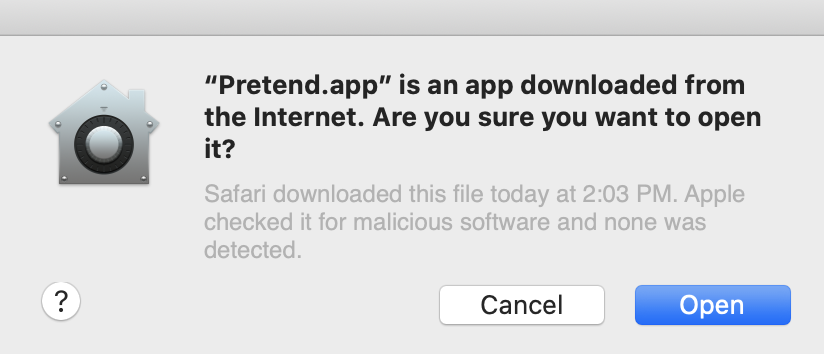
The Login Window
After opening Pretend for the first time, you'll see this Mac confirmation box appear. Hit Open.
Next, the Login Window will appear. Enter the email and password you gave while registering on the Pretend website. If you enter the correct email but the wrong password (we all forget sometimes), click Forget Password to reset the password.
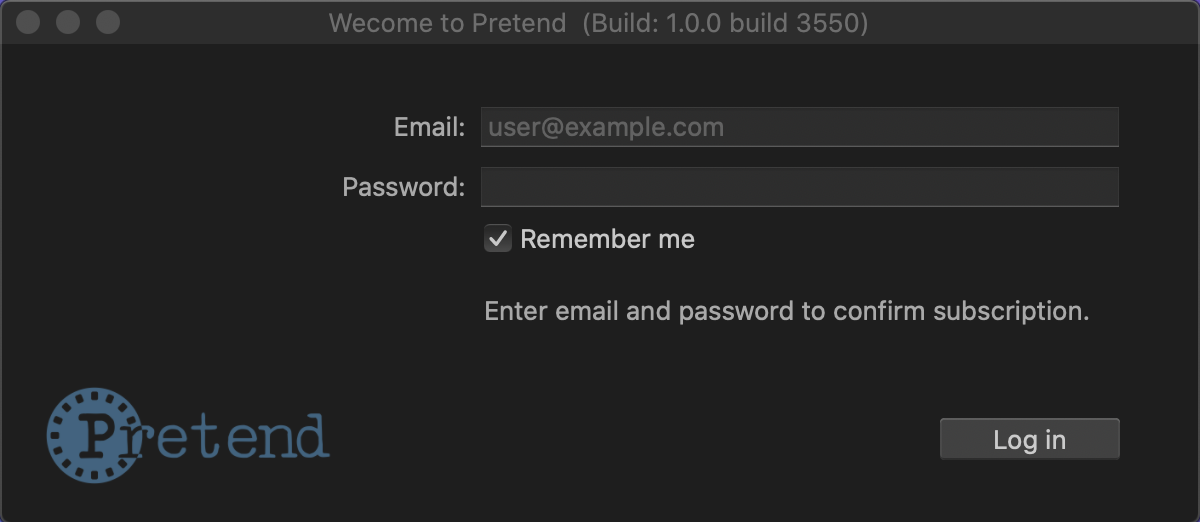
If "Remember me" is checked, Pretend will bypass the Login Window whenever you open it in the future. If you have the full version of Pretend, this will last as long as your subscription is current.
After you log in to Pretend, the Project Browser will appear next, as we discuss in the next section.
The Project Browser
The Project Browser has three main tabs: New, Recent and Open. In the top left is the close button. In the top right is the help button which opens the Pretend user guide in your browser. The Subscription button is in the lower left section. If no recent projects exist, the New tab page is displayed.
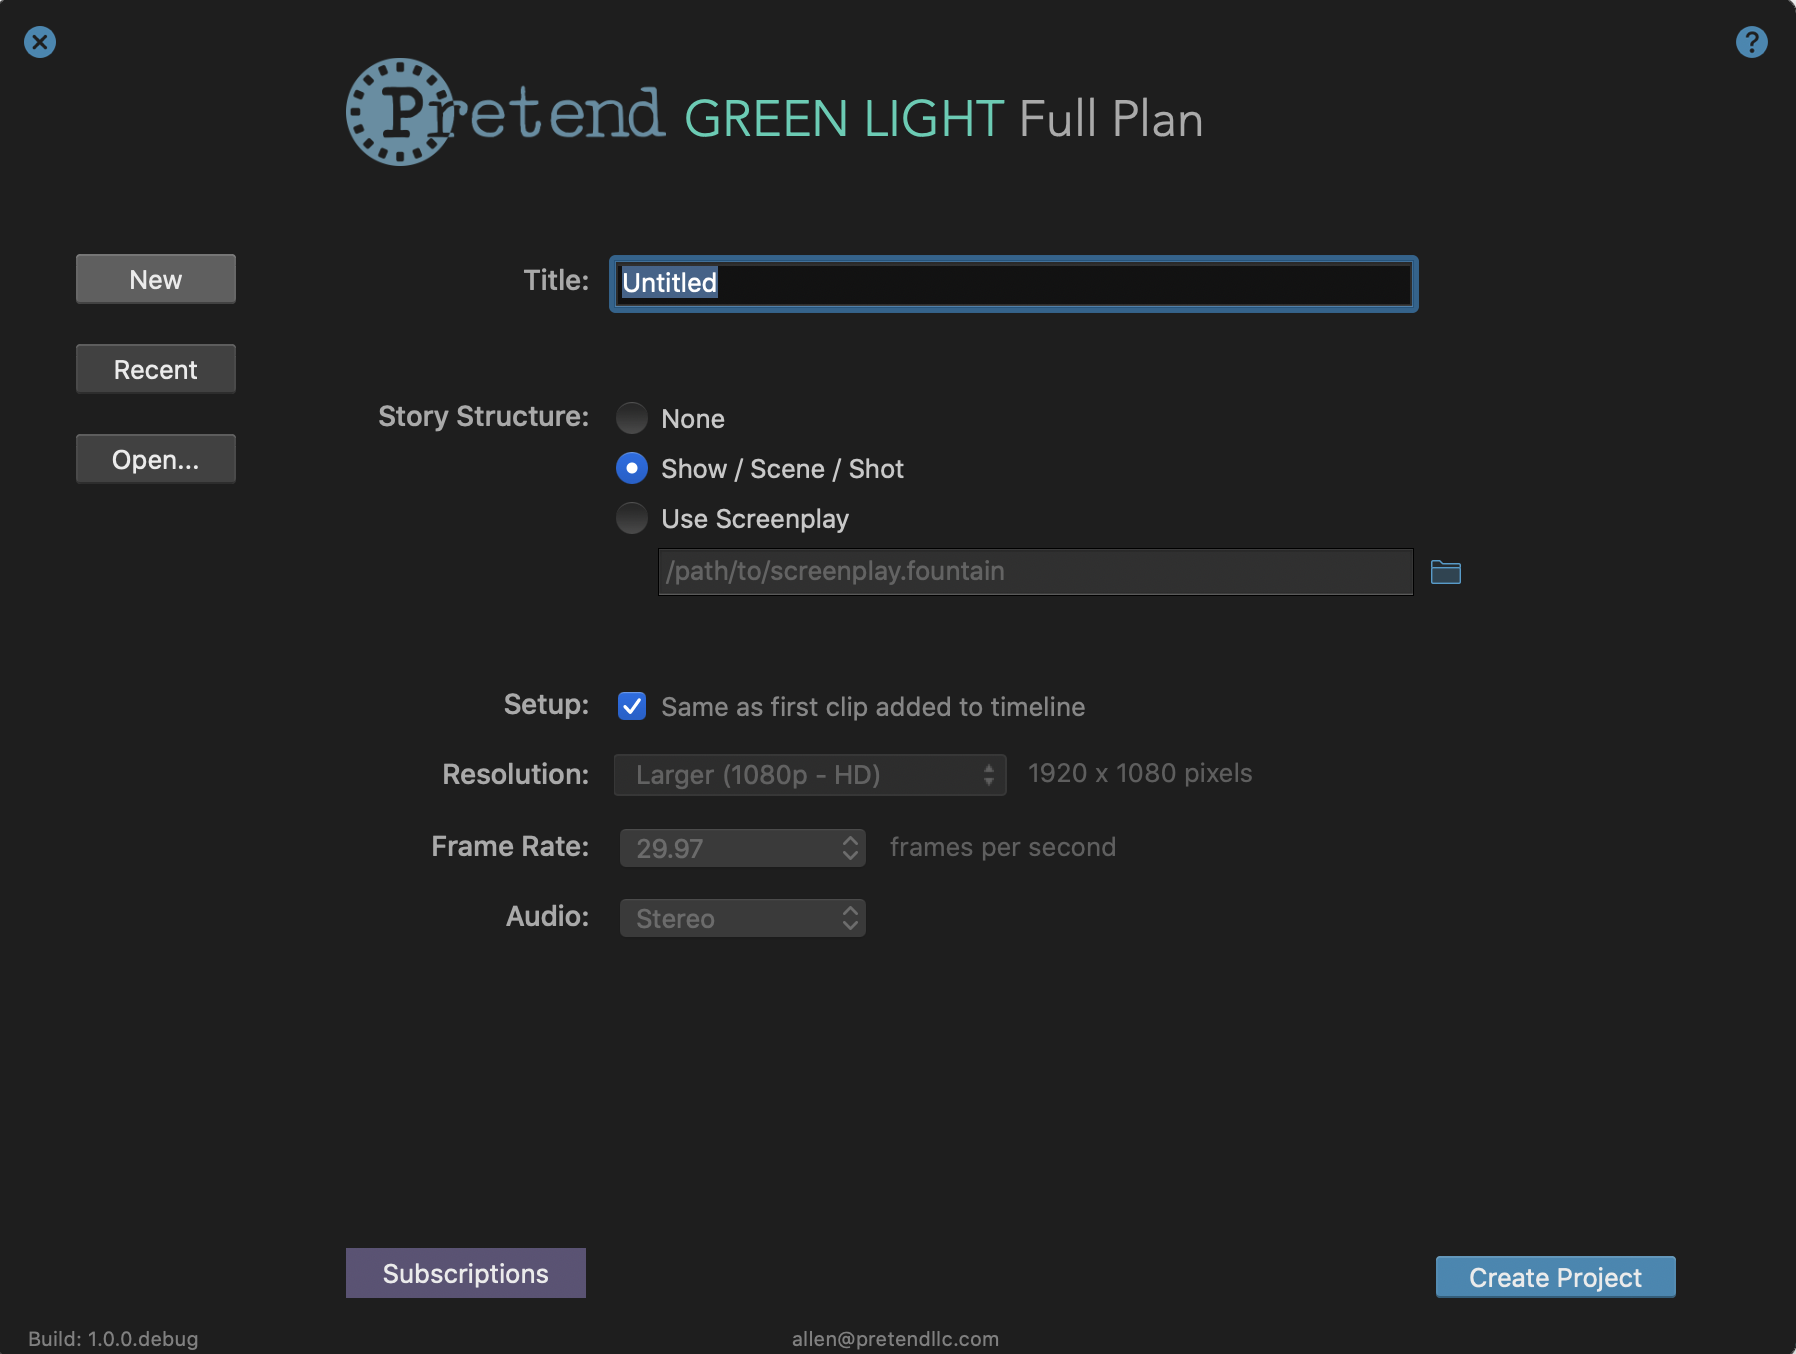
The New tab has three sections. First you enter the title of the project file.
The next section is to choose the story structure. You can choose None if you want to make a non-story project. Choosing None only uses a default Show group where you can create whatever story structure you like from scratch. Or you can choose Show/Scene/Shot. This places a default show, scene and shot in your project that you can modify as you like. Or you can choose Screenplay and load in an existing screenplay. The story structure will be extracted from the screenplay.
The last section is for the format setup. If you leave the box checked, the first video clip into the timeline will set the format for that show. So if you drag in an HD clip, the resolution would be set at 1920 x 1080. You can change this later in the show's inspector. If unchecked, you choose the resolution, frame rate and audio options from the dropdown menus. Note that the first video clip sets the project, not audio or still image clips.

The recent page shows recent projects if any. Use the Open button to open projects not in the Recent tab.
You can open a project anytime while using Pretend through the main menu under Window>Project Browser or under File>Open.
Use the Open button to open projects not in the Recent tab. You can open a project anytime while using Pretend through the top menu under Window>Project Browser or under File>Open.
Click the Subscribe button to manage your subscription. If you are on the Full plan, it will take you to where you can upgrade, downgrade, cancel or modify your billing information. If you are on the Free plan, it will take you to a checkout where you can upgrade to a Full plan.
Reconnecting Media
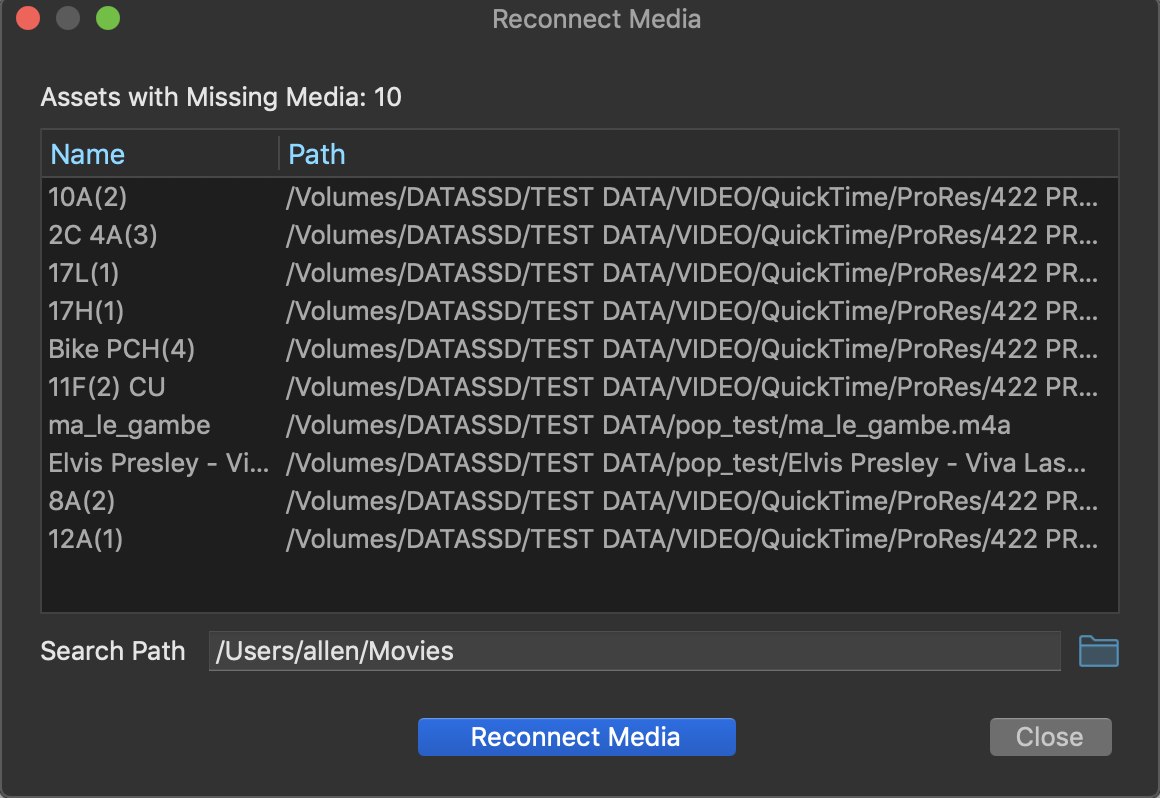
If you load a project using media that is no longer in the same location on your machine, the file path is not valid so the library can't load the media anymore. You need to reconnect the missing media.
If media is missing, the Reconnect Media panel will appear when opening the project, with the names and paths of the media. Below is the search path folder, which is where Pretend will search for the missing media. Pretend will search that folder, and all the folders it contains. Click on the folder icon to the right of the pathname to locate the correct folder in the Finder. Then click the Reconnect Media button.
If all the media is greyed out, you have reconnected all the missing media and can click Close. If some media is still missing, you need to repeat with the correct folder until all media is connected.
The Screenplay Editor
In the beginning, there were some words...
The Screenplay Editor is one of the two windows that appear when Pretend opens up. You can also access it by selecting View > Show Screenplay Editor in the Top Menu Bar.
It’s in the Screenplay Editor that you’ll be able to write your own screenplay for your project, or import an already existing one. It’s also where you’ll be able to bridge your project from script to production by lining your shots, and organizing your Story Groups.
Using the Screenplay Editor
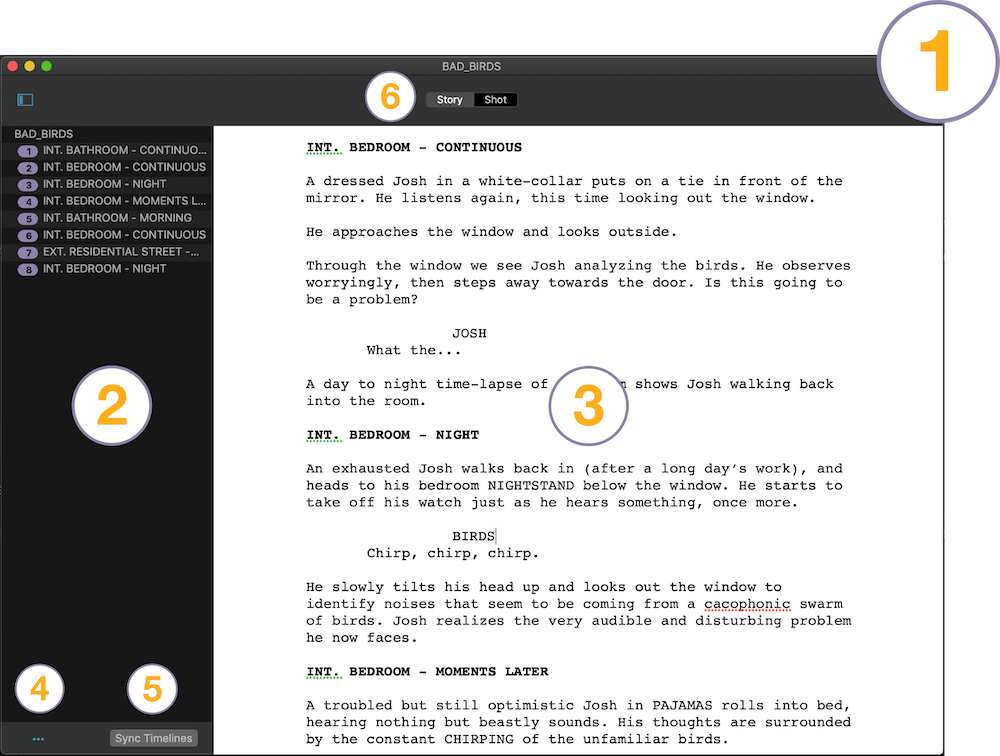
- The Screenplay Editor
- The Navigation Panel - Learn More
- The Text Editor Panel - Learn More
- The Navigation Panel Menu - Learn More
- Sync Timeline Button - Learn More
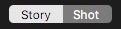
- Story / Shot Buttons - Learn More on Story Mode or Shot Mode
The Text Editor Panel
The Text Editor is the main text interface in the Screenplay Editor. It’s where you will be able to modify your script when in “Story” mode and line your shots in “Shot” mode. The Story and Shot buttons at the top switch between each mode as we examine them below.
"Story" Mode
The Screenplay Editor starts out in “Story” mode, which allows you to write your own screenplay. Pretend auto-formats your writing into standard script form (recognizing scene headings, actions, character names and dialogue) so that you can focus on your story.
The Screenplay Editor begins with a show/scene/shot story structure but you can add Story Groups to use as acts or sequences.
If you already have a script written, you can import it as a Fountain file using the File menu, File > Import > Import Fountain Screenplay...
Fountain files are a common type of screenplay file format and can be exported in most screenplay applications. If you load an existing screenplay, Pretend will recognize your different scenes and create Story Groups for them in your Library.
Import a Screenplay
When creating a new project through the Project Browser that appears when first opening Pretend, if you’d like to import an existing screenplay, select “Use Screenplay” under the Story Structure options and then select a Fountain screenplay file from the file browser.
To import an existing screenplay into a project that’s already been started:
- Choose File > Import... > Import Fountain Screenplay... from the Pretend top menu bar.
- Select a Fountain file screenplay from the File Browser.
- Hit “Open” and the screenplay appears in the Screenplay Editor with all of its scenes listed in the Navigation Panel.
Importing a new screenplay in an open project will create a new Show in addition to your current one. If you only want the imported screenplay, delete the old one by simply selecting it in the Library and hitting the “Delete” key.
Writing a Script
- If the screenplay editor is not visible, select View > Show Screenplay Editor from the top menu.
- Double-click slowly on the default "Show" label in the story navigation panel on the left and enter your title.
- If it's not already selected, click on the Story button in the upper bar. This lets you edit the story.
- Now in the Screenplay Editor panel on the right, edit the default scene heading, "INT. LOCATION - TIME". Change "INT." to "EXT." if needed, "LOCATION" to "HOUSE", and "TIME" to "DAY".
- Hit return, and add an action description. An extra line space is added since it's standard format for a screenplay. Hit return twice after the last action, then enter a character name in all caps. Hit return again and enter some dialogue. You'll see everything snap into standard format.
- To add a new scene, type in "INT." or "EXT." with a location and time. You don't need to type in caps. Once "int." or "ext." are typed in, the header uses only caps.
- You could also select Add Scene from the Screenplay Editor menu to get a template scene heading (INT. LOCATION - TIME) which you can then edit.
- In the navigation panel on the left, double-click on the scene heading and label the scene. You will see markup for a label in grey, directly below the scene header in the Screenplay Editor. Labeling the scene lets you use the navigation as an outline. Note the actual scene header in the screenplay stays the same but changing it now has no effect anymore in the scene name in the navigation panel.
Voila, you’ve made your first screenplay using Pretend!
Remember that most elements (such as scene headers or actions) need an empty line before and after the element in order to format properly. An exception is that character, parenthetical and dialogue elements don’t need an empty line separating them.
Changes to the scene structure in the Screenplay Editor sync with your Story Groups in your Library (in the Video Editor). See the library and timeline sections to learn more.
Important note, if you delete a scene in the Screenplay Editor, it is also deleted in the Library and Timeline. Meaning that if you delete a scene, it will also delete its Scene Group in your Library, along with any media attached to it (though not the original source files on the hard drive).
Export a Screenplay
To export a screenplay out of Pretend:
- Select the show, in the library, for which you would like to export a screenplay.
- Then choose “Export Fountain Screenplay...” from the Screenplay Editor menu at the bottom left or by selecting File > Export... > Fountain Screenplay... from the Pretend top toolbar menu.
- Choose where you would like to save your file in the browser window that appears. As of now, screenplays can only be exported as Fountain files.
Screenplay Format Types
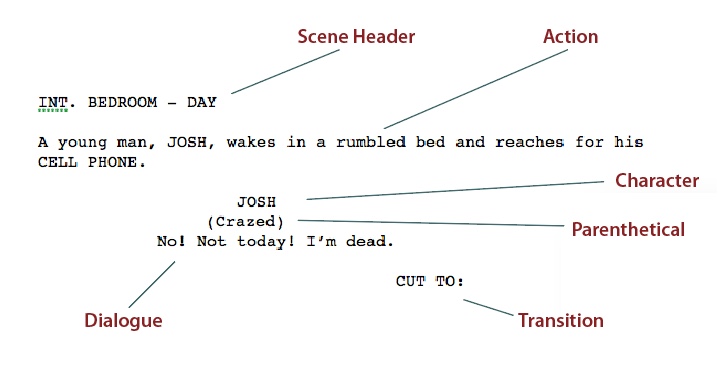
Pretend formats the screenplay as you type. Screenplays in the film industry follow a standard format. Let's review the main types below to see what Pretend looks for while formating.
Scene Headings |
These begin with INT. (interior) or EXT. (exterior) followed by a location name (such as OFFICE or STREET) and the general time such as DAY or NIGHT. Begin by typing "int." or "ext." (lower case is fine) to indicate this is a scene header and it switches to all caps automatically. |
Action |
Actions usually follow scene headings, though they can appear throughout the scene. They describe what is happening in the scene. Hit return after a scene heading to switch into action format. |
Character |
The indented name of a character written in caps. Hit return twice after, say, an action to get an extra line, then type the name in caps. Hit return again and it changes into character formating as you enter dialogue. |
Dialogue |
Follows the name of the character currently speaking. Hit return once after a character name and type to automatically format as the dialogue. |
Parenthetical |
A parenthetical is text in parentheses to describe the context of the dialogue. Most of the time, it appears under the character's name. Sometimes it also appears next to a character's name such as (V.O.), which means “voice offscreen”. Typing "(" will make both "(" and ")" for you. |
Transition |
Usually ends with a TO: such as “FADE TO:” indicating a shot transition. Type the transition (such as "CUT" or "FADE") in caps, followed by a "TO:" and the transition will format correctly on the right. |
Screenplay Editor Tools
Now that we've seen the format types, let's look at how to edit in the screenplay editor.
Insert/Select |
Click to insert, double-click to select a word and triple-click to select a paragraph. ⌘A to select all text in the panel. |
Undo/Redo |
Hit ⌘Z to undo and ⌘+⇧+Z to redo. Or select Undo or Redo from the upper Edit menu. |
New Screenplay |
Making a new Show automatically creates a new screenplay. First select an existing Show, then right-click in the nav panel or click the menu button (...) in the lower left and select Add Show. |
Save Screenplay |
Select "Export Fountain Screenplay..." in the Screenplay Editor menu to bring up a browser and save as a text file. Also, saving a Pretend project file will include your screenplay for later use. Or print out the screenplay as a PDF, although it cannot be reloaded directly in Pretend. |
Add New Scene |
In the Screenplay Editor, make sure there is an empty line above the insertion point, then type in a scene heading starting with “INT.” or “EXT.” (not case sensitive). A new scene appears. Continue typing the rest of the scene. Or right-click on a selected scene in the story navigator panel, then choose Add Scene. A new scene appears after the selected scene. |
Add a Story Group |
To add a general story group, right-click on a selection and select Add Story Group. You can also select Add Story Group from the Screenplay Editor menu at the bottom-left of the navigation panel. Generally, you use these as Acts or Sequences to group scenes so just drag the story group to the correct level and rename as something like "Act I". Then drag the scenes underneath slightly to the right. |
Delete Scene (or Story Group) |
Select a scene and hit Backspace or select Delete from the bottom left menu button. Important, this will delete both the story group and its contents, including in the library. So if you have assets inside the story group in the library that you want to keep in the project, move them out first. |
Add Action |
Hit Return after the scene heading to begin a paragraph in Action format. Hit Return again after an Action paragraph to start another Action paragraph. To finish with actions, hit Return twice so you have an empty line above a new element. |
Add Character |
Character names are in uppercase. When you type in caps, Pretend assumes you are typing a character name (unless you type INT or EXT). There is autocomplete for existing character names. When the autocomplete pops up a list, use the up/down arrow keys to choose and hit TAB or Return to accept the option. |
Add Dialogue |
Hitting Return after a Character line makes the next paragraph into a Dialogue. |
Add Parenthetical |
Typing a “(“ after a Return from a Character or Dialogue line is a Parenthetical. An insertion point appears between two parentheses. After you enter text, hit Return after the “)” to go next to a Dialogue. |
Add Transition |
Typing in uppercase ending in “TO:” will format a Transition. |
Add a Section |
This is the same as adding a Story Group. Type a hash mark (#) before a line to make the first level, two hash marks to make the second level, and so on. |
An extra line appears after the section when you hit Return which is standard in Fountain.
Note that you usually give an extra line space except between a character and dialogue. Hit Return once after the character name and type the dialogue.
Below is a list of what Pretend typically expects to follow each story element.
• Scene -> Action,
• Action -> Action
• Character -> Dialgoue
• Parenthetical -> Dialogue
• Dialogue -> Action
• Transition -> Scene.
Sometimes you may want to force a format on a line. Look under the Force submenu in the contextual menu for the selected element you want to force. Or you can use Fountain markup to force a format if needed with the following markup.
Force a Scene Heading |
Type a period (.) before the heading. |
Force an Action |
Type an exclamation point (!) before the action line. |
Force a Character |
Type an "at" symbol (@) before the Character name. |
Force a Transition |
Type a greater-than symbol (>) before the Transition line. The transition should be in capitals. |
Text Editor Menu
Right-clicking in the editing panel brings up a contextual menu.
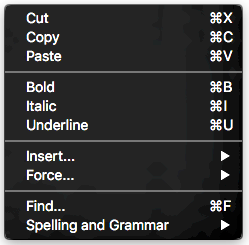
Cut/copy/paste |
Cut/copy/paste with ⌘X / ⌘C / ⌘V or select from the upper Edit menu. |
Bold |
Choose Bold from the contextual menu. Or do it yourself by enclosing the text in double asterisks like **text**. The asterisks appear grey to show they are non-printing and the enclosed text is bold. |
Italic |
Choose Italic from the contextual menu. Or do it yourself by enclosing the text in asterisks like *text*. The asterisks appear grey to show they are non-printing and the text is italic. |
Underscore |
Choose Underscore from the contextual menu. Or do it yourself by enclosing the text in underscores like _text_. The underscores appear grey to show they are non-printing. |
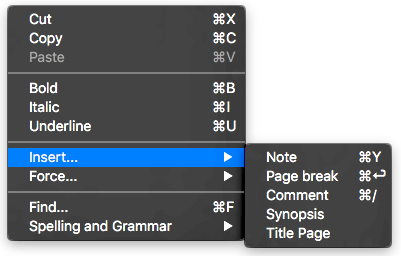
Note |
To add a note, choose Insert > Note from the contextual menu. Or enclose the text of the note in double brackets such as "[[ take a look at this later ]]". You can add a note anywhere. The note is in grey to show it's not to be in a printed formatted screenplay. |
Page Break |
Choose Insert > Page Break from the contextual menu or do it yourself by typing === on its own line. The three equal signs are in grey to show they are not printed. |
Comment |
You can comment out any part of the printed screenplay by selecting the text, then selecting the Comment option. Or you can also do it by enclosing the desired text with "/*" at the start and "*/" at the end of the text. |
Synopsis |
A synopsis is a summary of what happens in the story. Type an equals sign (=) before a line of description. Normally, a synopsis line is after a section but it can appear anywhere. The markup is in grey indicating it's not meant to appear in a printed screenplay. |
Title Page |
You can either use Insert > Title Page from the contextual menu or do it yourself. Just enter keywords followed by text. The keywords are "Title:", "Credit:", "Author:" and "Draft Date:" which appear in grey to show they are not printed. |
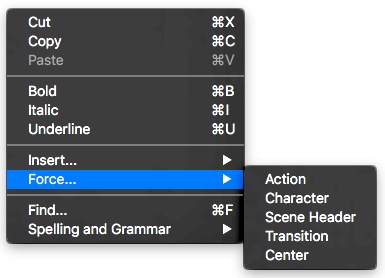
Action |
Forces an action by placing an exclamation point (!) before the action line. |
Character |
Forces a character by placing an "at" symbol (@) before the Character name. |
Scene Header |
Forces a scene heading by placing a period (.) before the heading. |
Transition |
Forces a transition by placing a greater-than symbol (>) before the Transition line. |
Center |
Centers the selected text by enclosing the text with > and < to center the text. |
Find |
Select Edit > Find (or ⌘ F), to open a Find widget at the top of the screenplay editor panel. Enter the text to find. Hit the backward/forward buttons to go to the previous/next word. Check the box before Replace to open a second text field for replacement text. to replace all or one at a time. You can type in a keyword to begin a search. Hit the Done button to exit. |
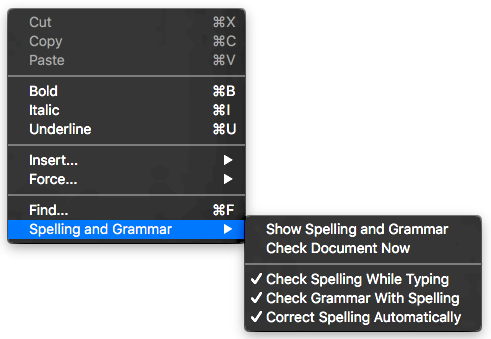
Spelling and Grammar |
This is an OS-supplied command that checks spelling and grammar. |
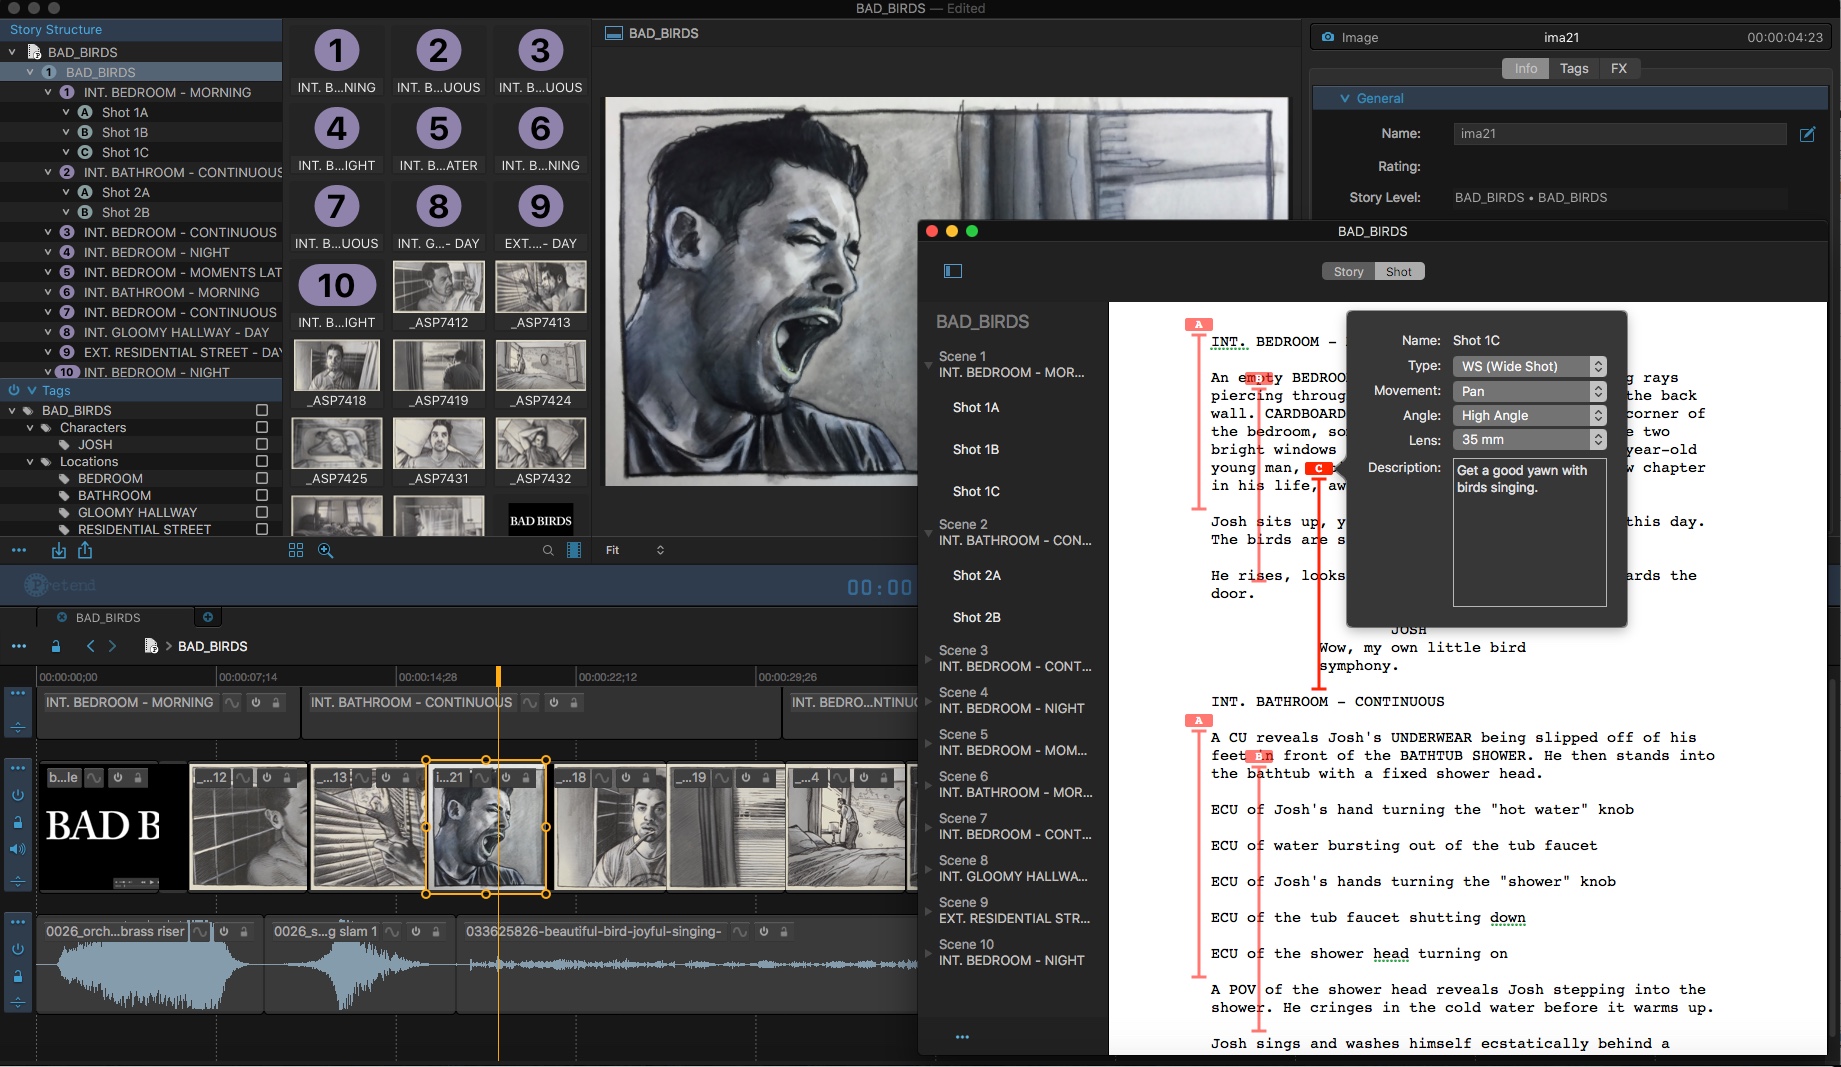
"Shot" Mode
The Screenplay editor can be switched to “Shot” mode using the switch right above the Text Editor. In this mode, you can line shots onto your script, which creates a Shot Group below its corresponding Scene Group in the Library. It’s in this Shot Group that you’ll be able to drop clips or other media assets associated with this shot.
When in “Shot” mode, these shots will also appear under your scene names in the Screenplay Navigation Panel. However, in order to focus more on the story, these shots will not be visible when in “Story” mode.
Shots lined in your script will also appear in your Library structure. You can double-click on a shot in the Library to open the shot's timeline in the Timeline panel.
Shots also appear under the scene in the Library but not automatically in the scene's timeline. You must drag the shot from the Library to the Timeline to actually use it in the scene. This makes sense since you haven’t made any editing decisions yet. Otherwise, shots remain in the library as extra coverage.
Add a shot
When in “Shot” mode, click anywhere over your script in the Text Editor and drag down to make a shot line—this process is called “shot lining.” The length of your shot is represented by the length of the line on your script, and what is covered in the shot is represented by the portion of the script above which you have traced your line.
You can change the length of a shot after it has been traced by simply selecting an endpoint, and dragging it out to where you would like it to be. The name of each shot will start with its scene number and finish with a letter that will be assigned in alphabetical order, starting again with “A” in each scene (example: 1A, 1B, 1C, 2A, 2B).
Delete a shot
To delete a shot, simply select the shot you wish to delete in the Navigation Panel and hit the “Delete” key. You can also select “Delete” from the Navigation Panel Menu.
Modify the shot
To change the length of a shot after it has been traced, select an endpoint and drag it up or down.
Shot Info Balloon
Click on a shot label to open a Shot Info Balloon. In this pop-up window or “Balloon,” you can enter a shot’s type, movement, angle, lens and description. This information will also be shown in the shot’s inspector.
Name |
Examples |
|
Type: |
None (default), EWS (Extreme Wide Shot), VWS (Very Wide Shot), WS (Wide Shot), MS (Medium Shot), MCU (Medium Close Up), CU (Close Up), ECU (Extreme Close Up), Cut-in, CA (Cutaway), Two-Shot, OSS (Over-the-Shoulder Shot), Noddy Shot, POV (Point-Of-View), Weather Shot. |
|
Movement: |
None (default), Arc, Crab, Dolly, Dolly Zoom, Follow, Pedestal, Pan, Tilt, Tracking, Trucking, Zooming |
|
Angle: |
None (default), Eye Level, High Angle, Low Angle, Bird's Eye, Slanted |
|
Lens: |
None (default), 15mm, 28mm, 30mm, 35mm, 40mm, 50mm, 55mm, 60mm, 65mm |
|
Description: |
Enter more description in the text box. |
The Navigation Panel
The Navigation Panel on the left-hand side lets you organize and move around your Story Groups and different scenes that have been created for your project. Select a scene or Story Group to jump to that part of your script in the Text Editor.
The show title is at the top of the Story Group stack, you can change the show title by selecting it, double-clicking to got into edit mode, renaming the show and pressing “Enter.”
You can also move your scenes and Story Groups around by selecting and dragging them to where you would like for them to be. These changes will be represented in your script as well as in your Library structure.
You can hide the Navigation Panel by clicking on the toggle switch above it.
Navigation Panel Menu
The Navigation Panel Menu can be opened by clicking on its icon at the bottom-right of the Navigation Panel (…) or by right-clicking anywhere in the Navigation Panel.
Note that if an option is unavailable, it will be grey. For example, you can only add a Story Group when the show is selected at the top of the Navigation Panel.
Add Show |
This adds another Show to the project and switches the screenplay editor to the new show. Switch to another show from the list of project shows at the bottom. Add Show is only available when you have selected a show. |
Add Scene |
This adds a scene below the current selection. |
Add Shot |
Only available when you're in Shot mode, Add Shot adds a shot to the selected scene as a one-line length lined shot. |
Add Story Group |
This lets you add a group to help organize your screenplays, such as an act or a sequence. For example, you could right-click on the show title and choose "Add Story Group", then rename the group as "Act 1". You can then move the desired scenes to that Act 1 level. Each time you want to add a new act or sequence, make a new story group. In the screenplay editor, you can only insert a story group between a show and its scenes. |
Rename |
Click the name, hesitate and click again to switch to rename mode. Enter the new name. Scenes use the scene header as a default label that you can change. If you rename the scene, a label grey markup appears under the scene header in the screenplay editor. The actual scene header in the screenplay is not changed. This lets you give the scene a more descriptive name in the navigator which helps with the outline. Note that modifying the scene header in the screenplay editor is echoed in the default label of the scene in the nav panel. However, as soon as you rename the default label in the nav panel, that link is removed and changing the scene header in the screenplay editor has no effect in the nav panel. The scene's label markup takes priority. |
Delete |
Select a story group and hit the Delete key to delete that story group and its contents. You can also right-click the group or click the navigation menu button and select Delete. |
Export to Fountain... |
Opens a browser to save the screenplay in Fountain format, which is readable in any text editor. |
Print... |
Prints the formatted screenplay. You can also save as a PDF with the PDF menu button in the lower-left of the Print popup window. |
List of Shows |
Any shows in the project appear here. Select one to switch the screenplay editor to that show's screenplay. |
The "Sync Timeline" Button
When writing your screenplay, you can use the Sync Timeline button to update the timeline so it is in sync with your screenplay. Note that the duration of the scene clip in the timeline will adjust to match the estimated time according to the number of lines in your scene.
What is Fountain?
Fountain (www.fountain.io) is a simple format used to write, edit and share screenplays in plain text. You can write a screenplay in Fountain form using any text interface.
Since a Fountain file is written in plain text, and can be imported into almost any screenwriting software, it is a great format for archiving screenplays.
As of now, Pretend can only import existing screenplays if they’re Fountain files. If you’d like to import a screenplay into Pretend but only have a PDF version of your script, check out these references to turn your PDF into a Fountain file:
Highland (https://highland2.app/screenwriters.php)
Writing with Fountain Markup
Pretend formats while you type but you can also use Fountain markup. You can either type in the markup yourself or choose from the Text Editor Menu.
Use Fountain markup to embed notes in your script that you don’t want to appear in a printed screenplay. These notes will be displayed in grey throughout your script until you’re ready to print.

Check out the Fountain site (https://fountain.io/syntax) for complete syntax info.
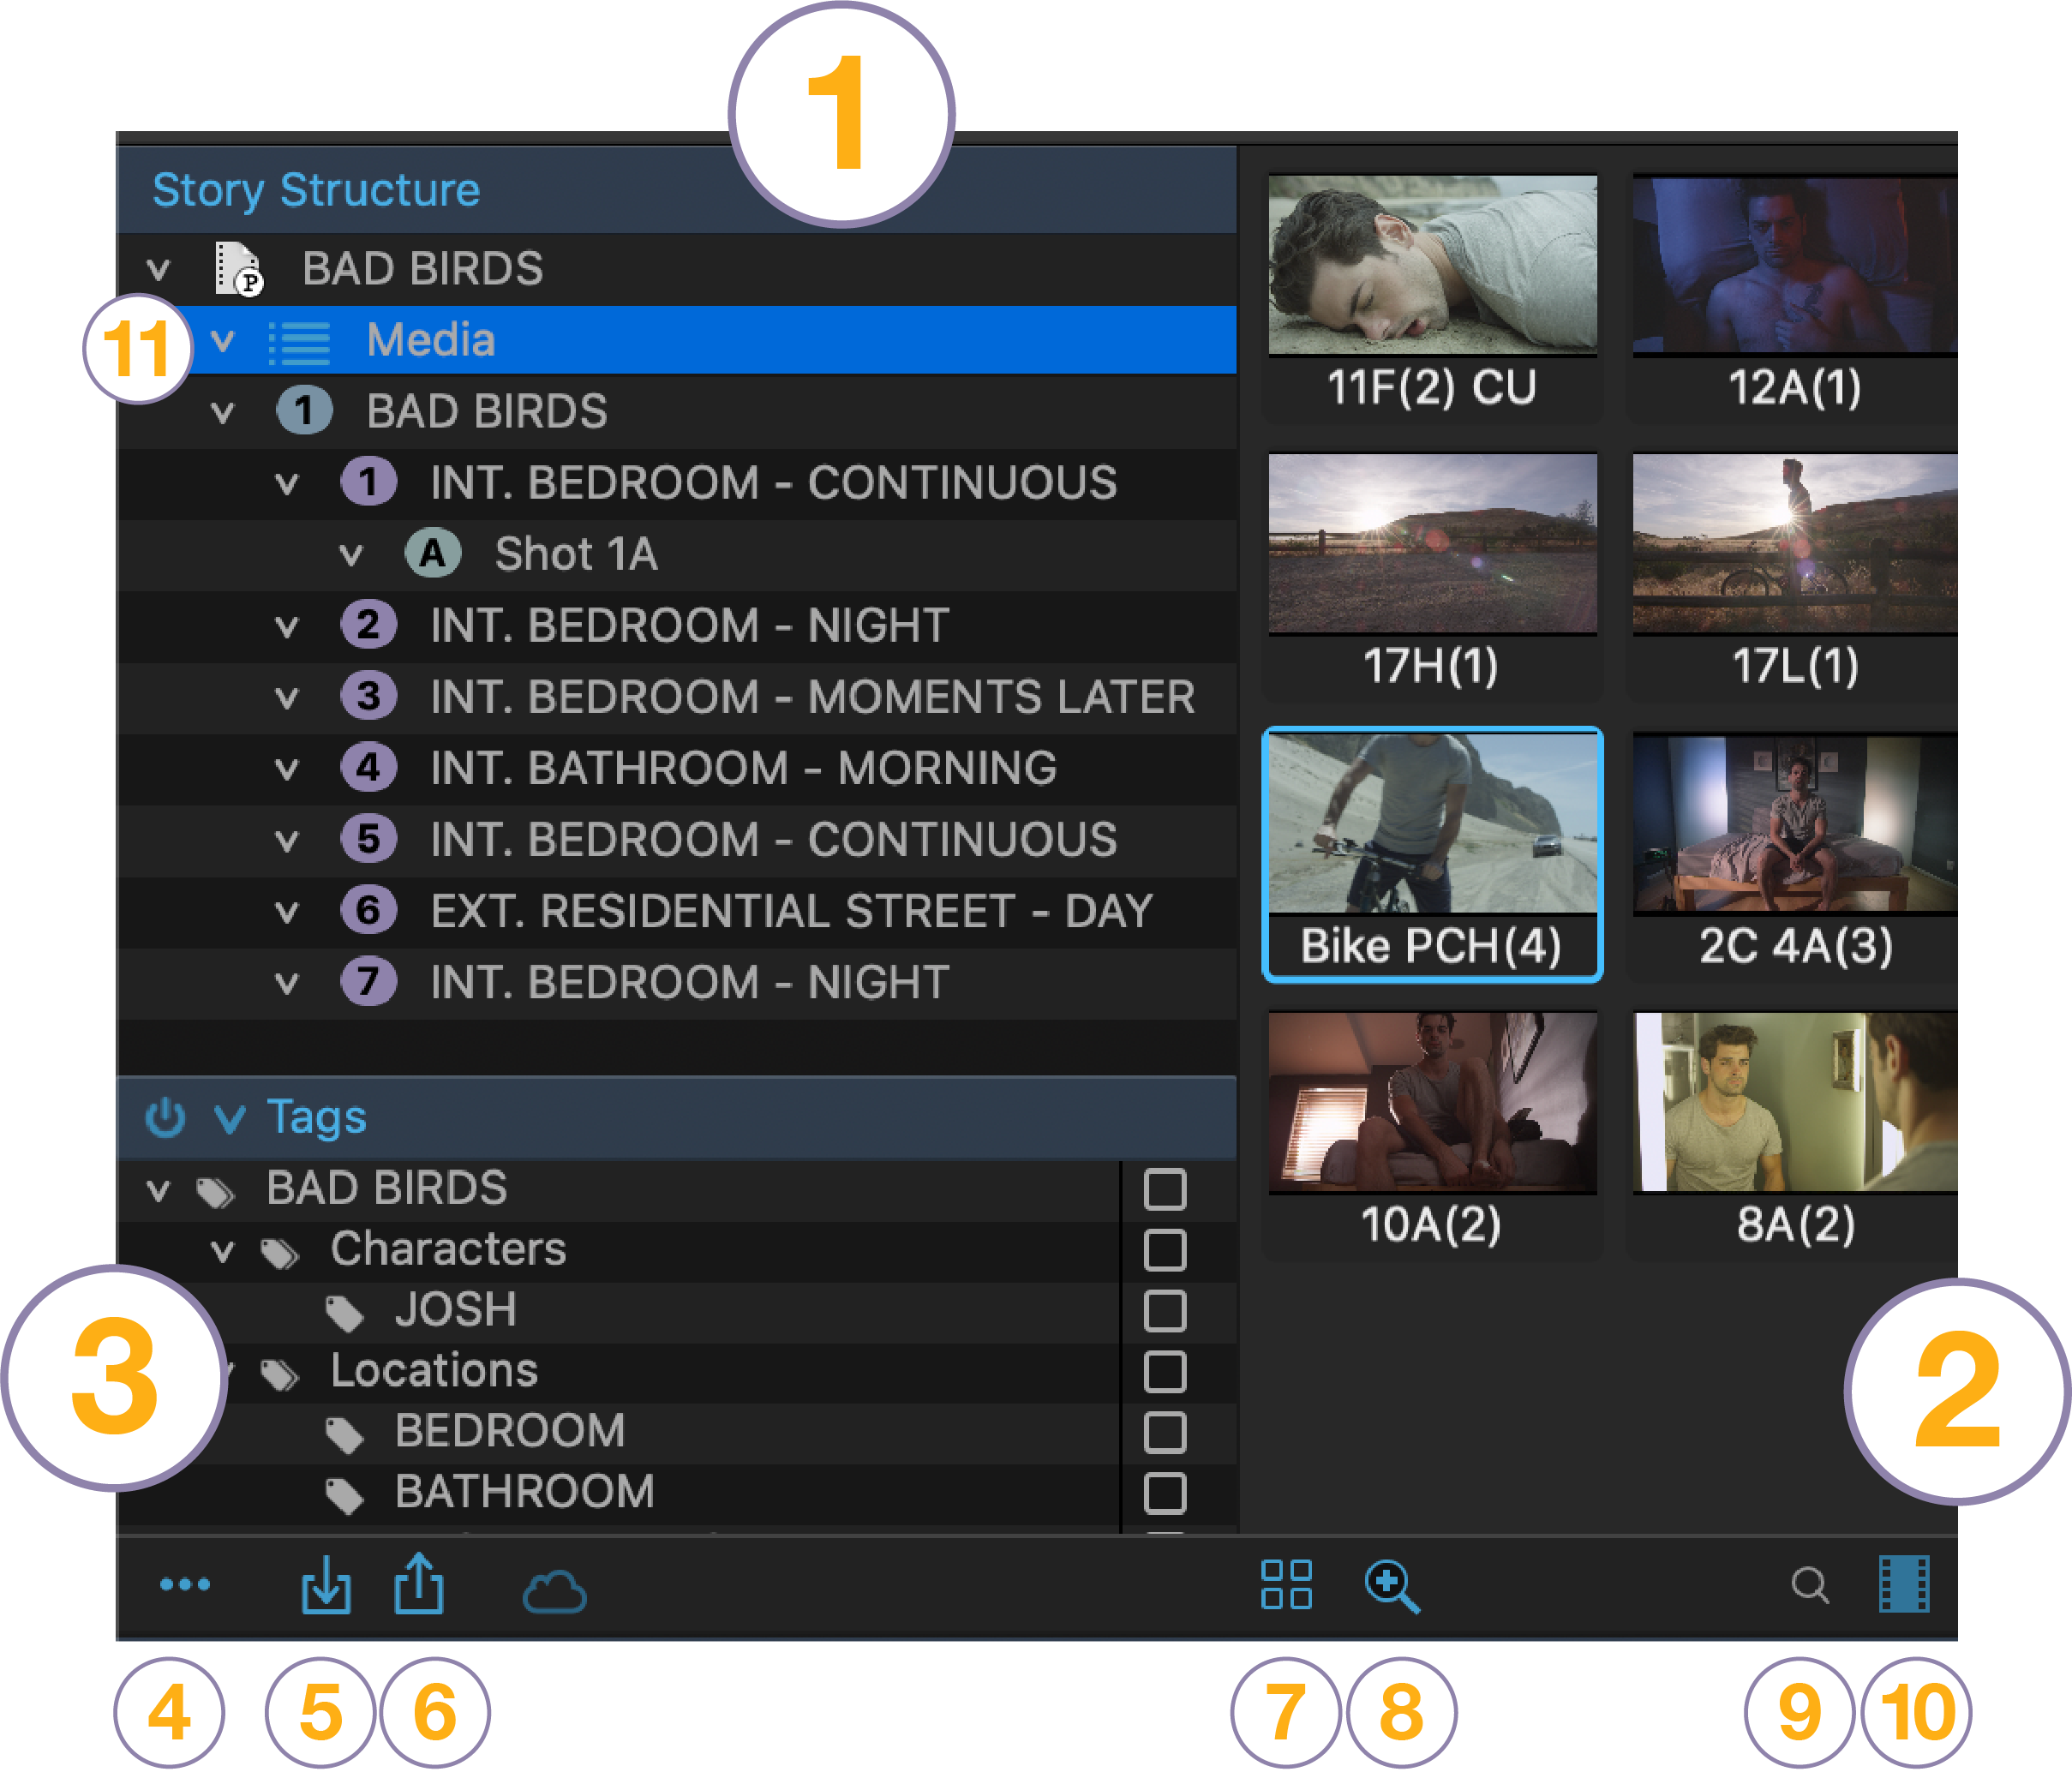
The Library
Use the story to keep track of everything.
The Library is where you will find all of the Story Groups and media assets (video, audio, references, 3rd party files) for your project.
Pretend uses the shows, scenes and shots of your script to create a Group hierarchy in the library. These Groups (Scene Groups, Shot Groups, …) will act as containers, holding any related assets (video clips, audio clips, web links, images, ...).
- Story Structure Panel
- Item Panel
- Tag Panel
- Library Menu
- Import Assets
- Export Selection
- List/Thumbnail View Button
- Thumbnail Size
- Item Search
- Asset Type Filter
- Media Smart List
In the Library, you will find the Story Structure, Tags and Items panels. The Story Structure panel lets you organize and navigate assets by Story Groups such as scenes. The Tags panel uses tag-words to further filter your assets. And lastly, the Items panel displays the assets contained in the Group or Tag you have selected.
The Library Menu
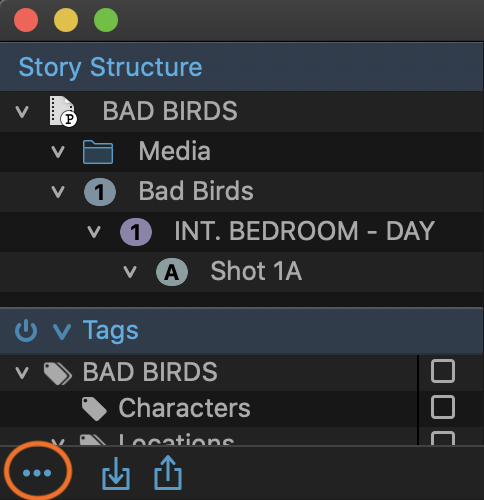
Click on the ellipsis icon to open the Library Menu options. This popup menu’s options change depending on the current panel being used, either the Story Structure Panel or Tags Panel.
You can also right-click in either panel to get the same Library Menu.
The Story Structure Panel
You can use the Story Structure Panel (or Story Panel) to navigate your Library. It uses a story outline made of Groups to organize all of your story assets, such as video and audio clips. At the top of this panel is the name of your Pretend project.
Below your project level is the Media Smart List, which is where you will find all of the media that you have imported into your project. If your “Media” list is selected, you will be able to view all of your project’s assets regardless of where they are in your story structure.
Clicking on a Story Group on one of your story levels will display the assets associated with that Group. By default, the Story Structure Panel only displays Story Groups, Groups and Lists. If you’d like to view media assets in your Story Structure panel, you can uncheck “Structure Only” in the Library Menu.
Essentially, Pretend lets you see your project in two ways at once. You can view the Media alone, which can be further divided into folders such as "Video" or "Music." Or you can view the Story divided into sequences, scenes and shots.
Note that you will always see all assets in Media but you need to place the assets in Story Groups to view them there.
Add a Story Group
You can add a Story Group (Show, Scene, Shot, …) or Group by selecting “Add…” from the right-click menu. You can also click on the Story Structure Library Menu on the bottom-left (…).
Note that when you have a Story Group selected in the Library, you can only add a Group that is equal to or below the Group you have selected. Meaning, if you want to add a Scene, you’ll need to have another Scene selected (or Show). Having a Shot selected won’t let you add a Scene since Scenes are above Shots in the hierarchy.
Adding Assets
You can add assets to any Story group (such as adding a video clip to a Shot Group) by selecting that Story Group and importing into it. You can import in several ways:
- Drag a file from the Finder over to a Story Group in your Story Panel or directly into the Items Panel.
- Select File > Import... > Import Media...
- Click on the “Import Asset” button on the bottom-left of the Library.
- Click on “Import File” from the Library Menu when a Group is selected.
- Or open a Story Group’s Timeline and drag a file into it.
To view a Story Group’s Timeline, double-click on it in your Library or select it and choose "Open (selection) in Timeline".
Story Structure Navigation
You can organize your story’s structure and assets through the Story Panel. For example, add all the takes of a shot to its Shot Group. Or add shots to a scene. If you move the scene, all its items move with it.
Drag and drop a Story Group to move it in the story structure. For example, drag a scene up or down to reorder its position in your story. The changes you make to your story structure in your Story Structure Panel will also be made in your Screenplay Editor’s script and Navigation Panel.
Library Menu
The options in the Library Menu (found on the lower-left side of the Library), change depending on which panel or asset you have selected. Let’s explore your options when in the Story Structure Panel.
You can also access these functions by right-clicking on an item in the Story Panel.
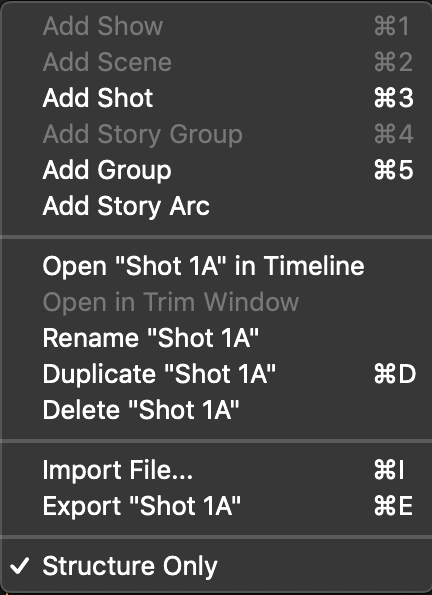
Add Show |
Adds a Show to the project. This option is available when the selection is from the project level all the way down to a show level. |
⌘ 1 |
Add Scene |
Adds a Scene. Only available when you have a show, scene or a story group below a show selected. |
⌘ 2 |
Add Shot |
Adds a Shot. Only available when you have a scene or shot selected. |
⌘ 3 |
Add Story Group |
Adds a Story Group. Only available when the selection is from the project to the scene level. Story groups are organizers so you might group some scenes into a story group and call it "Act 1". |
⌘ 4 |
Add Group |
Adds a Group. A group can be anywhere in the project. Groups are in the library and timeline but not the screenplay editor since it's not story-specific, for example, a Group for reference material. |
⌘ 5 |
Add Story Arc |
Adds a Story Arc. Drag the arc down into the timeline. By default, it will take the duration of the timeline's existing contents which you can change later. |
|
Open "Selection" in Timeline |
Opens the selected group’s timeline in the timeline editor below. Double-clicking on the group also opens its timeline. |
|
Open "Selection" in Trim Window |
Opens the selected video clip in a Trim window. You can also double-click the clip to open and trim. You can then drag the trimmed clip from the library to a timeline. |
|
Rename "Selection" |
Allows you to rename your selection. |
|
Duplicate "Selection" |
Duplicates your selection. |
⌘ D |
Delete "Selection" |
Deletes the selection. |
Delete |
Import File |
Add media or other assets from your computer into your project at the selected place in your library. A file browser allows you to select one or more files to be added. |
⌘ I |
Export Selection |
Exports a render of your selected story level. The Export window appears (see the In and Out section). |
⌘ E |
Structure Only |
Shows only story groups in the Story panel while on. When off, media assets are also shown. |
How to see all the media in your project at the same time.

While it's great to be able to keep all your media assets organized with groups, maybe you don't remember where you put a particular video clip. Sometimes you might want to see everything in a single list in the Items panel that you can filter and sort all at once.
The Media list lets you see all the media in the project no matter where it's located. Select the Media folder, the top-level under the project, to see the project's full media list in the Item panel.
To make a media sub-folder, select the Media folder and select "Add Media Folder" from the Library menu (or right-click to pick "Add Media Folder" from the contextual menu). Name the sub-folder as you like. Note that only one level of sub-folders can be added under Media.
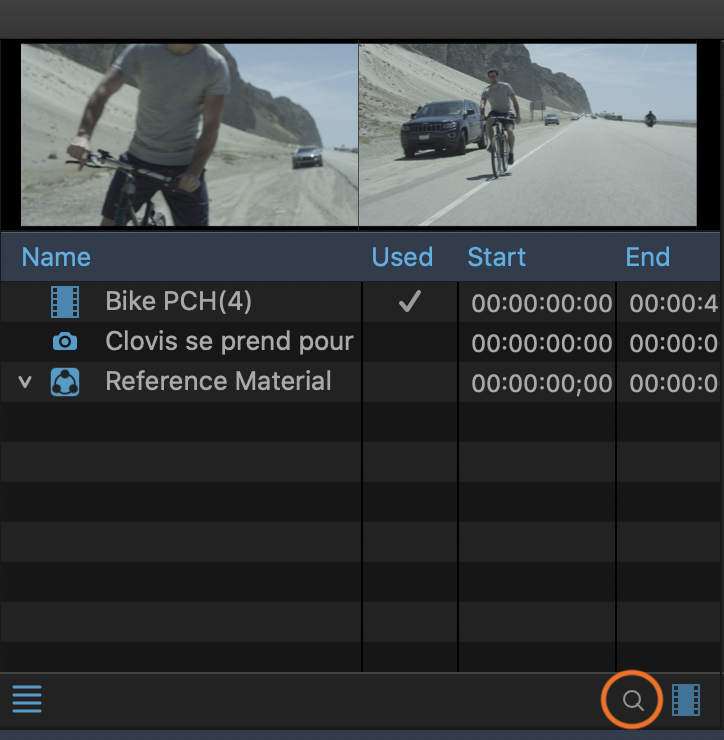
To see where a particular asset is used in any timeline, switch to a List view in the Item panel.
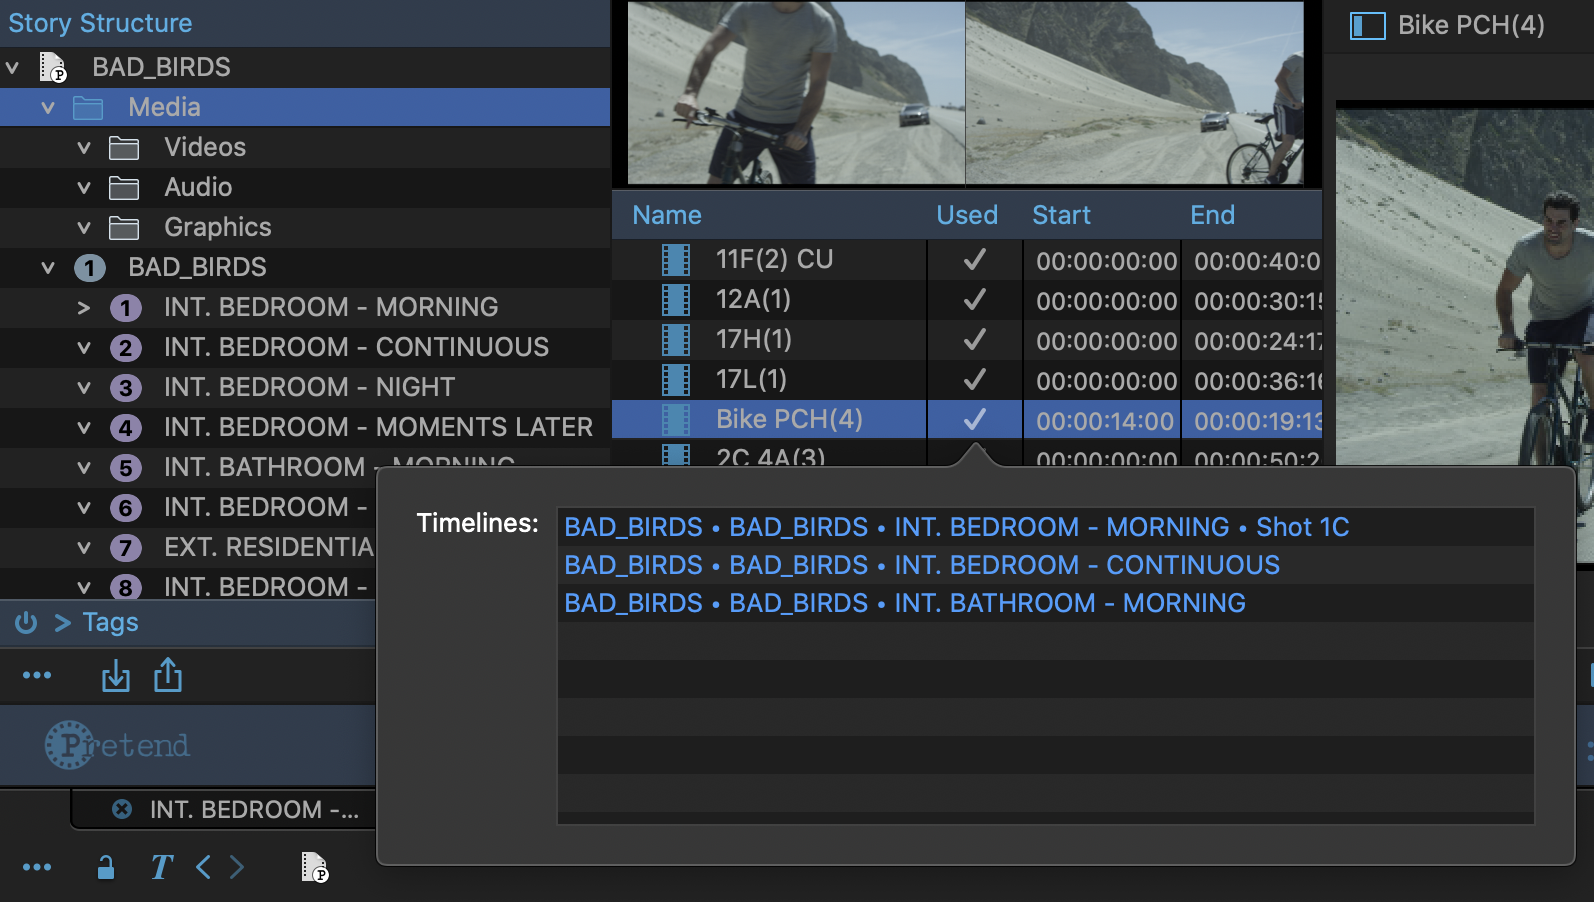
If there is checkmark under the item's Used column, double-click it to open a timelines box showing all the timelines that use the item. Double-click on a timeline to open it in the Timeline panel.
The Tags Panel
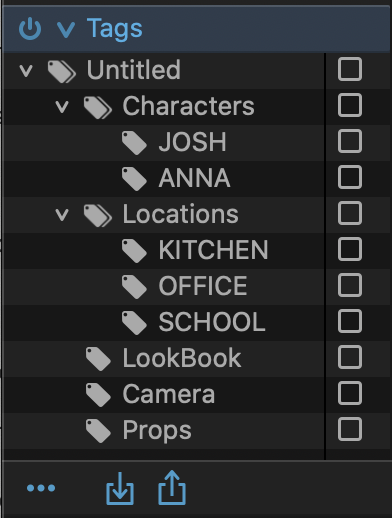
The Tags Panel, located at the bottom-left of your Library, is where you will find the different subset groups that you have created with the use of tags.
How Tags Work
Let’s say you have an important prop (a “Samurai Sword”) featured in your story, and you want to keep track of each scene in which this prop is used, you would create a “Samurai Sword” tag and add that tag in each scene where that prop is used. This will then create a samurai sword tag in your tags panel. Tags can be nested and can contain other tags.
You can create tags yourself, but they are also automatically generated. You’ll notice that as you’re writing your script, Pretend will detect character names and locations to create parent tags for them. This way, you’ll easily be able to locate each scene or shot in which “Josh” is present, as well as each scene or shot that occurs in the “Bedroom.”
Tags can be used to filter assets in the library to only show assets with the selected tags.
The checkboxes beside each parent tag turns the tag filter on or off. Turning on a parent tag will show any asset containing that tag. If a parent tag with multiple sub-tags is checked, you will see all of the assets containing that main tag, regardless of which sub-tags are checked. If you would like to only view your sub-tags, make sure to uncheck the main tag.
Lastly, tags will only filter through whatever you have selected in your Story Structure Panel, so if you want to filter through your entire project, make sure to have your project level selected in your Story Structure Panel.
Creating Tags
You can use the Tags Panel Library Menu to create a new tag. After selecting an item in your Tags Panel, click on your Tags Panel Library Menu and select “Add Tag.” New tags are placed under the currently selected tag. You are free to drag & drop the tag to another location in the tags panel.
Tags will be placed into whatever you have selected in your Tags Panel. So, if you’d like to add a new main tag to your project, make sure to select the project level. And if you’d like to create a new sub-tag, make sure to select whichever main tag you would like for them to be placed in.
Adding a Tag to an Asset
Once you’ve created a tag in your Tags Panel, you can drag it to any asset or Story Group in your Library. Once added, the tag name will appear in the “Tags” column of your asset in the Items Panel. You can also drag an asset or multiple assets onto a tag in your Tags Panel, either way works.
Tag Box
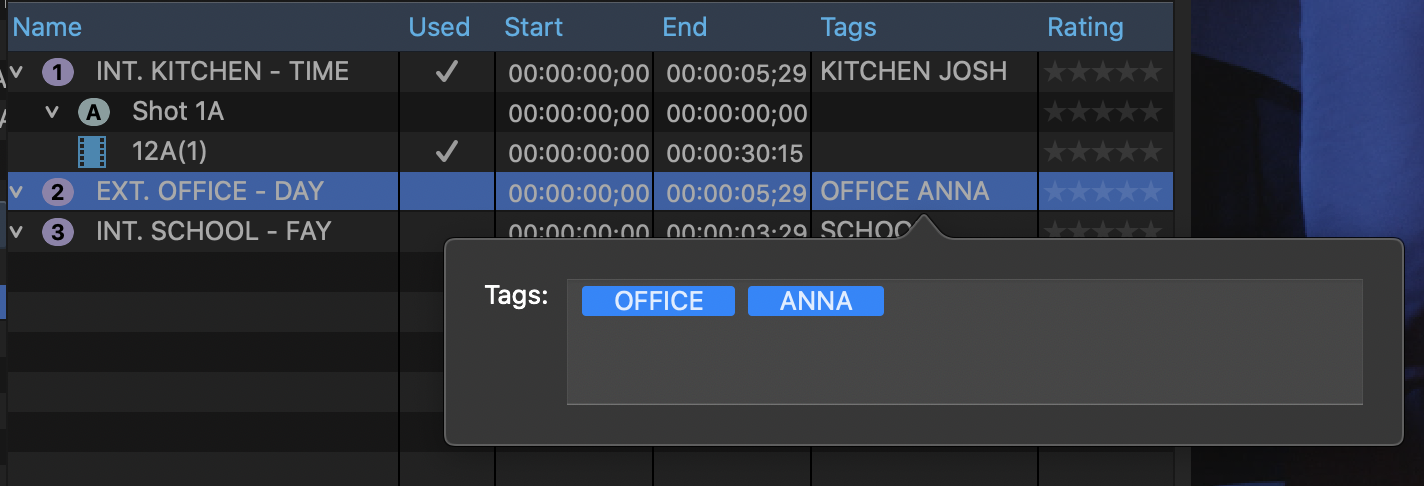
A Tag Box contains all of the tags that have been assigned to an item. While in “List” view in the Items Panel, double-click on any item’s tag to open its Tag Box. Any current tags assigned to that item will be displayed in the box.
Within the Tag Box of an item, you can add a tag by simply clicking in the box and typing in whichever tag name you’d like to add. If the added tag doesn’t exist, it will create a new tag container for it in your Tags Panel, but if it does, an auto-complete list of tags will appear as you type a tag name.
Remove a tag by selecting it and hitting the “Delete” key.
You can also select an item in your Library, then click on the “Tags” tab of the item's Inspector to open that item’s Tag Box.
Removing a Tag from an Item
To remove a tag from an asset or Story Group, open the item’s Tag Box, select the tag you’d like to remove and hit “Delete.”
Deleting Tags
Select the tag in the Tags Panel and hit the Delete key or use the Delete option from the Tags Menu. Deleting a tag with sub tags will remove the parent and all its sub tags from the project.
Tags On/Off Toggle
To turn your Tag filters on or off, click on the icon (power button) on the left of the “Tags” bar. When turning the Tags “Off”, the filters you have selected will be deactivated. Once you turn your Tags back “On,” whichever filters you had previously selected will reappear as such.
Collapse Tags Panel
Click on the V-shaped icon on the left of the Tags top bar to collapse or open the Tags Panel.
Tags Menu
To access the Tags menu, a tag must be the primary selection in the tags panel. Click the … button under the tags panel to vie the menu. This menu is also available by right-clicking on a tag.
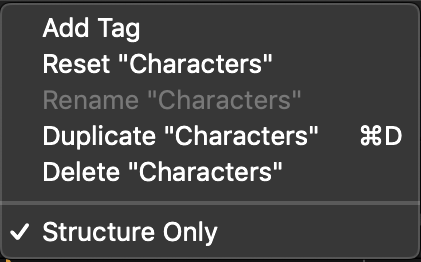
Add Tag |
Adds a tag to the Tag panel. Select the top level tag, then choose add tag. A new tag is added at the end of the list of tags. The new tag (imaginatively titled “New Tag”) is highlighted and editable to allow you to rename it. Click once, wait a beat, then click again on the tag name “New Tag” to activate the rename box. Or right-click the new tag, then pick Rename in the Library menu. If you select a tag, then choose Add Tag, it creates a child tag underneath the selected tag. So, if you select Characters, then Add Tag, a new tag will be created under Characters which you could name, say, "John". |
Reset "Selection" |
Resets the selected tag. |
Rename "Selection" |
Allows you to rename the selected tag. |
Duplicate "Selection" |
Duplicates the selected tag. If you select a parent tag, all the parent's children tags will also be duplicated. |
Delete "Selection" |
Deletes the selected tag. If you select a parent tag, all the parent's children tags will also be deleted. |
The Items Panel
The Items Panel, on the right side of the Library, is where you’ll be able to locate and filter through all of the different assets you’ve collected for your project.
How to use The Items Panel
The Items Panel shows you all of the different assets in whichever Group you have selected in your Library. You can use the Story and Tags Panels to navigate through the different contents of your Items Panel.
You can add items in lots of ways:
- Select File > Import... > Import Media... from the top menu.
- Click in the “Import Asset” button in the bottom-left of the Library.
- Select “Import File” from the Library Menu.
- Drag a file into a Story Group’s timeline. You can open a Timeline by double-clicking on a Group in the Library’s Story Structure Panel.
- Or drag and drop a file from your computer over a Story Groups name in the Library’s Story Structure Panel.
You can also add files to your project that aren’t supported by Pretend (non-native files). For example, you can drag a Photoshop file over to your Story Group, to keep as a reference. Double-clicking on that file in Pretend will open it up in Photoshop. This allows you to organize all of your outside material into your story structure.
Along with non-native files, you can also drag web links into your Items Panel to save any web page relevant to your project. Simply drag the URL from your web browser and add it to your Items Panel. These web pages could involve research, potential props, or even images for a “lookbook.”
Note that the Library Menu is the same in both the Items Panel and the Story Structure Panel.
To copy an item, just hold down the Option key while dragging to a new location.
Note that applying FX on an item in the library is separate from applying FX to a clip in the timeline.
For example, if you apply a color correction to a video asset in the library and then apply a color correction to a timeline clip using that same video asset, you will be applying a second color correction to that asset, in addition to the color correction already applied in the library (and not modifying the initial library color correction). Applying effects to a library asset allows you to uniformly modify all instances of that asset in your project.
List/Thumbnail View Toggle Button
You can toggle between “Thumbnail” and “List” view by clicking on this Button.
By selecting the “Thumbnail” option, your assets will be displayed as icons of which you can change the size with the help of the Thumbnail Size Slider.
While in Thumbnail View, press on the spacebar to play an item in the viewer (press it again to pause).
By selecting “List” view, your assets will be displayed as a line item, with all of its properties being displayed in the different columns of your Items Panel.
Library Asset Viewer
When in List View, there is a small viewer at the top of the Items Panel to screen whichever asset you have selected.
Reorganizing Columns
You can drag the column header left or right in the Items Panel to reposition the column.
You can also resize the width of a column by clicking on that columns border and dragging it in or out.
Lastly, you can right-click on a column header to display a list of all column types for you to choose from. If you’d like to remove a type of column from your Items Panel, simply uncheck it in the right-click menu.
Click on a heading to show the ascending/descending icon to sort the column. Reset the column order by right-clicking the icon for a menu and select Reset Sort.
Thumbnail Size Slider
Click on the magnifying glass, located next to the Thumbnail icon, to reveal the Thumbnail Size Slider. Push the slider up or down to make your thumbnails bigger or smaller, respectively.
Item Search Box
Click on the “Search” icon in the lower-right side of the Items Panel to open a Search Box, and enter the name of whichever asset you’d like to find.

Click outside of the bar menu to exit the Search Box, or select “x” to the right of the search to remove your current search entry.
Asset Type Filter Button
Click on this icon to open a list of filters, organized by type of media.
Select from the options to display a specific type of assets. You can select “All” from the asset type options to view all of your different types of assets.
Trim Window
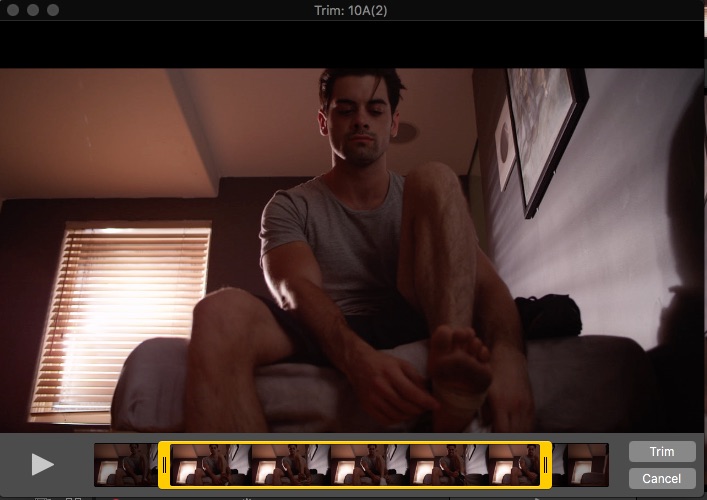
In the Items Panel, double-click on a video (or right-click on the clip and select “Open Selection in Trim Window”) to open a Trim Window.
Once open, use the yellow handles to set your in and out points (where you would like for your clip to start and end). When ready, click “Trim” to adjust the length or “Cancel” to exit the Trim Window.
Note that once you’ve trimmed a video, you can still edit the in and out points of your clip once you drag it into your Timeline.
Story Arcs
Pretend lets you see your story through story arcs shown in the timeline. You can make an arc for a whole show, scene, character or whatever.
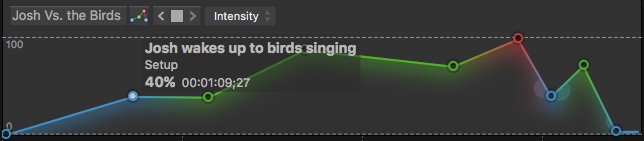
First select a story group in the story navigation panel of the library. Then, either right-click or open the Library menu and select Add Story Arc.
The new Arc appears in the Item panel of the Library in the selected group and as a new inspector. If you open the story group in the timeline, you can drag in the new Arc and make a new track.
Note the Arc clip is the width of the story group. Change the time range by dragging an edit handle, the small circle, at either end of the Arc clip. You are limited in adjusting the duration by the beginning and ending plot points.
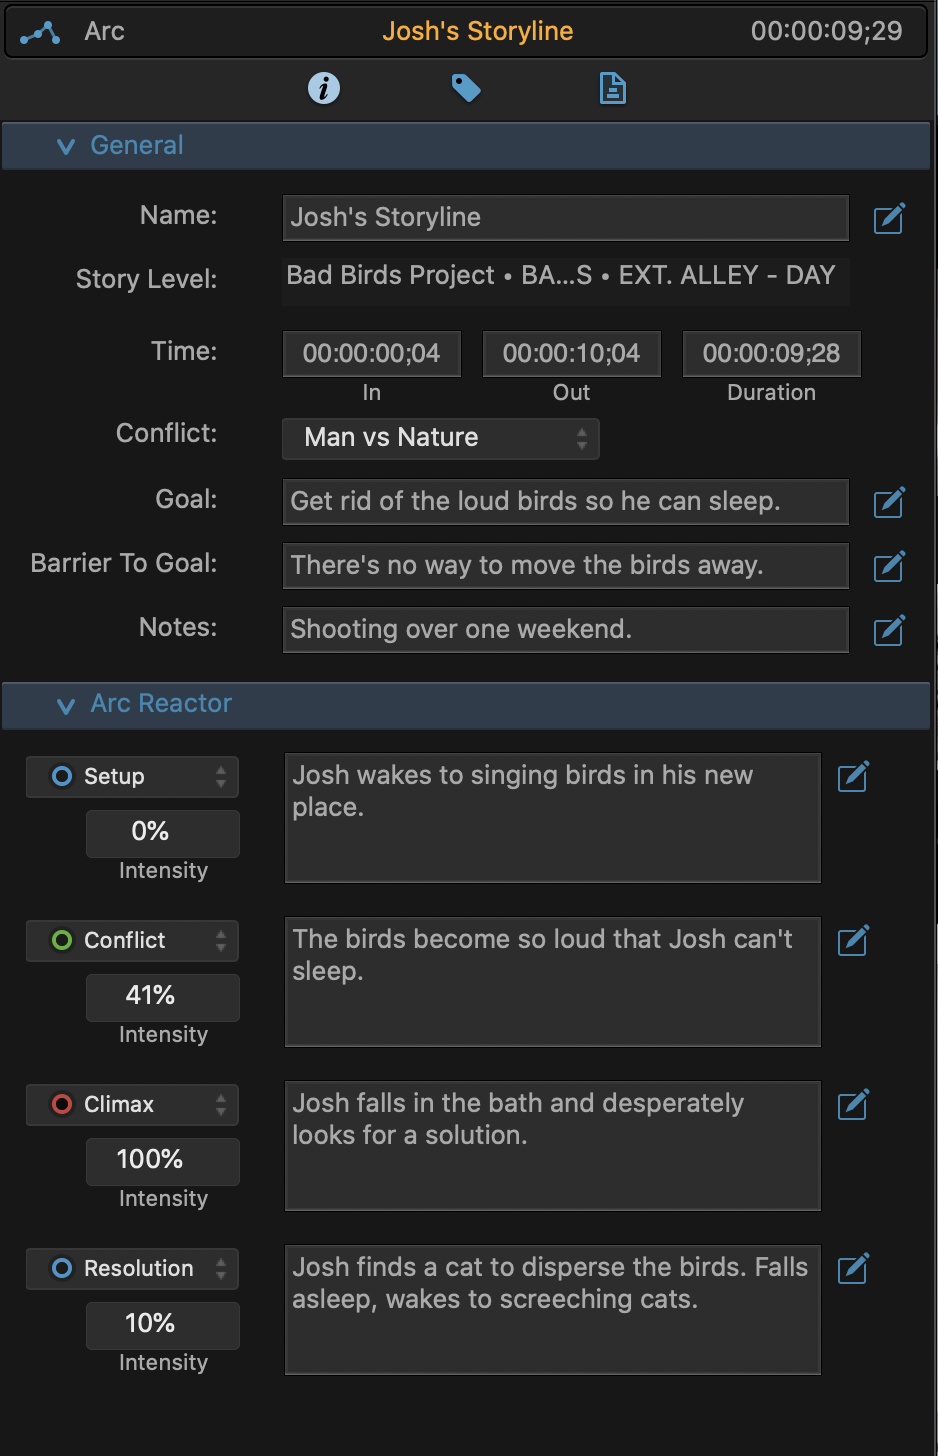
Four arc plot points are displayed by default to make the initial arc. You can see one each of the Setup, Conflict, Climax and Resolution types.
Double-click on the curve to add an arc point. Double-click on an arc point to delete that arc point. Shift-drag vertically to only change the intensity value or Control-drag horizontally to only change the timing. Right-click on a point to change the arc point type.
Hover over or drag an arc point. The arc point's type, description, intensity and timing appear next to the arc point. Setup and Resolution points are blue, Conflict points are green and Climax is red.
To delete an arc point, select it and hit the Delete key. If no points are selected, the Arc clip itself is deleted.
In the Inspector you can change arc point types, add a description and change the intensity. You can also reorder the points by dragging the arc point area up or down. Arc points reflect what you have added or deleted in the Arc clip's curve in the timeline. In the General section, you can name the Arc and describe the main conflict, goal and barrier.
The Inspector
The Inspector, located in the upper-right corner of the Project Window displays information regarding the currently selected library asset, group or timeline clip.
Some items can be modified, and even animated over time, whilst others are read-only. A wide range of metadata and settings are presented here, such as: item names, timecodes, file location, file size, codec, tags, screenplay excerpts, color correction settings, crop settings and transform settings.
- Item Type The type of the selected item appears preceded by its icon.
- Item Name The name of the selection is either blue (indicating it is in the library) or orange (indicating it is in the current timeline).
- Duration The overall length of the selection.
- The Info Tab General information and controls which vary depending on the selected item.
- The Tags Tab Lets you add and delete tags describing the item for filtering.
- The Script Tab Only appearing when you have a story group selected, the associated script appears for reference while editing.
- The FX Tab The FX tab appears when an item can have color or transforms applied.
The top bar inside the panel will display information regarding the group or asset selected. When a group or media asset is selected, the bar will display the group or asset’s type, name and duration.
Below the top bar is the Inspector Tab Bar which will have up to 4 buttons, one for each of: the Info tab, the Tags tab, the Script Tab, and the FX tab.
Info Tab
The info tab displays information about the currently selected library asset, group or timeline clip.
Click on the different types of items below to see how they affect the Info Tab:
Project |
|
Story Group |
|
Show |

|
Scene |

|
Shot |
|
Video |

|
Audio |
|
Image |
|
Media |
|
Group |
|
File |
|
Arc |
|
Text |
|
Transition |
|
The Tags Tab

The Tags Tab in the Inspectors Panel displays all of the Tags associated with whichever group or asset you have selected. Note that you can also find these Tags in the Library’s Item Panel when in List View (in the Tags column).
Adding a Tag
To add a Tag to a selected item in the Library, click inside the Tag Box and type in the name of the tag you would like to add and press Enter. If the tag you’re adding already exists, an auto-complete list of tags will appear as you type.
Deleting a Tag
To delete a Tag, select it and press Delete.
The Script Tab
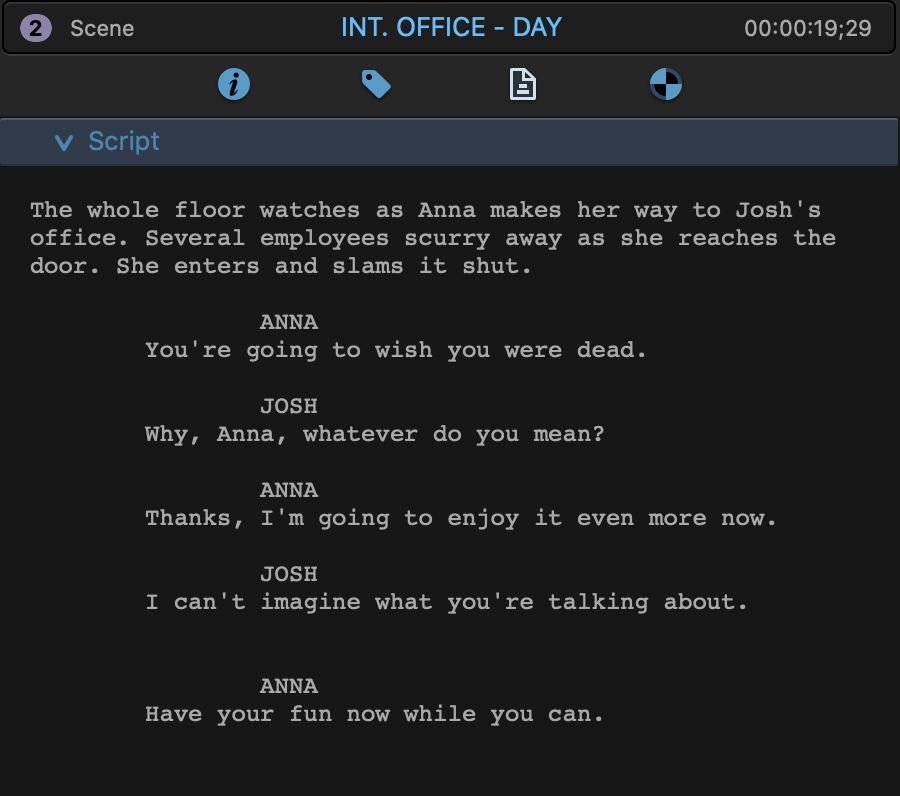
The Script Tab in your Inspectors Panel is where you will find the portion of the script corresponding to a particular Story Group, such as a Show or Scene. Note that the Script Tag only appears when you have a Story Group selected.
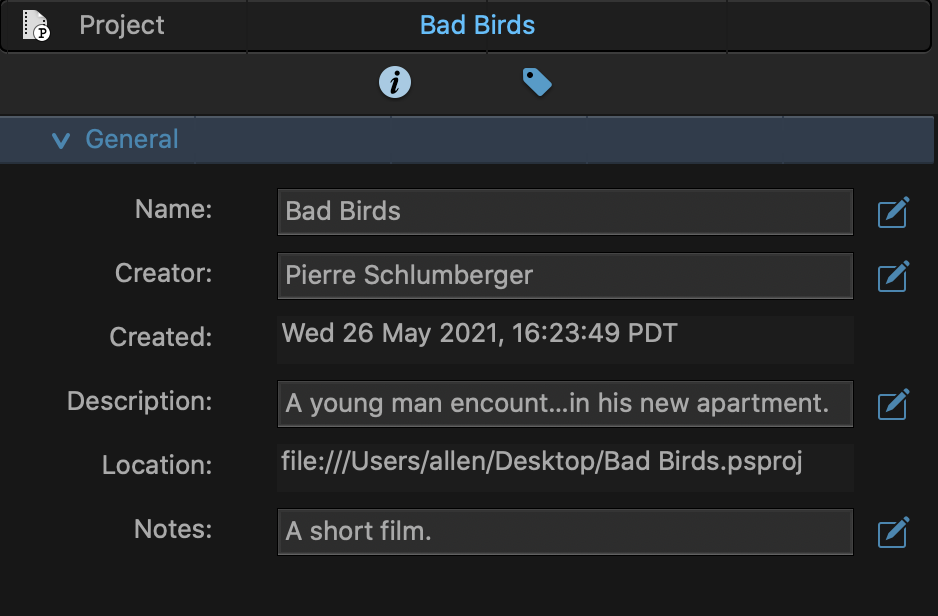
Project
The Project inspector only has the Info and Tags tabs.
General
Name |
Name of the project. |
Creator |
Creator of the project. |
Created |
Date of creation. |
Description |
An optional description of the overall project. |
Location |
Shows the path of the saved project file. Click the folder icon to bring up a file browser to view location. |
Notes |
Enter any notes on the project here. |
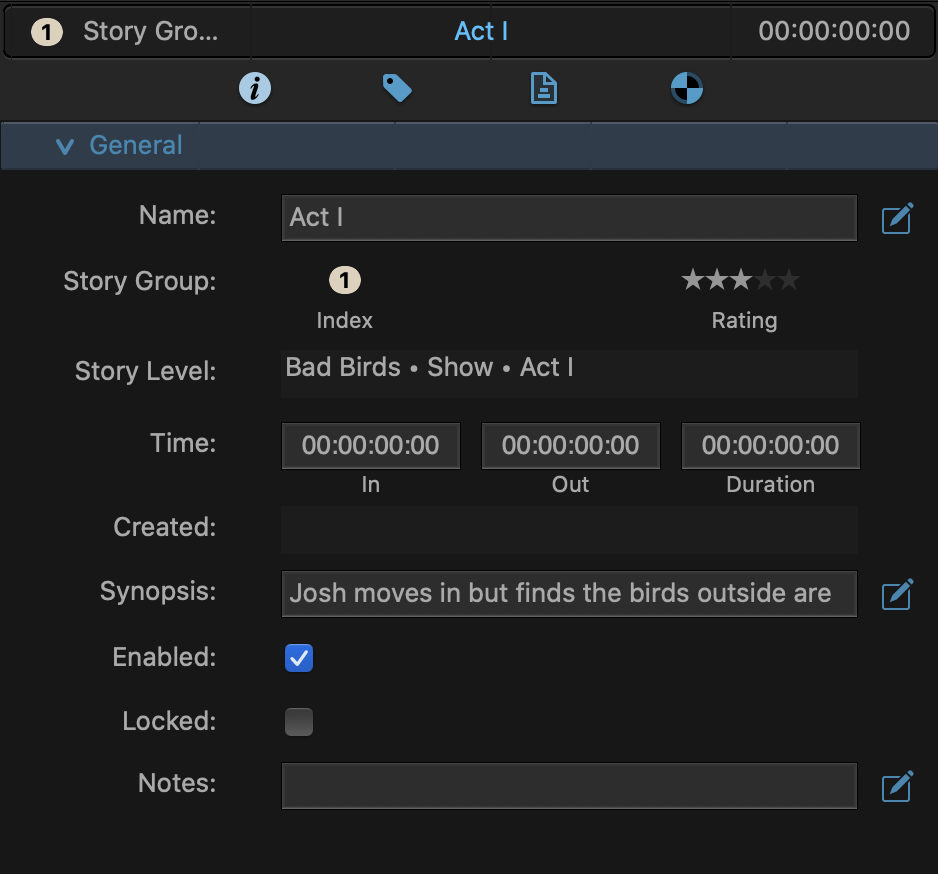
Story Group
This is a general story group used to organize the story such as an Act or Sequence.
General
Name |
Give a name such as "Act 1". |
Story Group |
Index: Order number of the story group in that level. Rating: Rating of the story group. Click to change the rating (1-5 stars). |
Story Level |
Displays the location of the story group in the story, such as show/sequence/scene. |
Time |
Displays the In point, Out point and Duration of the story group. |
Created |
Shows the date/time of creation for the story group. |
Synopsis |
A general description of the story for that section. This will appear as a synopsis in the screenplay, but greyed out as markup. |
Enabled |
Enable or disable the story group. Disabled shows black in playback. |
Locked |
If checked, prevents any changes to the story group. |
Notes |
Enter any notes on the story group here. |
Show (Story Group)
A Show holds the screenplay and is generally meant to be seen in a single viewing. You can also change the resolution, frame rate and audio channels per show.
General
Name |
Name of the show. |
Show |
Index: Order number of the show in that level. Rating: Rating of the show. Click to change the rating (1-5 stars). |
Story Level |
Displays the location of the show in the story structure, such as project/show or project/season/episode. |
Time |
Displays the Duration of the show. |
Created |
Shows the date/time of creation for the show. |
Director |
Name of the director for the show. |
Writer |
Name of the writer for the show. |
Genre |
Popup list of genres. Click to choose one. |
Logline |
A short description of the story, usually 1-2 lines. |
Synopsis |
A longer description of the show that is also seen in the screenplay. |
Locked |
If checked, prevents any changes to the show. |
Screenplay |
Shows the location of the screenplay file, either the original loaded screenplay or the last saved file. |
Notes |
Enter any notes on the overall show here. |
Setup
Resolution |
Resolution of the show. |
Frame Rate |
Select the frame rate. |
Audio Channels |
Select the audio format. |
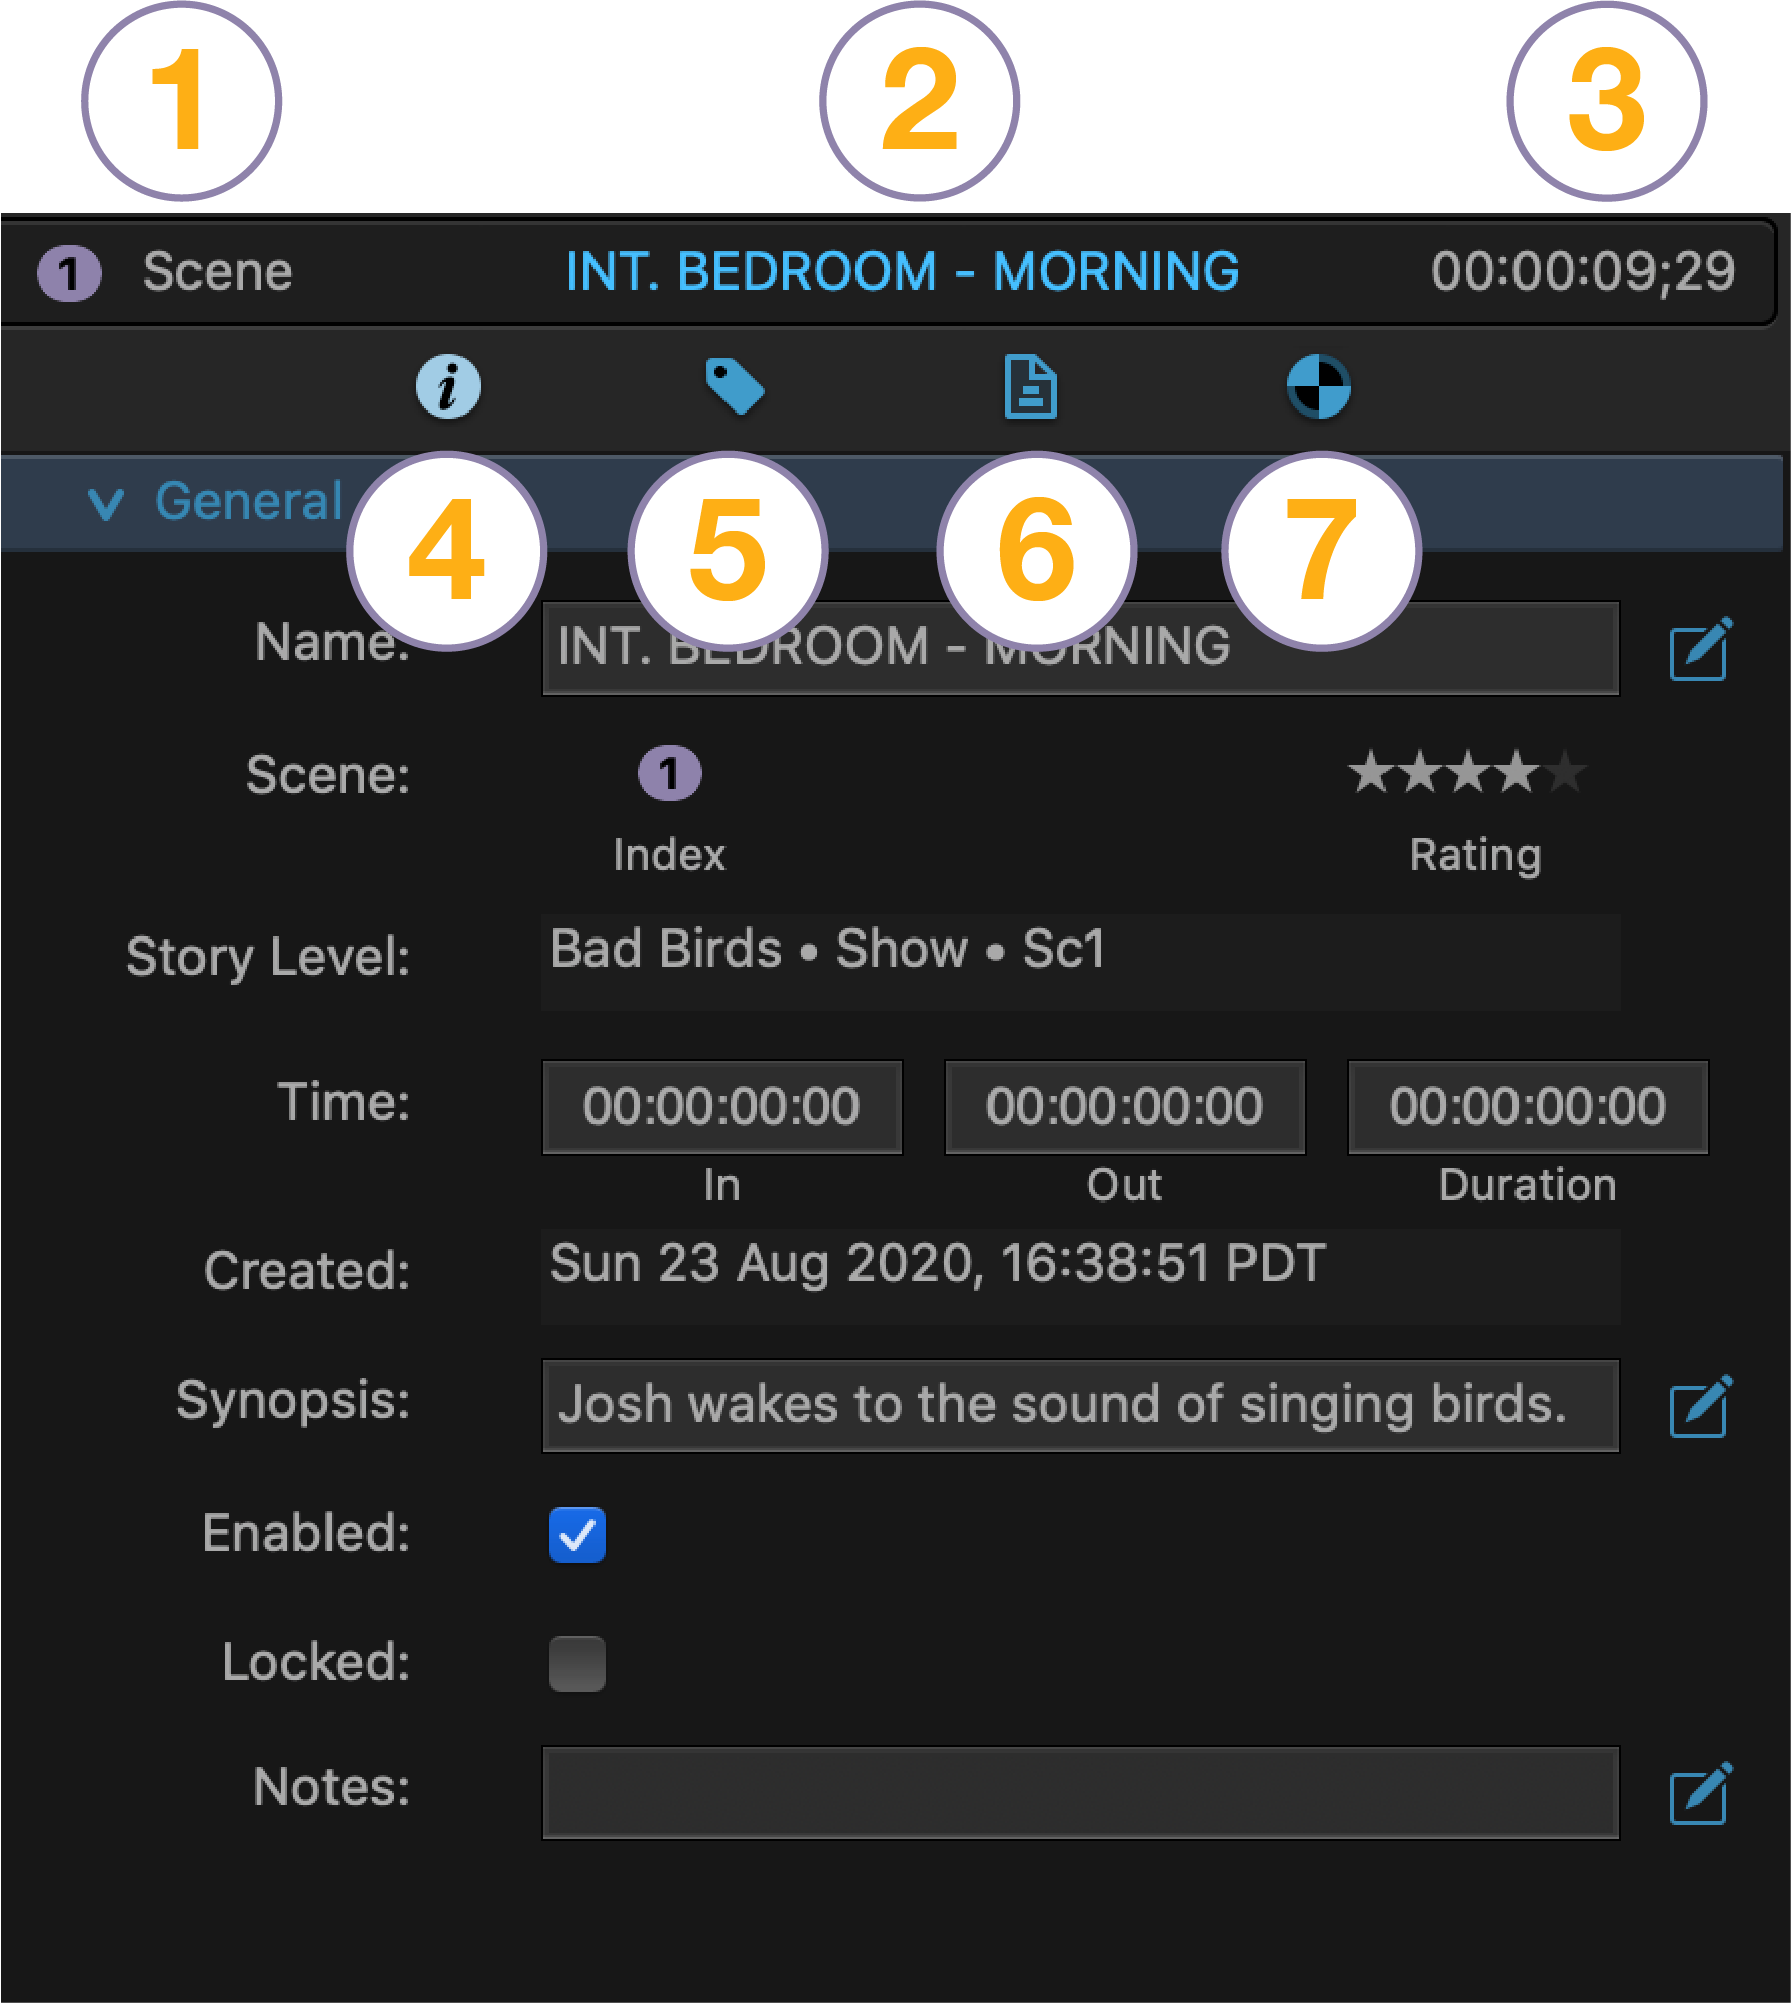
Scene (Story Group)
A Scene is a core story group where an event takes place at a location, usually with characters.
General
Name |
Title or name of the scene. By default, it uses the scene header name, if available, but you can change it to something more descriptive of the story. Also used in the outline of the screenplay. |
Scene |
Index: Order number of the scene. Scene numbers are sequencial throughout the show, regardless of any story groups containing them. Rating: Rating of the scene. Click to change the rating (1-5 stars). |
Story Level |
Displays the location of the scene group in the story, such as show/sequence/scene. |
Time |
Displays the In point, Out point and Duration of the scene. |
Created |
Shows the date/time of creation for the scene. |
Synopsis |
Synopsis of the scene, used also in the outline and visible in the screenplay. |
Enabled |
Enable or disable the scene. Disabled shows black in playback. |
Locked |
If checked, prevents any changes to the scene. |
Notes |
Enter any notes on the scene here. |
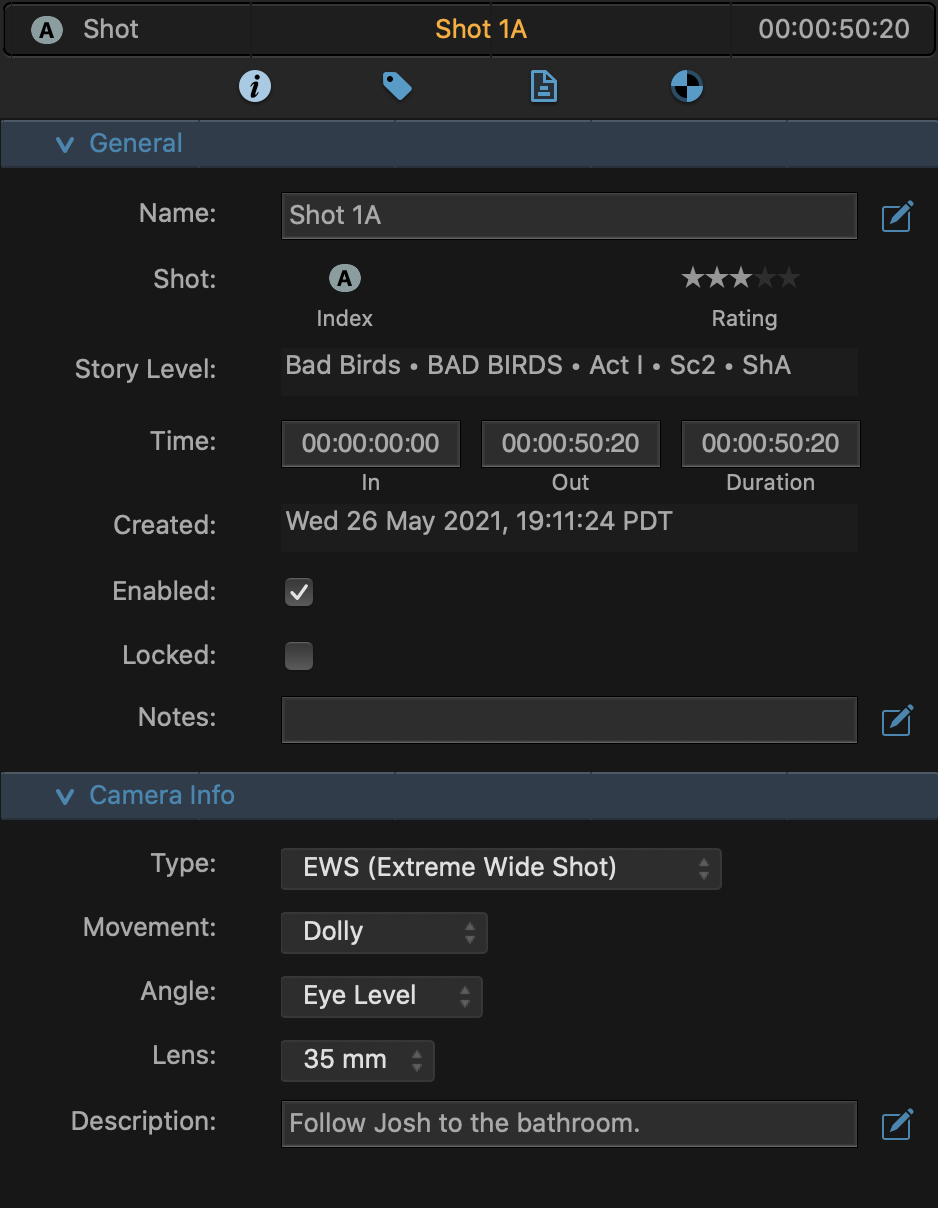
Shot (Story Group)
A Shot is a view of a Scene.
General
Name |
Label of the shot such as Shot 1A but you could rename it as, say, "CU John". |
Shot |
Index: Order number of the shot in the parent story group. Rating: Rating of the shot. Click to change the rating (1-5 stars). |
Story Level |
Displays the location of the shot in the story, such as show/sequence/scene. |
Time |
Displays the In point, Out point and Duration of the shot. |
Created |
Shows the date/time of creation for the shot. |
Enabled |
Enable or disable the shot. Disabled shows black in playback. |
Locked |
If checked, prevents any changes to the shot group. |
Notes |
Enter any notes the shot. |
Camera Info
Type |
Choose a type of camera shot from the popup list such as a close-up or wide shot. |
Movement |
Choose a movement of the camera from the popup list such as a Dolly or Pan. |
Angle |
Choose an angle or elevation of the camera from the popup list such as Bird's Eye or Low Angle. |
Lens |
Choose a lens from the popup list such as 35mm or 50mm. |
Description |
Enter any further notes on the camera here. |
Video
The Video inspector only has Info, Tags and FX tabs.
General
Name |
Name of the video, by default the source filename, but you can change it. |
Rating |
Rating of the video. Click to change the rating (1-5 stars). |
Story Level |
Displays the location of the video in the story, such as show/sequence/scene/shot/video. |
Time |
Displays the In point, Out point and Duration of the video. |
Enabled |
Enable or disable the video. Disabled shows black in playback. |
Locked |
If checked, prevents any changes to the video. |
Notes |
Enter any notes on the video here. |
Source File
Location |
Location of the video source file. Click to see the full path. You can change this to a different file if you like. Useful to reconnect a relocated file or point to a different take. Note that locking library assets in the Pretend preferences will also lock the location so you can't change the source file location. |
Kind |
Type of video such as a Quicktime movie. |
File Size |
Size of the video source file. |
Duration |
Original duration of the video source file. |
Created |
Creation date/time of the video source file. |
Modified |
Last modification date/time of the video source file. |
Video Encoding |
Encoding type of the video source file such as ProRes. |
Resolution |
Format and resolution of the video source file such as Large (720p-HD) - 1280 x 720. |
Aspect Ratio |
Aspect ratio of the video source file such as 16:9. |
Frame Rate |
Frame rate of the video source file such as 24 FPS. |
Color Space |
Color space of the video source file such as BT.709. |
Chroma |
Chroma of the video source file such as 4:2:2. |
Channels |
Channels available in the video source file such as RGBA (red, green, blue, alpha). |
Bit Depth |
Bit depth of the video source file such as 8 or 16 bits. |
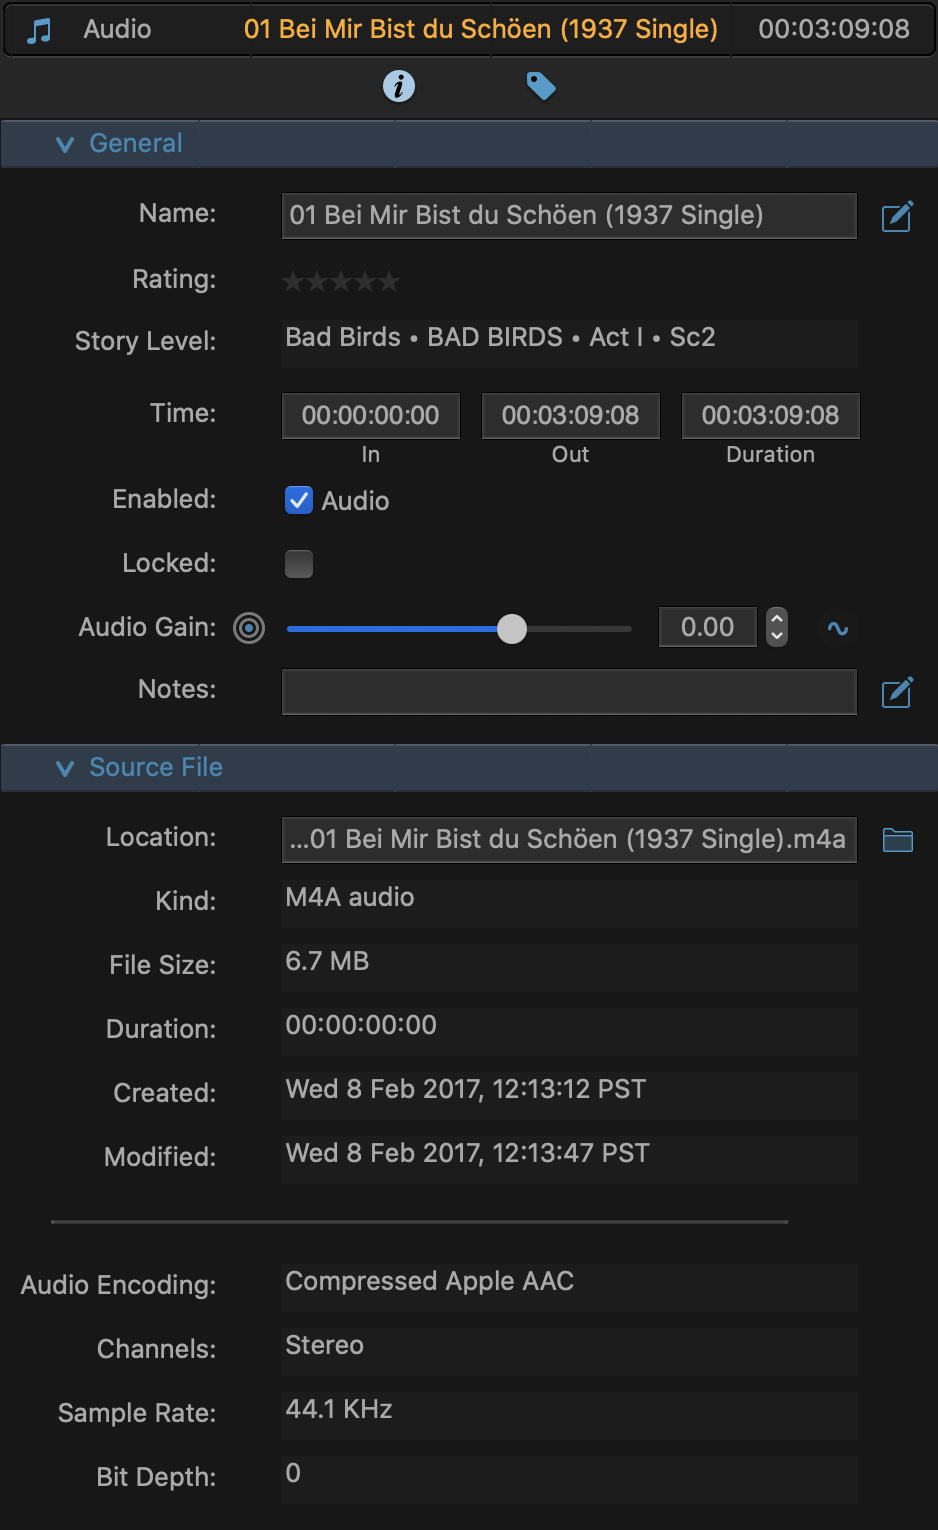
Audio
The Audio inspector only has Info and Tags tabs.
General
Name |
Name of the audio, by default, the source filename but you can change it. |
Rating |
Rating of the audio. Click to change the rating (1-5 stars). |
Story Level |
Displays the location of the audio in the story, such as show/sequence/scene/shot/audio. |
Time |
Displays the In point, Out point and Duration of the audio. |
Enabled |
Enable or disable the audio. Disabled shows black in playback. |
Locked |
If checked, prevents any changes to the audio. |
Volume |
Drag the slider or enter a value to change the volume. This can also be animated if the audio clip is selected in the timeline. The animation diamond to the right is greyed out if not available. |
Notes |
Enter any notes on the audio here. |
Source File
Location |
Location of the audio source file. Click to see the full path and change to source a different file if you like. Note that locking library assets in the Pretend preferences will also lock the location so you can't change the source file location. |
Kind |
Type of audio such as an MP3. |
File Size |
Size of the audio source file. |
Duration |
Original duration of the audio source file. |
Created |
Creation date/time of the audio source file. |
Modified |
Last modification date/time of the audio source file. |
Audio Encoding |
Encoding type of the audio source file such as Compressed MPEG. |
Channels |
Channels available in the audio source file such as Mono or Stereo. |
Sample Rate |
Sample rate of the audio source file such as 44.1 KHz. |
Bit Depth |
Bit depth of the audio source file such as 8 or 16 bits. |
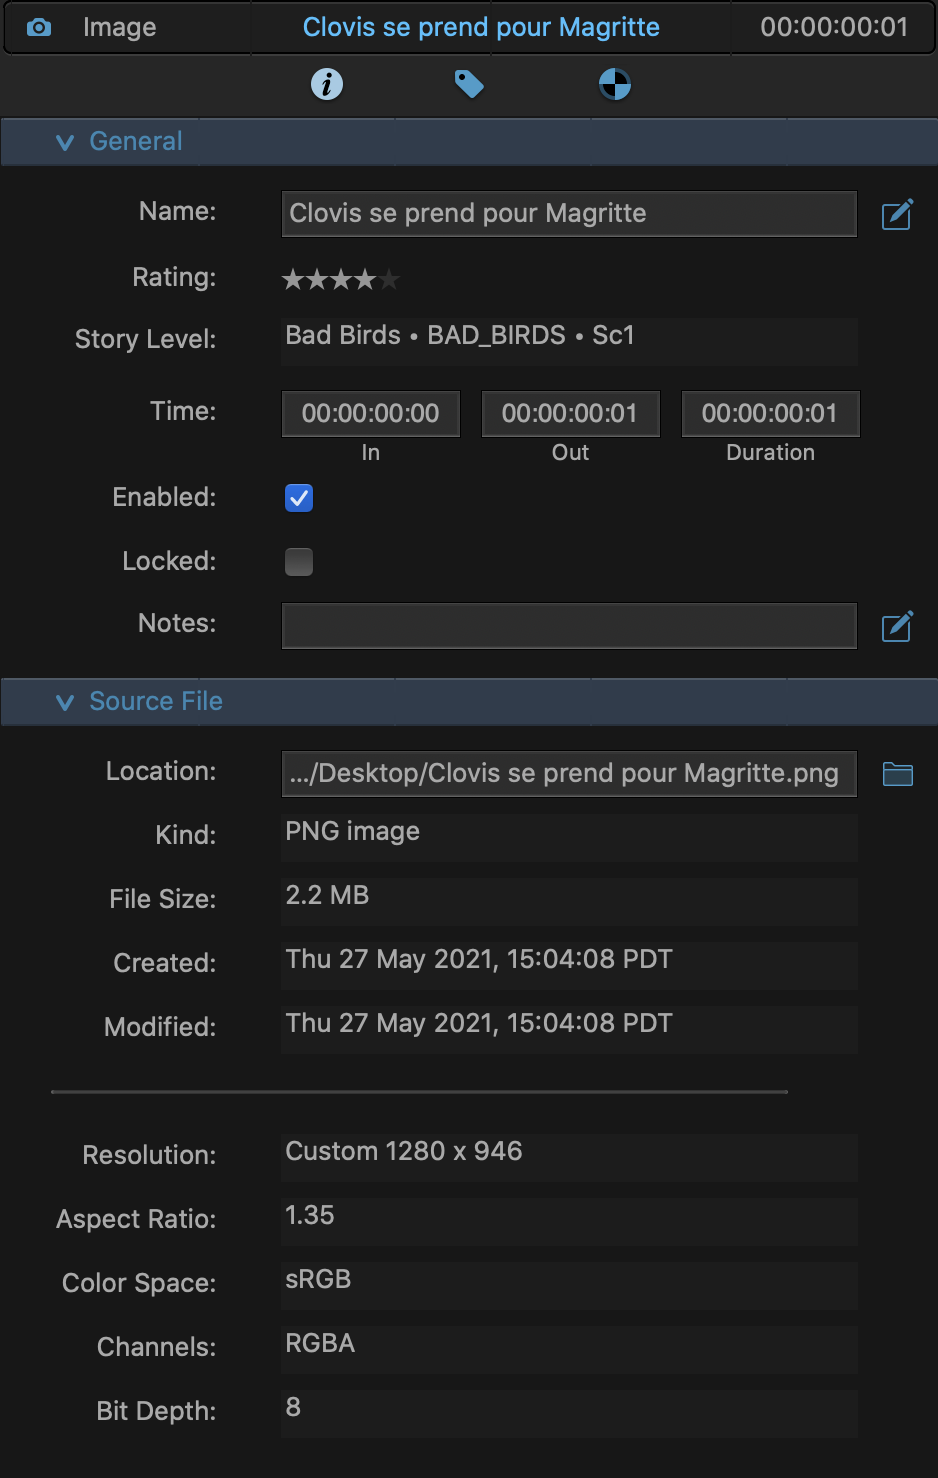
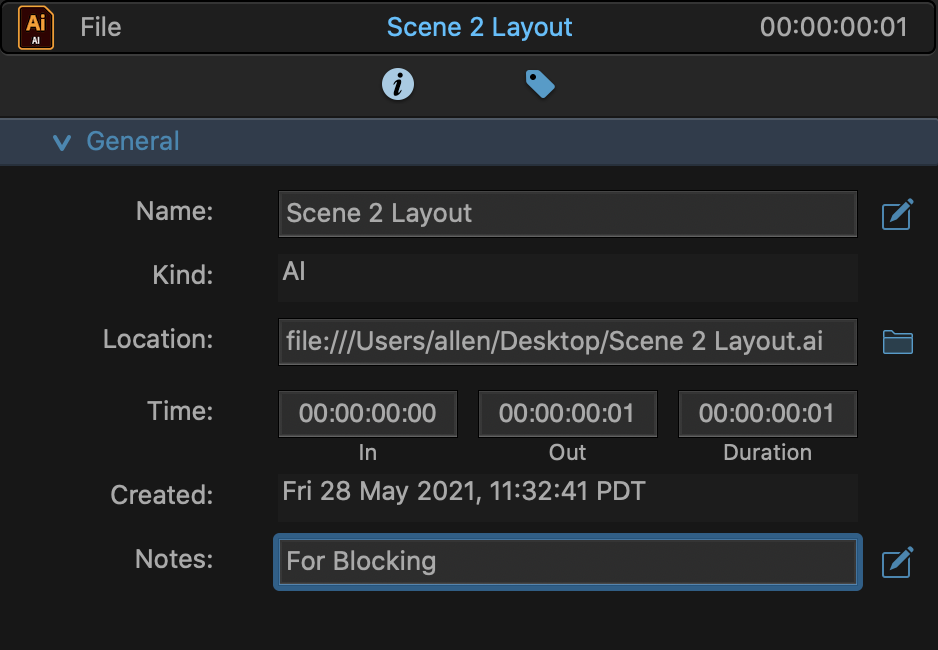
Image
The Image inspector only has Info, Tags, and FX tabs.
General
Name |
Name of the image, by default, the source filename but you can change it. |
Rating |
Rating of the image. Click to change the rating (1-5 stars). |
Story Level |
Displays the location of the image in the story, such as show/sequence/scene/shot/image. |
Time |
Displays the In point, Out point and Duration of the image. |
Enabled |
Enable or disable the image. Disabled shows black in playback. |
Locked |
If checked, prevents any changes to the image. |
Notes |
Enter any notes on the image here. |
Source File
Location |
Location of the image source file. Click to see the full path. You can reconnect to another image file if you like. Note that locking library assets in the Pretend preferences will also lock the location so you can't change the source file location. |
Kind |
Type of image such as a JPG. |
File Size |
Size of the image source file. |
Created |
Creation date/time of the image source file. |
Modified |
Last modification date/time of the image source file. |
Resolution |
Resolution of the image source file such as 1280 x 720. |
Aspect Ratio |
Aspect ratio of the image source file such as 16:9. |
Color Space |
Color space of the image source file such as BT.709. |
Channels |
Channels available in the image source file such as RGBA (red, green, blue, alpha). |
Bit Depth |
Bit depth of the image source file such as 8 or 16 bits. |
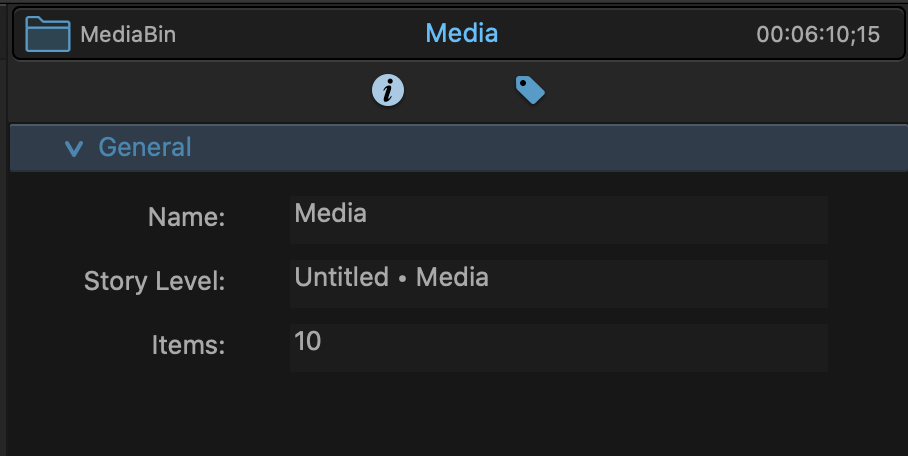
Media
The Media inspector only has an Info tab and a Tags tab.
General
Name |
Name of the image, by default, the source filename but you can change it. |
Level |
Displays the level of the Media Bin/SubFolder in the project. |
Items |
Number of media items in the Media Bin/SubFolder. |
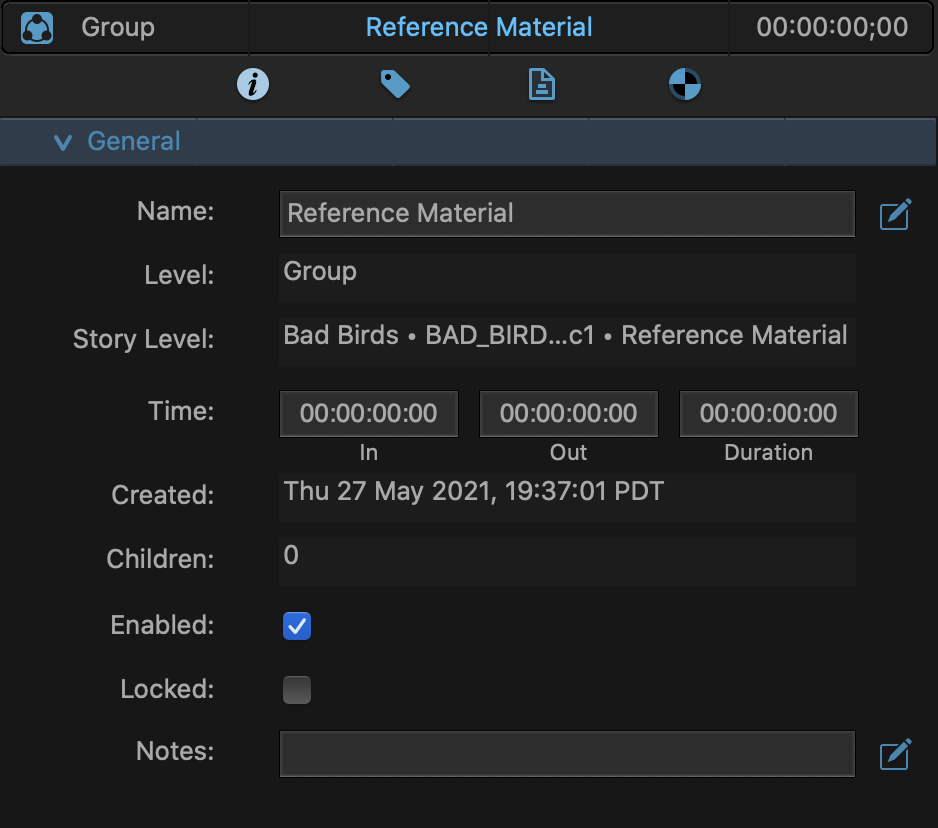
Group
This is a general group used to combine items that can be anywhere in the library or timeline. In the library, you can use it like a folder to hold items. If you drag one into the timeline, it's much like a shot in that it combines its contents into a single clip but you can use it at any level.
Note that since it's not a story group, it's not visible in the screenplay editor.
General
Name |
Give a name. |
Level |
Level. |
Story Level |
Displays the location of the group in the story. |
Time |
Displays the In point, Out point and Duration of the group. |
Created |
Shows the date/time of creation for the group. |
Children |
Number of child items contained in the group. |
Enabled |
Enable or disable the group. Disabled shows black in playback. |
Locked |
If checked, prevents any changes to the group. |
Notes |
Enter any notes on the group here. |
File
A File is usually an external file. It's useful to keep these files in the appropriate story groups they are related to in the library. Double-click a file to open it in its native app, if available on your system.
General
Name |
Shows the file name. |
Kind |
Displays the type of file. |
Location |
Shows the path to the file. Click on the folder icon to see the location in the file browser. Note that locking library assets in the Pretend preferences will also lock the location so you can't change the source file location. |
Time |
Displays the In point, Out point and Duration of the file if applicable. |
Created |
Shows the date/time of creation for the file. |
Notes |
Enter any notes on the file here. |
Arc
An Arc is set up in the inspector and visible as a curved arc in the timeline. The Arc inspector has Info, Tags and Script tabs.
General
Name |
Give a name. |
Story Level |
Displays the location of the arc in the story. |
Time |
Displays the In point, Out point and Duration of the arc in the story. |
Conflict |
Choose a type of conflict in the arc such as "Man vs Man" or "Man vs Nature". |
Goal |
What is the goal in the arc? |
Barrier to Goal |
What is blocking the goal? This is the main conflict. |
Notes |
Enter any notes on the arc here. |
Arc Reactor
Arc Points |
This is a list of plot points that make up the arc. Each point has its type (choose Setup, Conflict, Climax, or Resoluton), a description and an intensity. The intensity gives the vertical height of the point in the arc curve down in the timeline. |
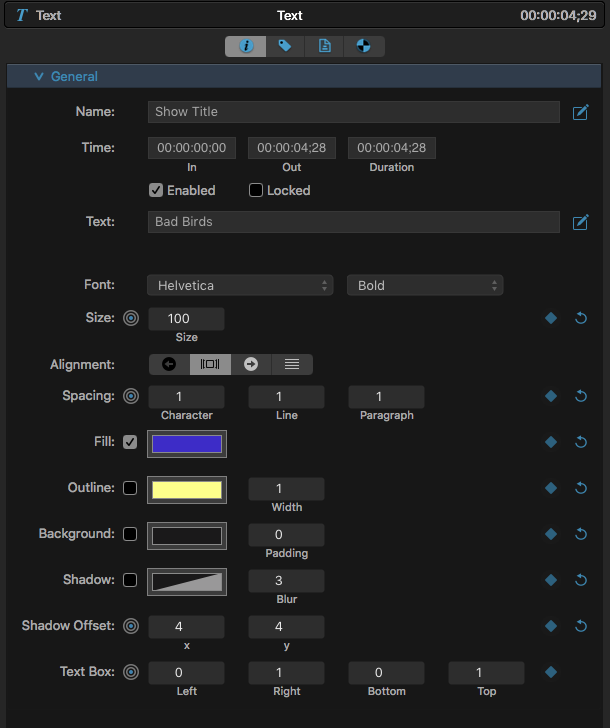
Text
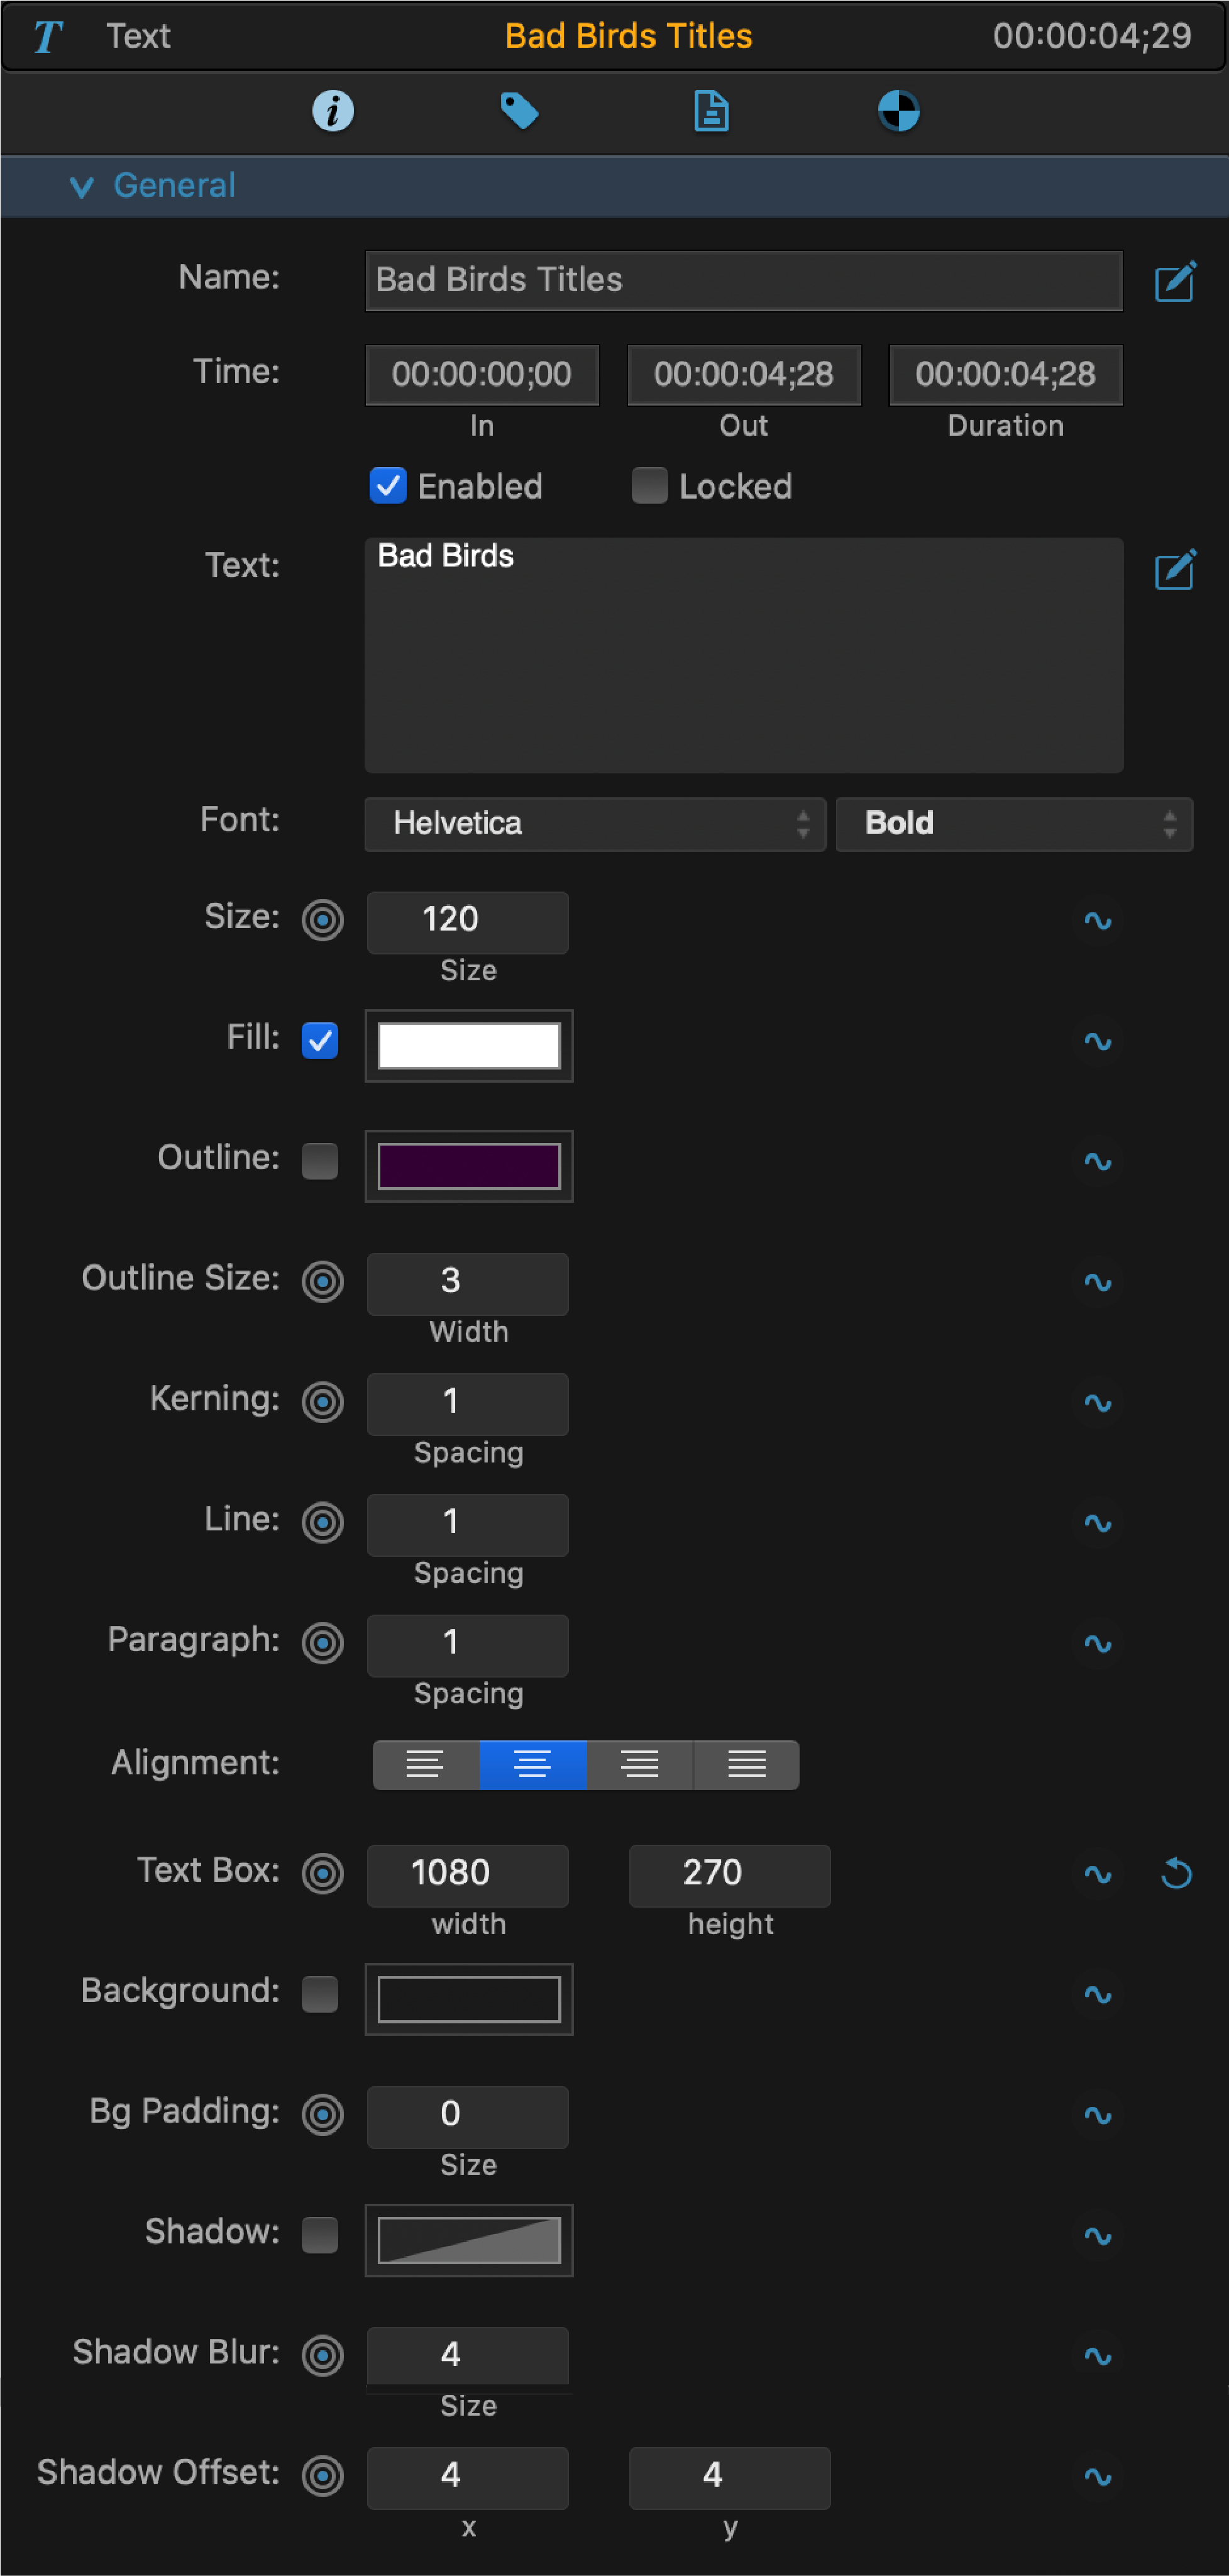
Text can be edited with the Text inspector.
General
Name |
Give a name for the text clip. |
Time |
Displays the In point, Out point and Duration of the group. |
Enabled |
If checked, the text clip is used for rendering and playback. |
Locked |
If checked, prevents any changes to the text clip. |
Text |
Shows the text contained in the text clip. If the text is longer than a line, click the edit button on the right for a larger text box popup. |
Font |
Click to choose a font family and weight. |
Size |
Enter the point size of the font. |
Fill |
If checked, displays the fill of the font. To modify the fill color of the font, click on the color box to bring up the color picker. Toggle between RGB and HSV color values. You can also modify the opacity. |
Outline |
If checked, displays the outline of the font. Modify the color and stroke width. |
Spacing |
Modify the space between characters, lines and paragraphs. |
Alignment |
Choose between left, centered, right and justified alignments. |
Text Box |
Controls the height and width of the text area in pixels. The text will wrap to fit the area. |
Background |
If checked, displays the background of the text using the overall text area. Modify the color and opacity by clicking the color box to bring up the color picker. To extend the rectangle beyond the text area, increase the padding. |
Shadow |
If checked, displays the shadow of the text. Modify the shadow color, opacity and blur. |
Shadow Offset |
Controls the direction and length of the shadow with the X and Y values. |
Transition
Change transitions with the transition inspector.
General
Name |
Give a name for the transition. |
Time |
Displays the In point, Out point and Duration of the transition. |
Enabled |
If checked, the transition is used for rendering and playback. |
Locked |
If checked, prevents any changes to the transition. |
Transition |
Choose between Cross Dissolve, Dip to Color, Fade In and Fade Out. |
Speed |
Speed controls how quickly the transition progresses at each point. Choose between Constant, Ease In, Ease Out and Ease In, Ease Out. |
Ease Curve |
Strengthen or weakens the speed mode if ease in, ease out or ease in, ease out. |
Fade Color |
To modify the fade color, click on the color box to bring up the color picker. Toggle between RGB and HSV color values. The chosen color is use to fade to or from. Default is black. |
The Viewer
Seeing is believing.
The viewer is the window into your project. This is where your selected media assets from either the Library or Timeline will be displayed for you to view.
Viewing Media Assets in the Library
Select any media asset in the Library that you would like to display in your viewer. The name of the asset selected will appear above the Viewer. Play by either clicking the viewer play button or the spacebar.
Note that the icon to the left of the asset’s name will be blue when you select an item from the Library ![]() and orange when you’ve selected an asset from your Timeline
and orange when you’ve selected an asset from your Timeline ![]() .
.
Viewing Timelines
To view what’s in your Timeline, make sure to have your Timeline Panel selected and press play (Space Bar). Remember, the Timeline starts playing from wherever the Playhead is located. You can drag your Playhead to any part of your Timeline by clicking on the timecode at the top of your Timeline.
Show or Hide the Viewer
On the right side of the Global Bar below the Viewer, is the Panel Menu which allows you to hide the different panels within Pretend.

Click the Hide Viewer function to get rid of your Viewer. Click it again to bring it back.
Viewer Menu Bar
At the bottom of your Viewer is the Viewer Menu Bar. You can hover over one of the menu items with your cursor for a pop-up description of that function.
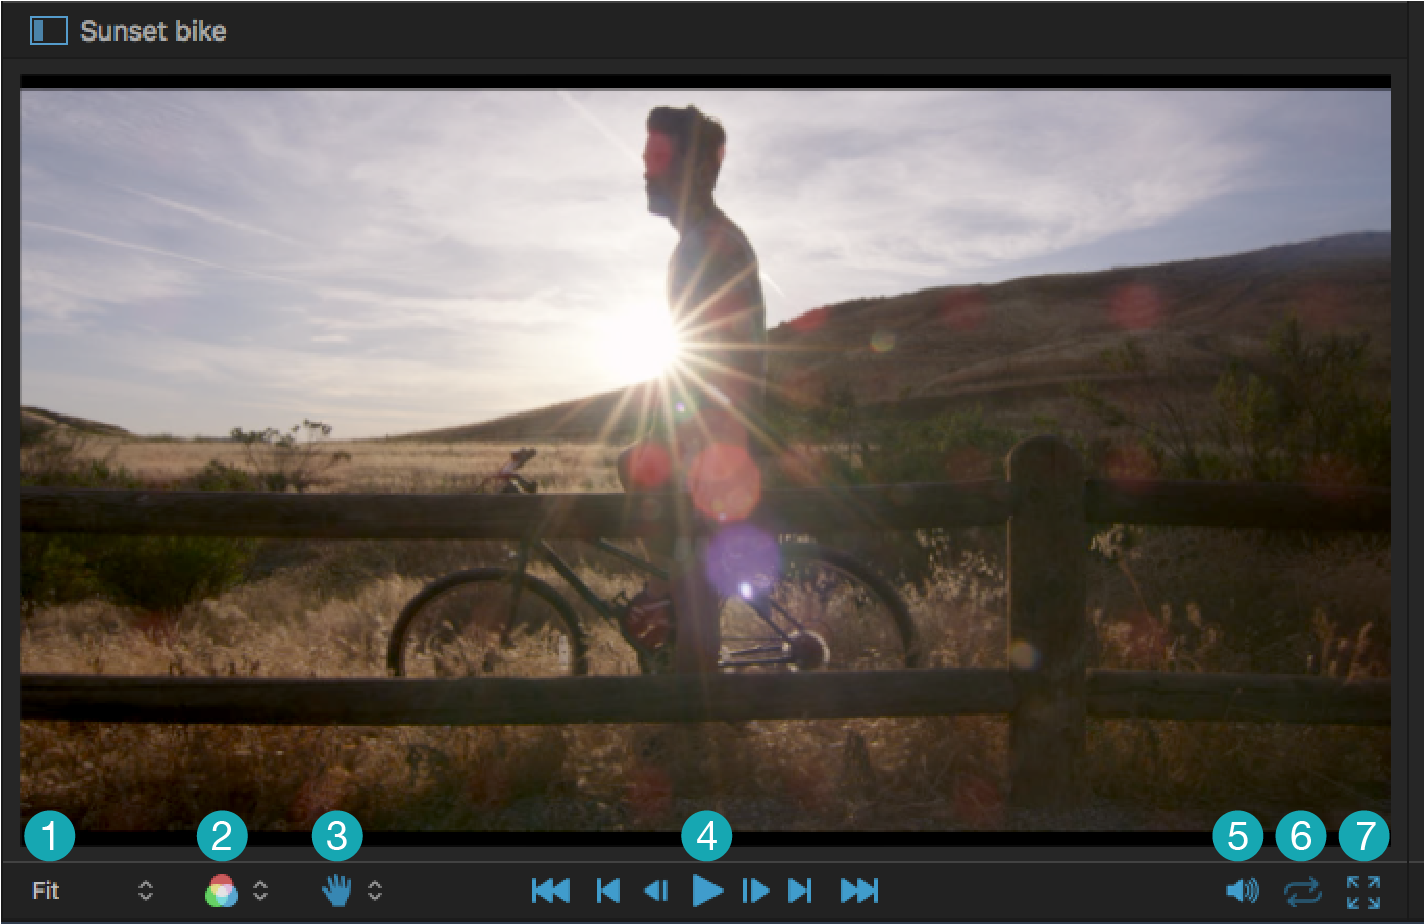
- Fit / Zoom
- Channels
- Pan & Zoom / 2D Transform / Framing / Text Tool
- Playback Controls
- Viewer Volume
- Loop On/Off
- Full Screen
Playback Controls

Press Play to play through all the clips in your Timeline from the Playhead position. Click again to Pause. Pressing the Space Bar also toggles between Play and Pause.
Icon |
Name |
Description |
Keyboard Shortcut |
|
|
Go to Start |
Moves playhead to beginning of timeline. |
|
Previous Edit |
Go to the previous edit. Repeated clicks will continue moving back in a pattern of moving to the beginning of the current clip, then end of previous clip, then beginning of previous clip and so on. |
↓ |
|
|
Step Back |
Move backward by single frame. |
← |
|
|
Play/Pause |
Play/Pause toggle |
Spacebar |
|
|
Step Forward |
Move forward by single frame. |
→ |
|
|
Next Edit |
Go to the next edit. Repeated clicks will continue moving forward in a pattern of moving to the end of the current clip, then beginning of next clip, then end of next clip and so on. |
↑ |
|
|
Go to End |
Moves playhead to end of timeline. |
Channels Pop-up Menu
Click on the Channels Menu for a pop-up of all the different functions. You’ll be able to view any of these different channels independently, including Color, Red, Blue, Green, Luminosity and Alpha Channels.
Icon |
Name |
Description |
Keyboard Shortcut |
|
|
RGB |
Displays the combined red, green and blue channels of the image. |
|
Red |
Displays only the red channel of the image. |
|
|
Green |
Displays only the green channel of the image. |
|
|
|
Blue |
Displays only the blue channel of the image. |
|
|
|
Luminousity |
Displays only the luminousity of the image. |
|
|
|
Alpha |
Displays only the alpha channel of the image. |
Zoom Menu
The Zoom Menu allows you to modify the size of your Viewer.
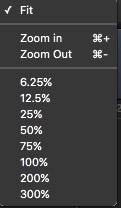
You can also press (⌘ +) or (⌘ -) to zoom in and out, or select one of the preset sizes available. If you’d like for the Viewer to occupy all of the available viewer space, select Fit.
Viewer Tools Menu
Choose between viewer controls for pan/zoom, transform, framing and text. For the latter three, widgets appear that allow you to modify each one directly in the viewer.
Transform and Framing are fully explained in the FX section of the User Guide. Text is explained in the Editing section of the User Guide.
Icon |
Name |
Description |
|
|
Pan |
The default mode is a Pan icon but in this mode, you can pan and zoom. Just click and drag in the viewer to move it around. Hit ⌘ + to zoom in. Hit ⌘ - to zoom out. |
|
Transform |
Opens the Transform on-screen controls. See Transform in the FX section for a full description. |
|
|
Framing |
Opens the Framing on-screen controls. See Framing in the FX section for a full description. |
|
|
Text |
Opens the Text on-screen controls. See Making Titles and Text in the Editing section for a full description. |
Misc Viewer Controls
Icon |
Name |
Description |
Keyboard Shortcut |
|
|
Full Screen |
Enlarges the view to full screen mode. To exit Full Screen, either click the icon or hit Esc or ⌘ F. |
⌘ F |
|
|
Loop |
Playback keeps repeating from start of selection. |
None |
|
|
Volume |
Click the Volume icon for a volume slider. Note this adjusts the playback volume, not the output volume in your actual show. |
None |
Timeline
Edit with the story by your side.
You can start dragging in clips from the Finder to a track in the Timeline and start editing. But why edit like you're in a regular editor? Pretend edits in sync with your story.
What’s different about editing with Pretend is that your script is always by your side and can serve as a reference. Since each Story Group from your script has its own Timeline, it’s easier to tackle any project.
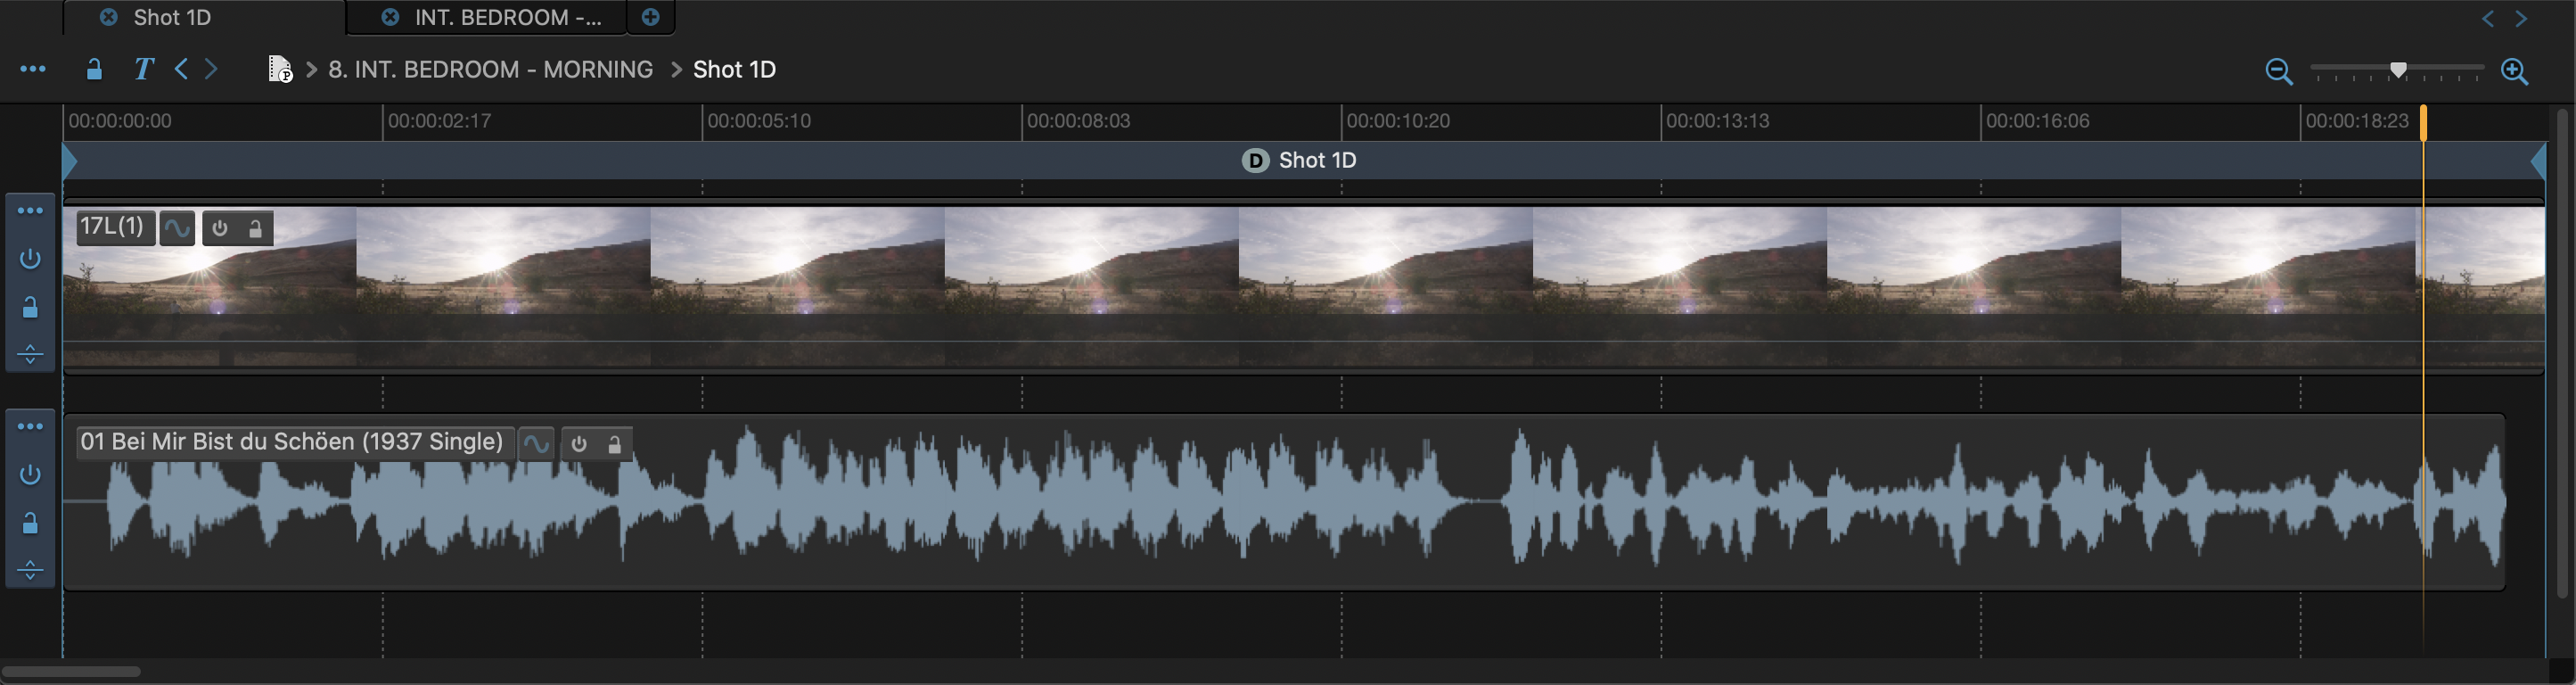
Story Groups & Timelines
Story groups are like boxes in boxes, or better, glass boxes in glass boxes with all the contents visible. A Show story group holds Scene story groups which hold Shot story groups. In the Library, Story Groups behave like folders but each Story Group is a also timeline that can be opened in the Timeline panel.
In a Scene timeline, you might add some Shots on one track, along with a music clip and a narration clip on tracks below. A Shot might contain a video take and an audio sound effect clip. You drill up and down the Story Groups to construct the visual story.
Pretend automatically uses your script’s scenes to make Story Groups that are found in your Library and Timeline. Let’s look into how to edit using these Story Groups.
Story Groups from Scripts
When you have a script in your Screenplay Editor, Pretend will automatically create Story Groups for each of your scenes. Each of these Story Groups act as containers in your Library, capable of holding all necessary media assets.
Story Groups as Containers
A Story Group can contain other Story Groups, just like a sequence contains scenes. For example, you can use a general Story Group to make a "Sequence" story group that contains several Scene story groups. If you have an audio track that spans through several scenes, you would add that track to your Sequence’s Timeline to see it alongside your different Scene story groups.
Using Story Groups’ Timelines
Each Story Group has its own Timeline. You can drag an item from your Story Group’s Item Panel and drop it in its Timeline. Once you’re done editing a Story Group’s Timeline, you can move onto the next one.
Since each Story Group has a Timeline, and Story Groups can contain other Story Groups, that means that you have Timelines within Timelines. It’s this hierarchical system that allows for you to edit portions of your story at a time.
Timeline Navigation

There are multiple ways of navigating between your project’s different Timelines.
Timeline Tabs

Timeline Tabs let you have different views of various Timelines available. There is only one Timeline open at a time but you can open many Timelines in different Tabs.
Adding/Deleting Timeline Tabs
Pretend opens with one Tab. It’s up to you to create a new Tab by clicking on the “+” icon at the end of the tabs in your Timeline Panel.
For every new tab that is added, an empty timeline, named “Timeline <N>” will be created in that new tab and will also be added to the “Timelines” group in the Library.
If you open a Story Group’s Timeline from the Library, that timeline will replace the current tab’s timeline. If the current tab’s timeline was empty, and only belonged to the Timelines group, it will be removed from both the tab and the Library, but if the timeline had some content, it will be preserved, and will remain in the Library.
If you delete a Tab while its Timeline is empty, the Timeline is also deleted from the Library to avoid having a bunch of empty Timelines. You must drag an item into a new Timeline (or the Timeline’s Item Panel) for it to remain in your Library even after you close its Tab.
Deleting a timeline in the library that is currently shown in a tab will also delete that tab, unless it is the last tab remaining.

|
Add Tab |
Click to add a new tab. The added timeline will be empty. Double-click on a story group in the library or timeline to see it in the tab's timeline workspace. You can open the story group in a new tab by holding the command key while double-clicking a story group. This works in either the library or timeline. |
|
|
Delete Tab |
Click to delete the tab. |
|
|
Move Back/Forward Tab |
If you have more tabs than can be seen, use the arrow buttons at the far right of the tab line. These will move the line of tabs back and forth to reveal more tabs. |
Reorder Tabs |
Drag a tab left or right horizontally to move the tab to a new place in the tab order. |

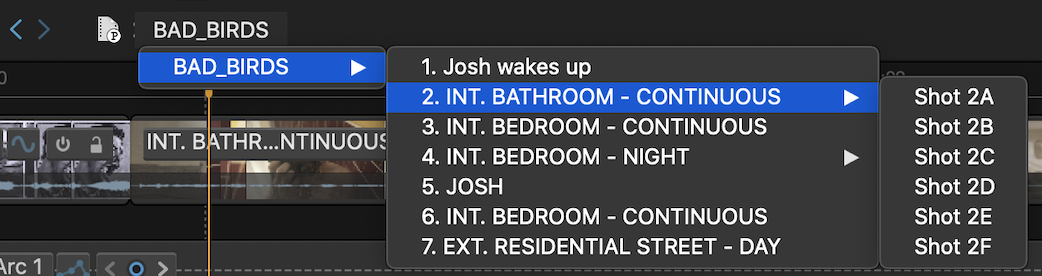
Go Up a Level |
Click once on the desired level in the breadcrumbs. |
|
Open a Child Group |
Double-click the child story group in the parent's timeline workspace. |
|
Move Back/Forward |
Click on the arrow buttons on the left of the breadcrumbs to move back or forward to previously viewed timelines (much like a web browser). |
|
Move Anywhere |
Click and hold on a breadcrumb level to see a tree menu of all story groups below the selected level. Select the desired story group to open it in the timeline. This is a quick way to move around your story in wide steps. |
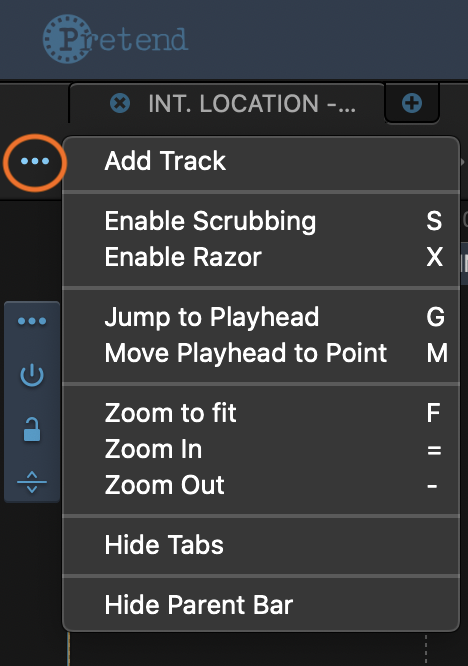
Name |
Description |
Keyboard Shortcut |
Add Track |
Adds an empty track to the timeline. |
|
Enable Scrubbing |
Acts as a toggle so it plays in the viewer as you move the cursor over a clip. |
S |
Enable Razor |
Turns on the razor tool until you toggle it back off. While active, clicking on a clip will split it into two clips at the point-in-time clicked on. |
X |
Jump to Playhead |
Moves the timeline view to wherever the playhead is currently. Useful if you have panned or zoomed to a different area and want to snap back to the playhead position. |
G |
Move Playhead to Point |
This moves the playhead to your current cursor position, the opposite of Jump to Playhead. Most useful if you use the M shortcut. |
M |
Zoom to Fit |
Resizes the timeline view to fit the current selection. If no selection, fits all the timeline content into view. |
F |
Zoom In |
Zooms in the timeline using the playhead as the center for scaling. |
= |
Zoom Out |
Zooms out the timeline using the playhead as the center for scaling. |
- |
Hide Tabs |
Shows or hides the tabs. |
|
Hide Parent Bar |
Shows or hides the Parent Bar. |
|
Zoom In from Cursor |
Zooms in using the cursor position as the center, wherever you press the key. This one is not in the menu since it's a quick key/mouse shortcut. |
Z |
Zoom Out from Cursor |
Zooms out using the cursor position as the center, wherever you press the key. This one is not in the menu since it's a quick key/mouse shortcut. |
⌥ Z |
Zoom |
Zoom in while pressing Z (or ⌥ Z to zoom out). The center of the zoom is where your cursor is. Or use the zoom slider in the timeline's top bar to horizontally resize the timeline using the playhead as the scaling center. You can also click the Zoom In and Zoom Out icons on either side of the slider. Or press the = or - keys to zoom in and out. |
Pan |
Press H while dragging to pan. Or use the vertical and horizontal scrollbars in the timeline to pan. |
Fit |
Hit F to set the zoom to fit the selected items. If nothing is selected, the zoom will be adjusted to fit all the contents of the timeline to the width of the timeline panel. |
Timecode Display

Displays the current timecode and frame rate.
The Timeline Workspace
The timeline workspace in Pretend is where you mix media assets to build your final edit.
Add Media to the Workspace
Drag a media file to the timeline, from either the library or a file browser. If you drag below the last track, a new track is created to place the dragged clip.
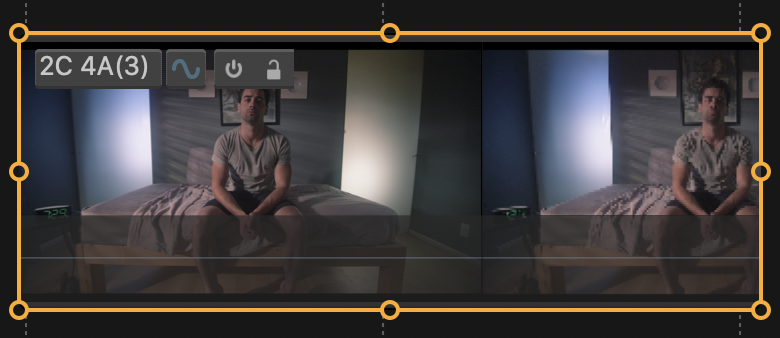
A timeline clip displays the name, animation toggle, disable and lock buttons.
Selection
Click on a clip to select it. A yellow box with edit handles appears around the clip. The clip's inspector also shows up in the inspector panel. Move the playhead to the selected clip to see it in the viewer.
Drag a box over clips to select multiple clips. ⌘-Click on a clip toggles its selection state.
Double-click a story group clip to open it in the timeline. ⌘-Hold while double-clicking to open it in a new tab.
While there is no cut/copy/paste in the timeline, ⌥-Drag creates a copy of the dragged item and places the copy where you drop it.
Track Header
The track header is at the beginning of each track in a timeline.
Track Header Controls
Icon |
Name |
Description |
|
|
Track Menu |
Various track related functions, see next table. |
|
|
Enable |
Toggle the Enable off in the track header. The track is now disabled and not used though it is visible in the timeline. Click it again to turn the track back on. In an audio clip, a Disable acts the same as a mute. |
|
|
Lock |
This toggle button locks the track to prevent further editing. The track contents are still seen when playing. Locking prevents any changes to that track. |
|
|
Mute |
Toggles the sound on and off. When an audio is embedded in a Quicktime video clip, use Mute Audio to mute the track but still enable the video. |
|
|
Resize Track |
Drag the bottom of the track header to resize the track vertically. Click the Resize button to toggle between collapsed and expanded. Note that as you shorten the track header, icons for Disable, Lock and Mute will be hidden. |
Reorder Track
Click on an empty part of the track header. Then drag the track header up or down to a different track position.
Track Header Menu
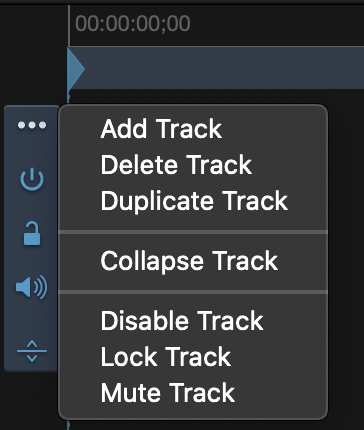
Name |
Description |
|
Add Track |
Adds a general track above the current track. You can add anything to this track. |
|
Delete Track |
Choose Delete Track to delete the current track. Note that you cannot delete a locked track. |
|
Duplicate Track |
Duplicates the current track. |
|
Collapse/Expand Track |
Choose Collapse/Expand Track to collapse or expand the current track vertically. Click on the Resize button to toggle between expanded and collapsed tracks. |
|
Disable Track |
Toggle the Enable off in the track header. The track is now disabled and not used though it is visible in the timeline. Click it again to turn the track back on. In an audio clip, a Disable acts the same as a mute. |
|
Lock Track |
This toggle button locks the track to prevent further editing. The track contents are still seen when playing. Locking prevents any changes to that track. |
|
Mute Track |
Toggles the sound on and off. When an audio is embedded in a Quicktime video clip, use Mute Audio to mute the track but still enable the video. |

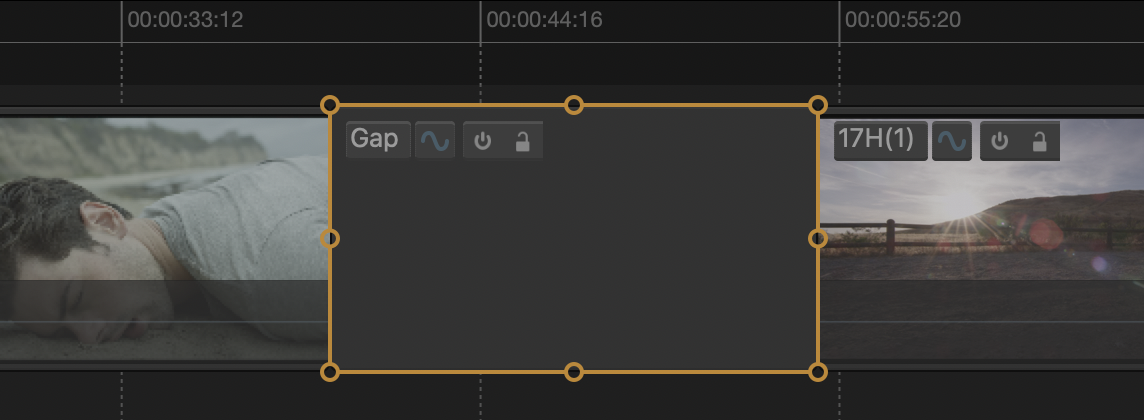
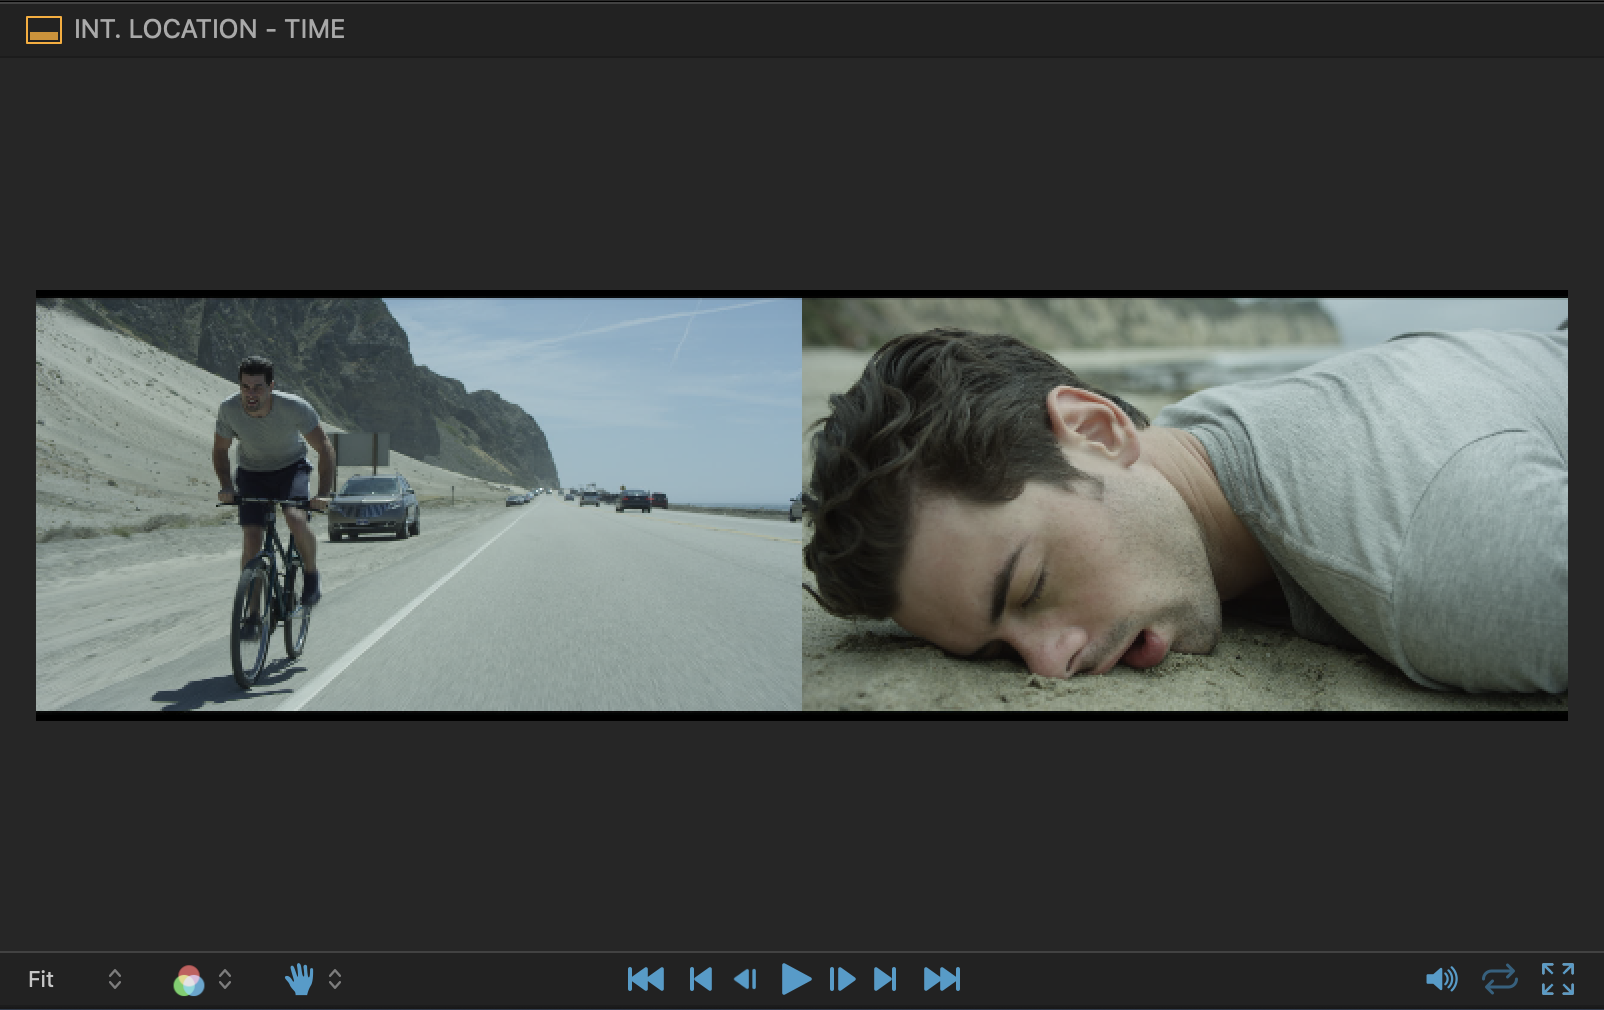
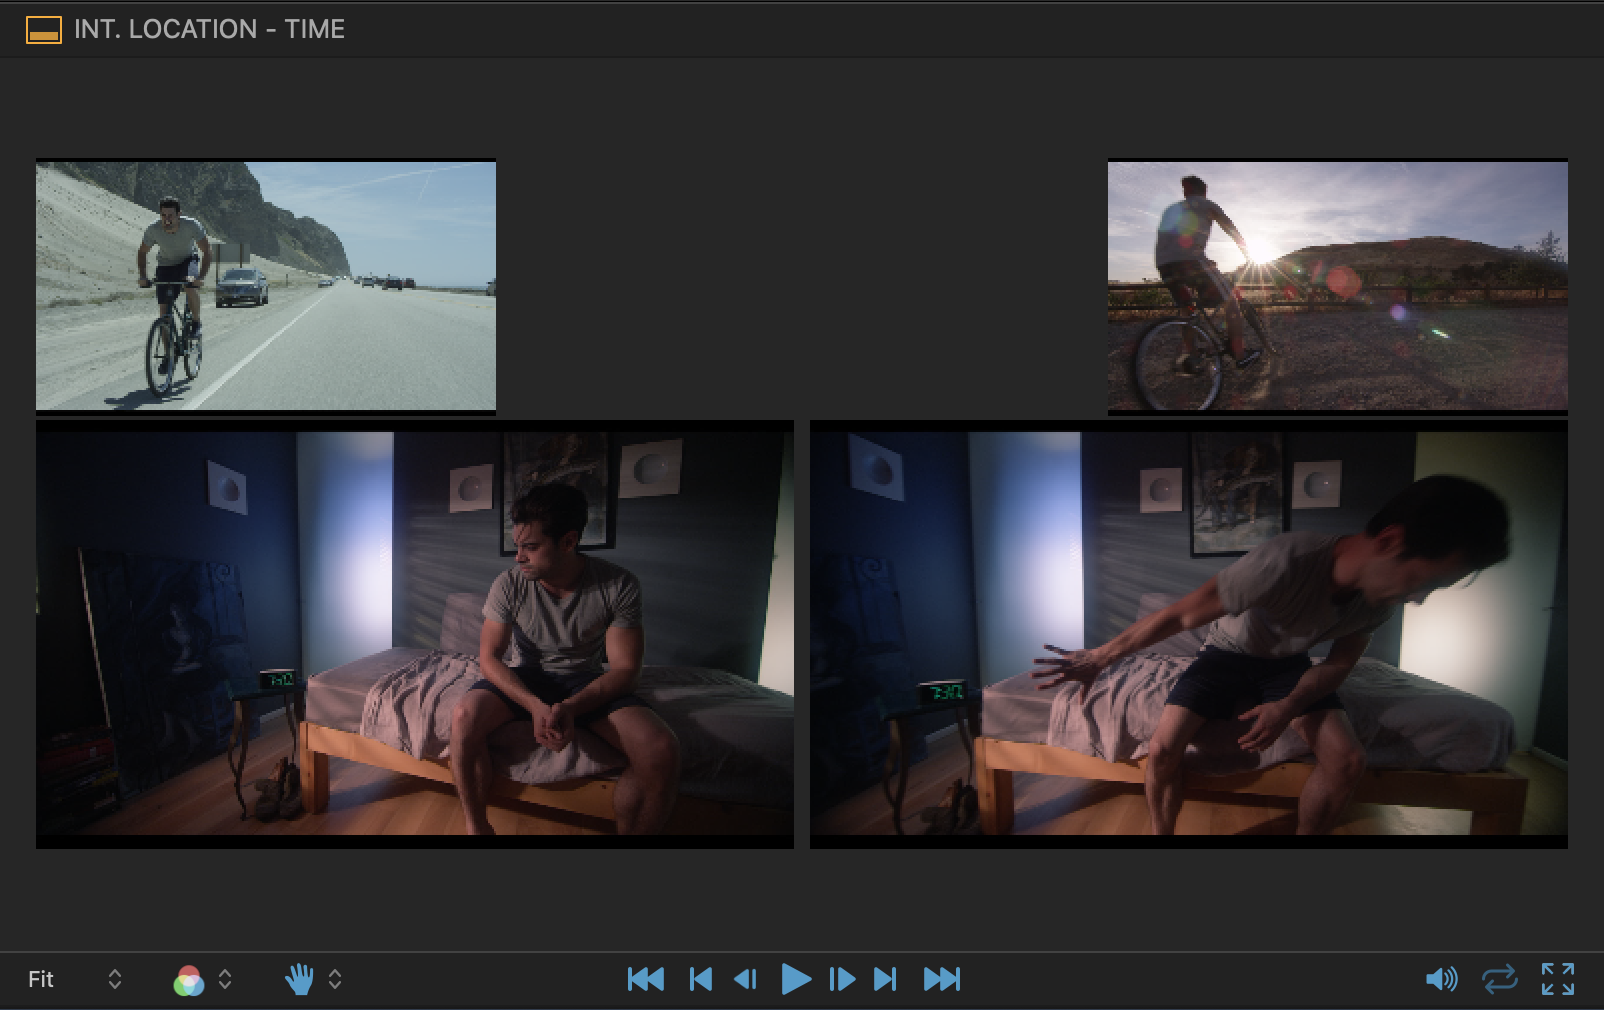
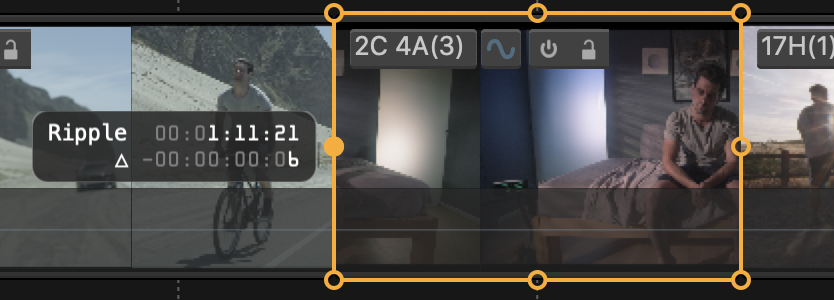
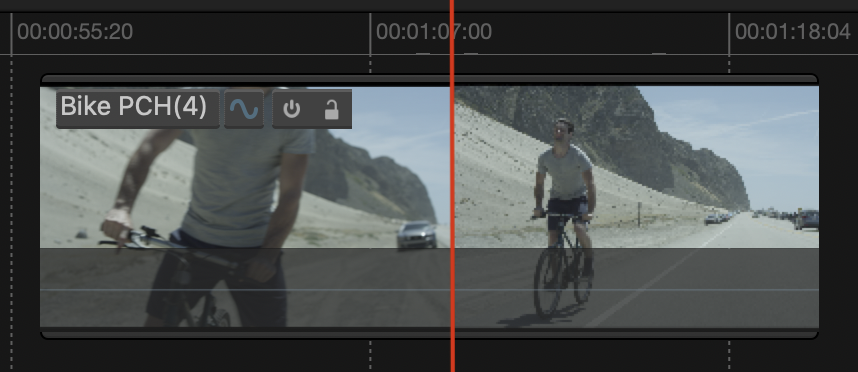
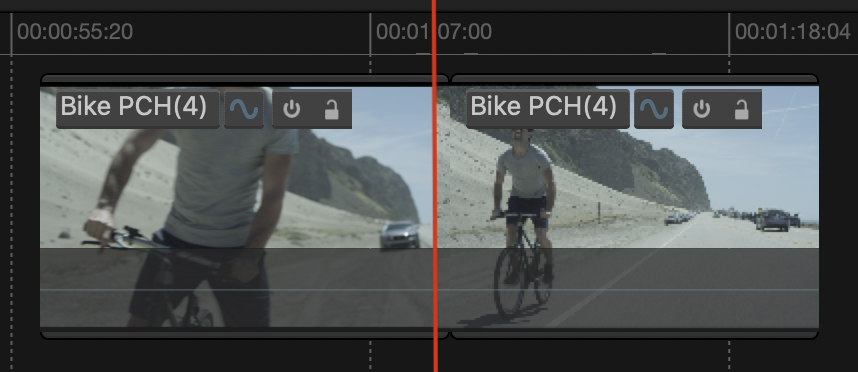
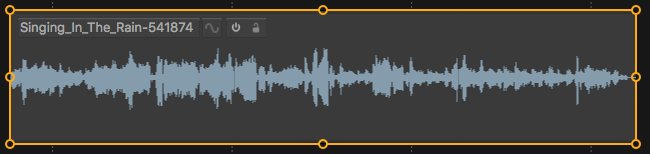

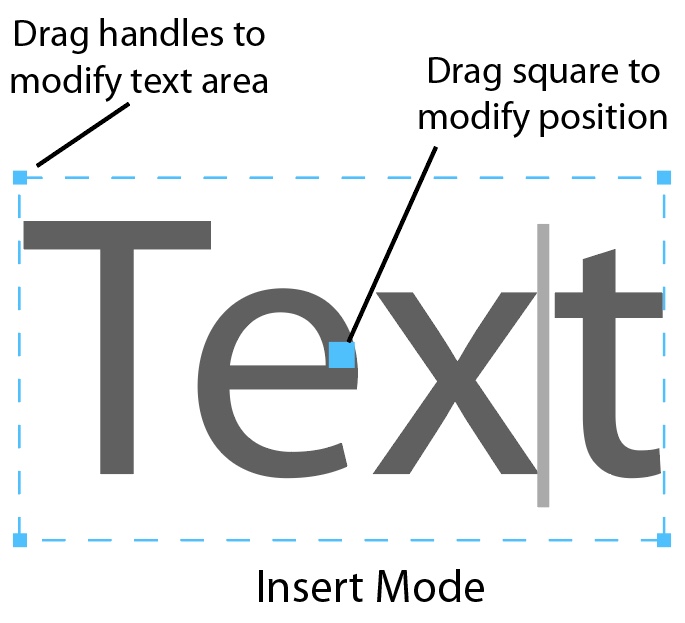
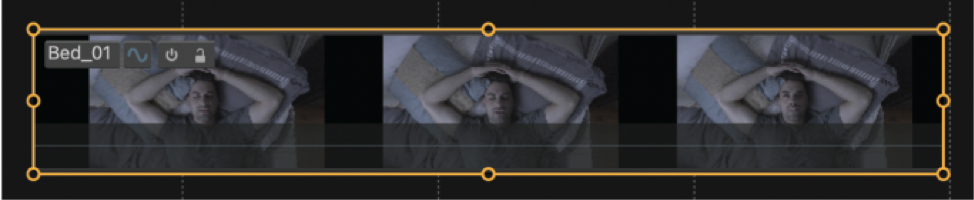
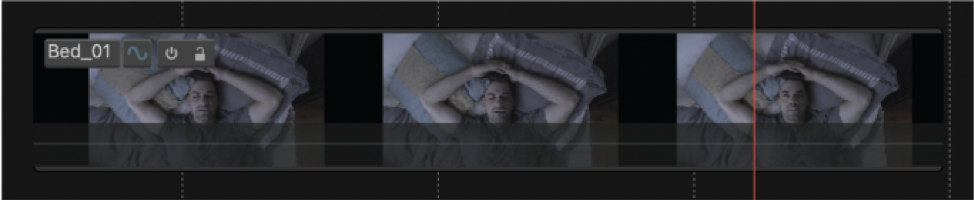


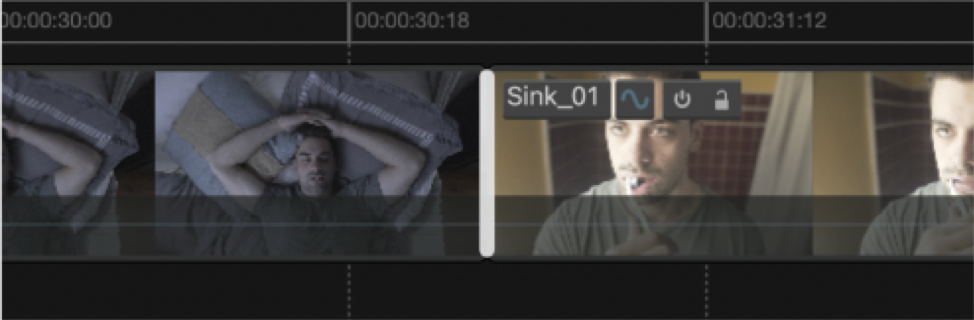
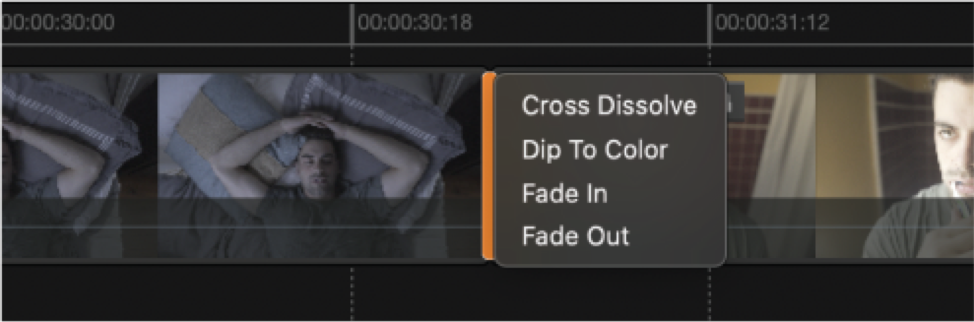
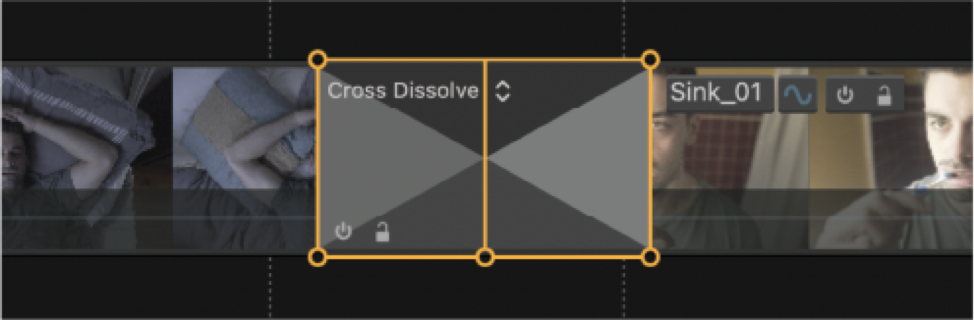
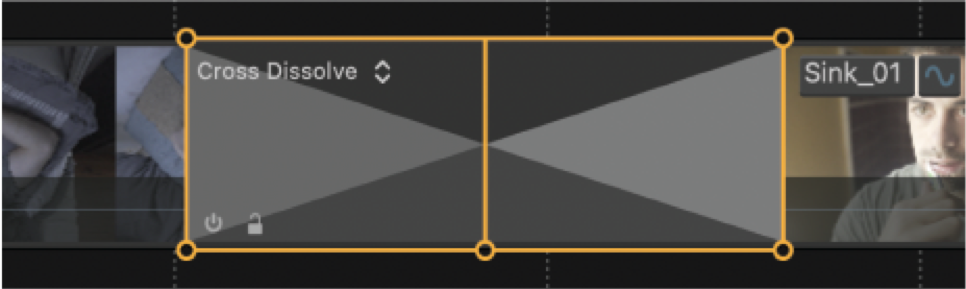
![[DIAGRAM OF DIP TO COLOR]](images/transitionDipToColor.png)
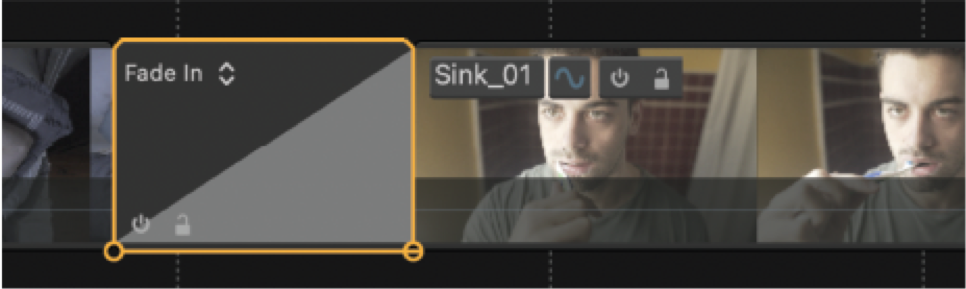
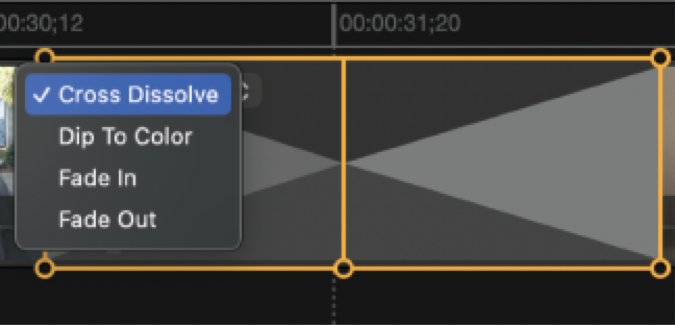
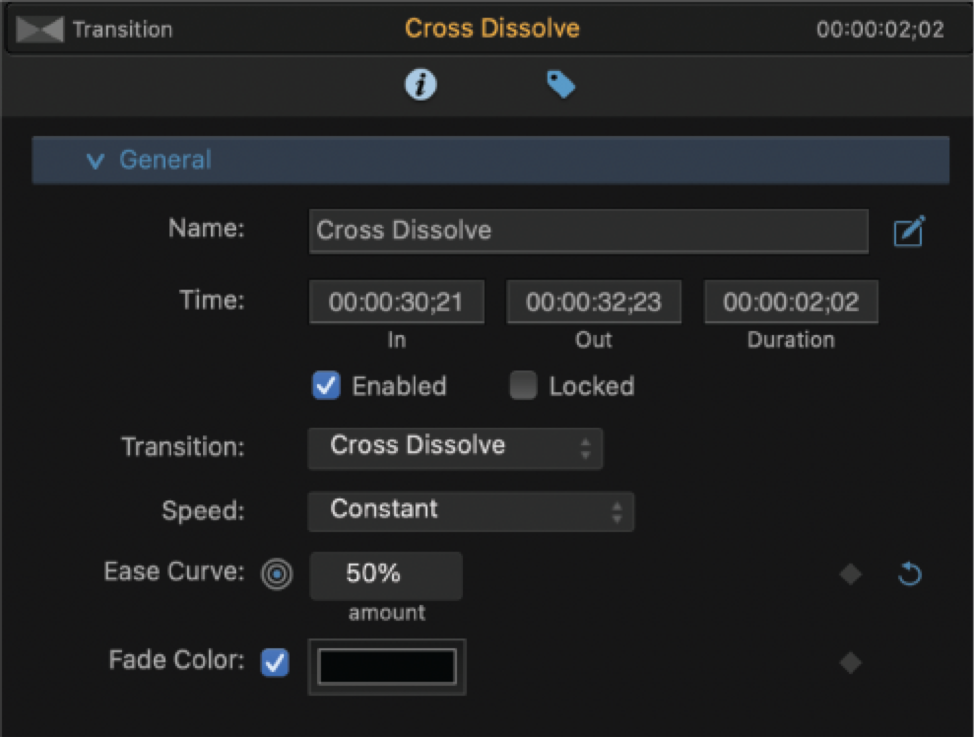
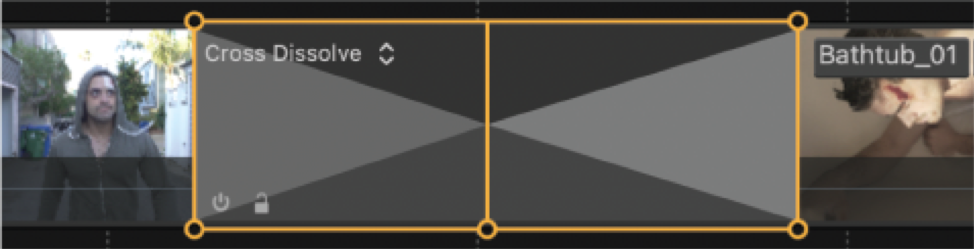
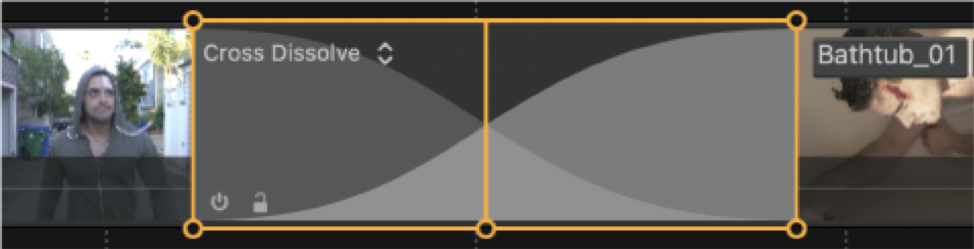
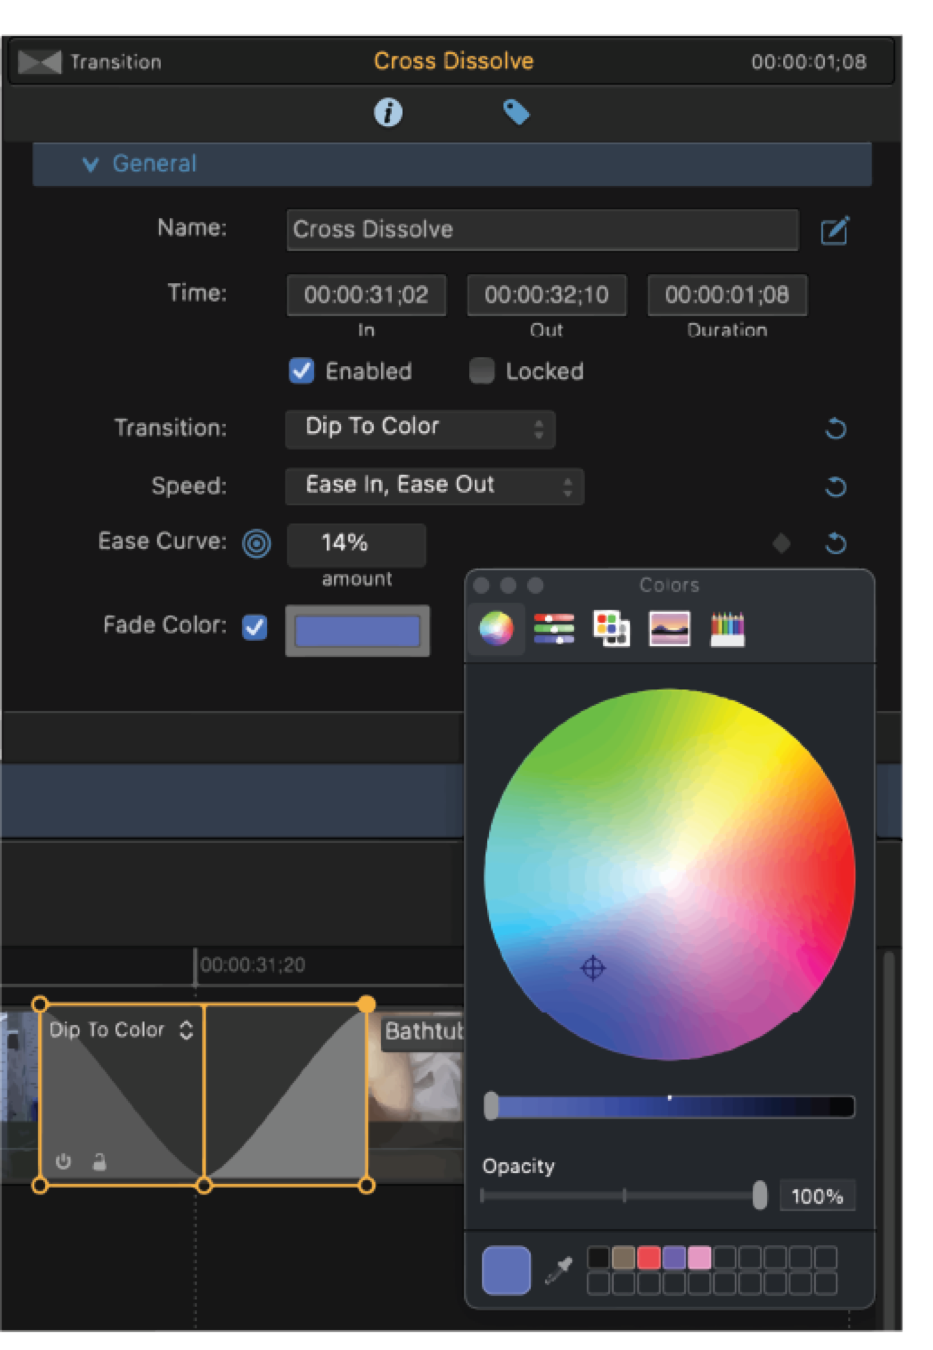
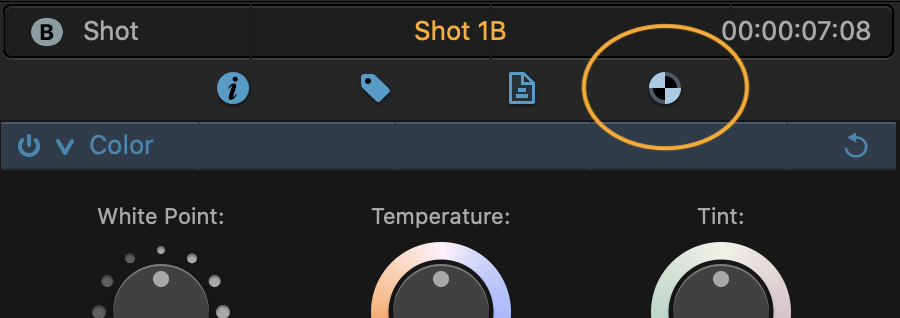


|
The power button allows you toggle an effect on or off. When the toggle is “On”, the effect is applied and can be seen in the viewer. If the toggle is “Off”, the effect is not used. The default is “On”. |

|
The Open/Close button allows you to view the controls of an effect or hide them and collapse the section down into a bar. The default is “Open”. |

|
The Reset Button returns all effect values back to the default. Clicking Reset will erase any animations you may have created for that effect. Most parameters in the Inspector also have their own Reset Button, which deletes that parameter’s animation and returns the parameter to its default value. |

|
The Animation control offers a set of tools to create, view and modify keyframes. It is off (grey) by default. See the Animation section below for more information on creating an animation. |

|
The Accelerator Button determines the precision of a control. Click to increase the steps from slow to fast. This toggles through three speed levels (the higher the speed level, the faster the change in value will occur as you drag through the slider). |
Note that you can reorder each effect in the panel by dragging the header up or down. So if you prefer Color lower in the stack, just drag the Color heading down in the stack.
Changing Values
Change parameter values by typing in the parameter field box, clicking on the stepper, or by using the virtual slider, which will appear when you scroll the cursor on top of a knob or below the parameter value box. Orange outlines of the box indicate a value that just changed. For the virtual slider, click the parameter name and drag left or right.
Color
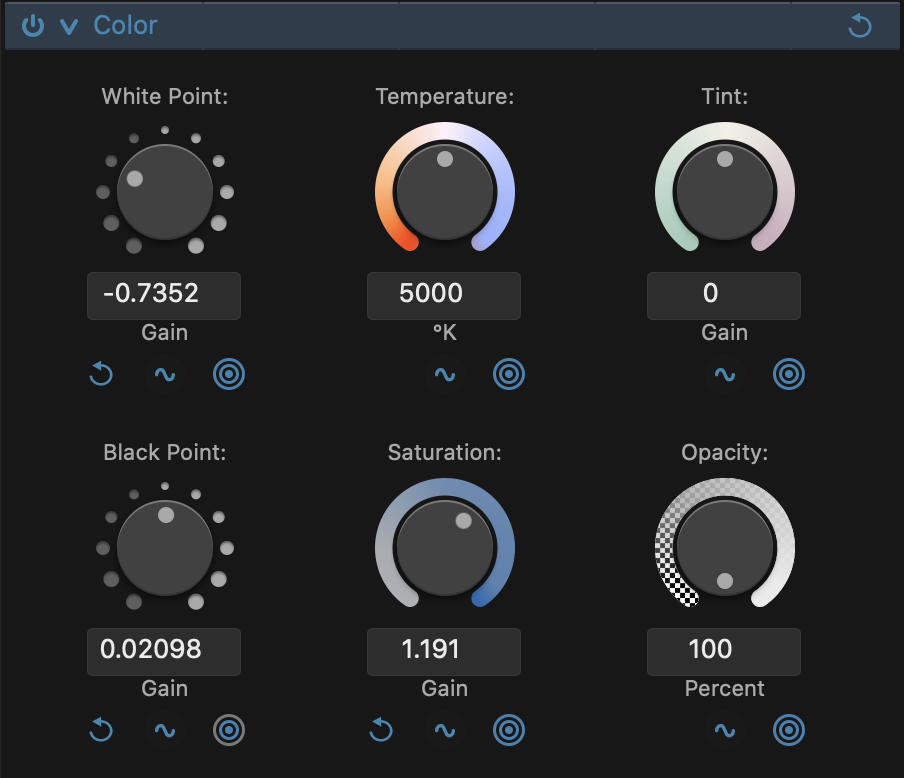
Color controls correct common color problems. Examples are over/under-exposed shots or improper white points for the lighting.
Most people's eyes adjust to see a white paper as white in most lighting conditions, but a camera doesn’t. To balance your shot, use the temperature to correct the white point. Tweak the tint if it looks a little green or magenta.
Adjusting the White Gain, is like changing the exposure. You are trying to get the widest range of highlights and shadows between the white and black points. But not so much that you clip your whites or crush your blacks.
White
The White Knob adjusts the gain (or value) of the white points up or down, which modifies the exposure. The black point stays fixed while the white point rises. This also scales the rest of the in-between values. Think of it as if you were holding one end of a rubber band fixed in one spot and stretched the other end in and out.
Temperature
Temperature modifies the white point along the blue-yellow axis. This compensates for different lighting conditions.
Tint
Tint moves the white point along the green-magenta axis. This is perpendicular to the temperature axis of blue-yellow. Use this after a temperature modification, if you have, say, a green tint from a florescent light.
You can look at temperature as an X axis and tint as a Y axis. The two let you move around a plane to map the white point to a new location.
Black
The Black Knob moves the black point up or down. The white point stays fixed and the black point changes, which also scales the rest of the in-between values.
Saturation
The Saturation Knob globally adjusts each pixel between full color and a neutral grey.
Opacity
The Opacity Knob controls the transparency of the item.
Note: Color modifications stay linear to preserve image data for later creative grading.
Orientation
The Orientation controls let you rotate, flip, or flop a clip.

Rotate 90
Rotates the image by 90 degrees clockwise. Click two times to rotate 180 degrees and three times for 270 degrees.
Flip
Reflects the video or image around the vertical axis.
Flop
Reflects the video or image around the horizontal axis.
Framing
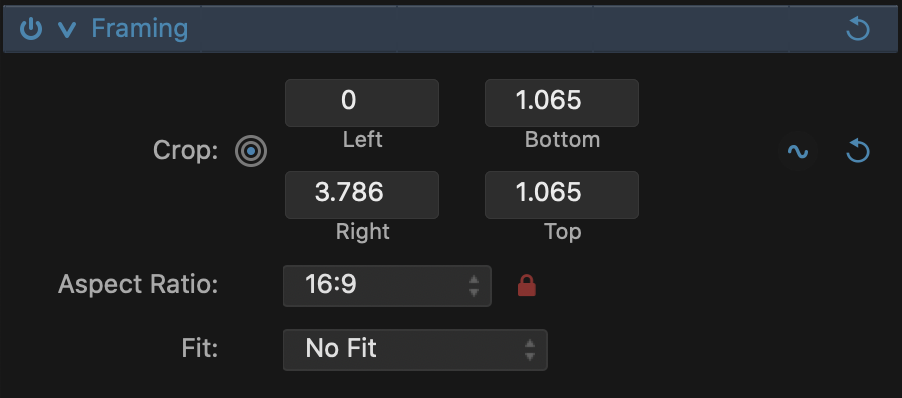
The Framing controls are a combination of crop and frame tools. You can crop using either the inspector or the on-screen Framing controls in the viewer.
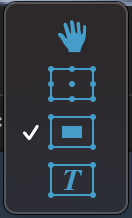
Click the Hand icon (or Transform icon if that's what you last used) in the Viewer to bring up a menu. If you do not see this icon, you might have to make your Viewer window bigger. Then select the on-screen Crop tool. In the viewer, you can drag the left, right, top and bottom sides. Drag the corner handles to crop while maintaining the aspect ratio. Drag the image to reposition it within the crop box.
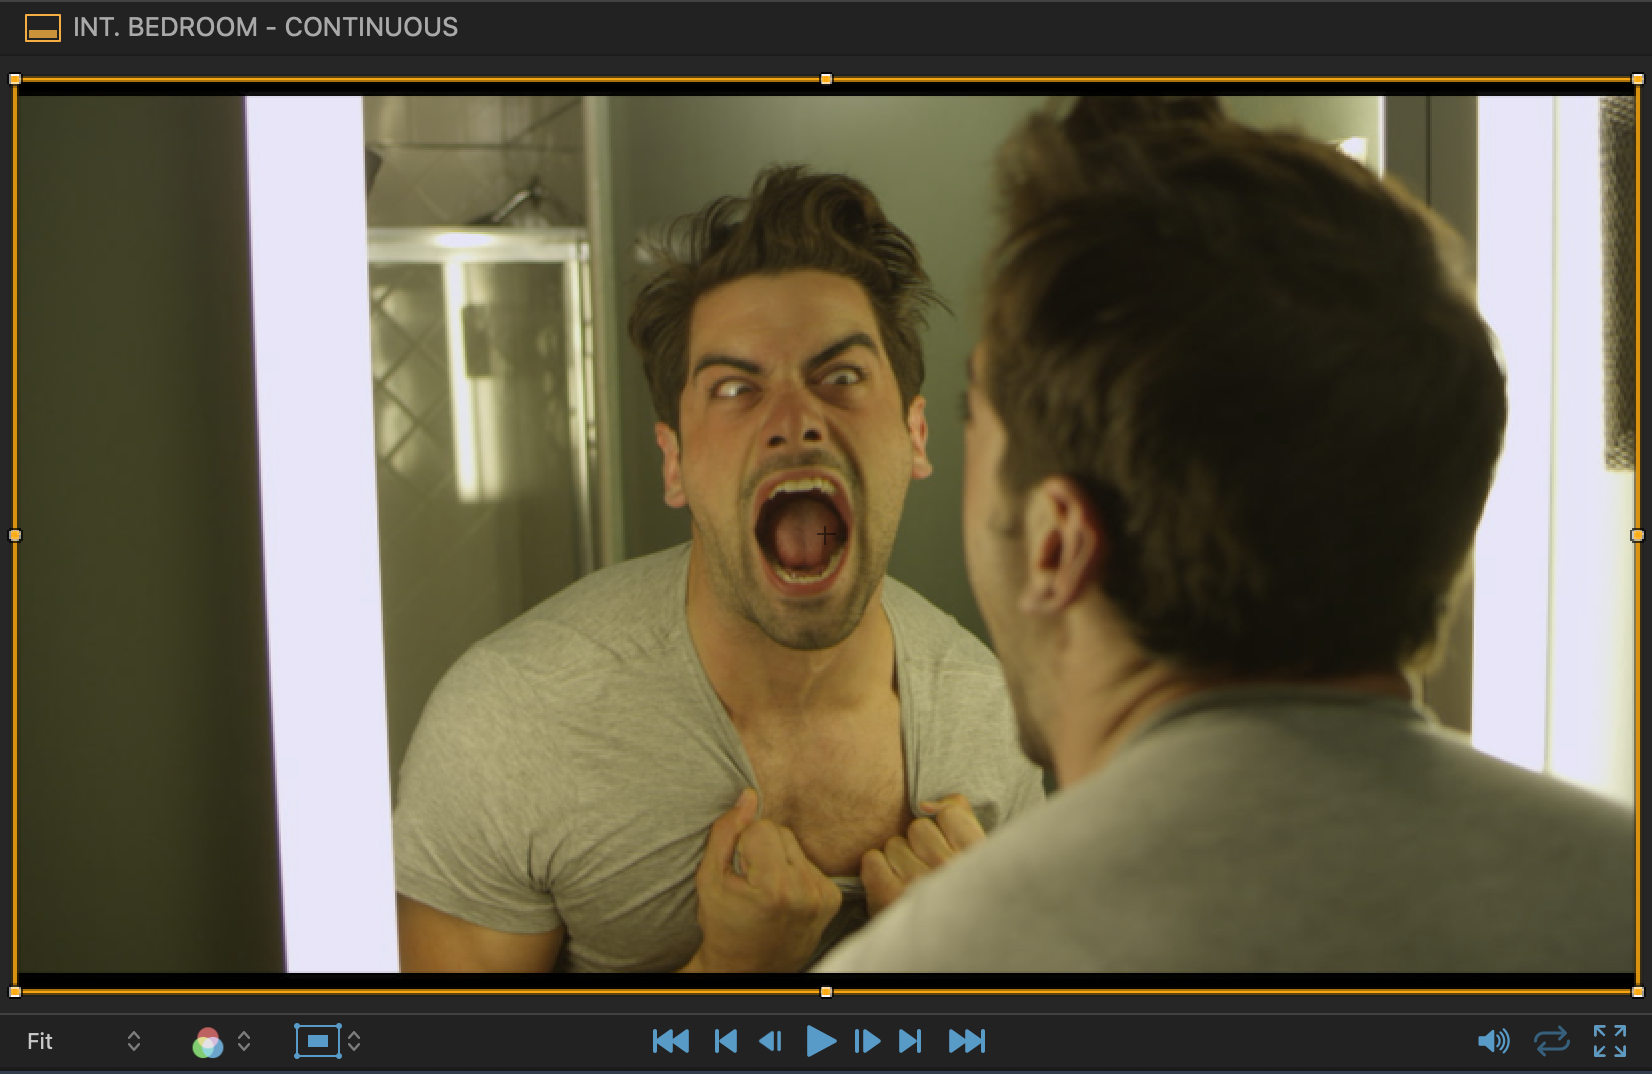
Crop
Crop each side in pixels with Left, Right, Top and Bottom controls. The values are relative to how far in the crop is from a side. So, a value of 100 in the Left value box means that 100 pixels are removed from the left side. Toggle on the Lock button beside Aspect Ratio to lock the aspect ratio while adjusting the crop box.
If the lock next to aspect ratio menu is active, the crop maintains the current aspect ratio when changing the crop values above. Turn off the lock, and only one side of the crop box changes at a time.
When using the Framing handles in the Viewer, dragging a corner handle preserves the current aspect ratio as you drag the corner, hold the Option key to allow the corner to move freely. Dragging a side handle does not preserve the aspect ratio.

Aspect Ratio
Choose an aspect ratio from the popup list (16:9, 4:3, 3:2, 2:1, 2.39, 2.35:1, 1.85:1, 1.43:1, 1:1, or Custom). This reshapes the crop box in the viewer to the chosen aspect ratio but you can change it with any side handles. To keep the aspect ratio fixed, only drag the corner handles. Or click the lock icon beside the Aspect Ratio value box.
Fit to Edges
Choose from the Fit popup (No Fit or Fit to Edges). "Fit to Edges" fits either the width or height of the image to the edge of the frame (whichever hits an edge first) and leaves black bars to fill in the rest of the viewer.
This is actually a transformation applied after the crop so if you go back to crop after this is on, you're going to get odd results, which are actually logical if you think it through. So, the best idea is to turn off the Fit to Edges, re-adjust your crop, and then turn it back on.
Transform
The Transform inspector panel lets you move, resize and rotate an image or video. You can transform a clip with either the Transform inspector or the on-screen Transform controls in the Viewer.
Transform in Inspector
Enter a new value in a parameter field, click the steppers next to the field or use the virtual slider by dragging below the parameter field box. The cursor changes to show the virtual slider availability.
Translate
Translate the video or image in X and Y. This will simply shift your media on the X-axis and Y-axis.
Rotate
Rotate the video or image in degrees.
Scale
Scale in X and Y. The scale link ( ![]() ) is on by default. Scaling in X or Y will scale the other parameter by the same amount. Toggle the link icon between the X and Y fields to turn off the link. You can then scale in X or Y independently.
) is on by default. Scaling in X or Y will scale the other parameter by the same amount. Toggle the link icon between the X and Y fields to turn off the link. You can then scale in X or Y independently.
Pivot
This moves the pivot (or center point) of the transformation. Note that the pivot can only be changed in the inspector, not the Viewer’s on-screen transform controls. This minimizes the chance of accidentally moving the pivot point.
Transform in Viewer
The Transform has an on-screen control. It lets you move, resize and rotate an image or video in the viewer.
In the lower left of the Viewer, there is a popup menu with three options—the hand (default), which allows you to Pan, Transform, Crop, and Text. Click the Transform icon to show the on-screen Transform controls.
Once the Transform controls are activated in your Viewer, drag any corner to scale. Drag the side handles to scale in one direction only. Drag in the middle circle to rotate. To move your box around, click and drag anywhere from inside the Transform box.
Hold down the Option key while dragging a handle to scale around the opposite corner or side as the pivot point. Hold down the Shift key while dragging a handle to corner handle to scale freely around the pivot point. Keep in mind that these options (Shift+drag and Option+drag) will modify your Aspect Ratio.
Reset the pan (translation or change in position) by double-clicking anywhere in the transform box except the circle. To reset an overall scale, double-click a corner handle. To reset an X or Y scale, double-click a side handle. To reset only the rotation, double-click in the rotation circle.
Of course, you could also reset transforms in the inspector using the Reset icon.
Animation
You can animate effects for timeline clips in two places, the inspector and the timeline.
Lets look at the inspector first.
Animation in the Inspector
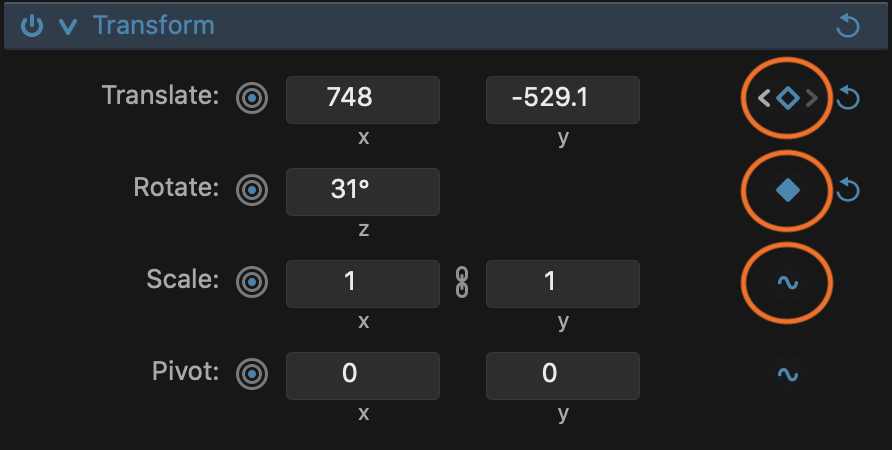
You can animate any parameter in an effect that has an animation control. By default, animation is off, indicated by a squiggle icon to the right of the parameter.

1. To activate a parameter's animation, move the Playhead over the selected clip to the desired frame for the first key and click on the squiggle. The squiggle changes to a filled diamond to show a keyframe on your new animation.
2. Adjust the parameter value of the new keyframe. Just change the value in the box by hand or drag over the label below the value box for a virtual slider. If animating a transform, crop or text clip, you can use an on-screen control in the viewer to tweak values.
3. Move the Playhead to the next place you want a key in the clip. The diamond icon is now empty to show that while it is animated, there is no key at the current frame.
4. Change the parameter value to automatically make a new key. Or click the empty diamond to make a new key with no change in the parameter's value.
5. Now that you have two keys, move the Playhead to the start of the clip and hit play to see your animation.
6. Use the "<" and ">" controls on either side of the animation control to move between keyframes.
You can also use the interactive controls in the viewer to change values, such as the Transform tool. If, say, Rotation is already animated then moving to a new frame with no key and changing the rotation angle will create a new key.
Sometimes you may want to make a new keyframe without changing the value. Move to a frame between two keys, and click the diamond in the animation icon. You will have a new keyframe with the interpolated value for that frame.
Parameter Animation Menu
Click and hold on an animation icon for a menu of options shown in the table below.
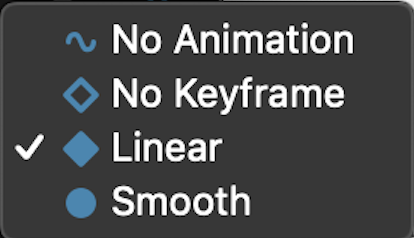
Menu Option |
Action |
|
No Animation |
Removes all keys if animated |
|
No Keyframe |
Remove the selected keyframe |
|
Linear |
Make the selected keyframe interpolate linearly |
|
Smooth |
Make the selected keyframe interpolate smoothly |
Moving between keyframes in the Inspector
You can see if a frame has a key or if a key is ahead or behind in the timeline from the chart below. Move the cursor over the animation control. Previous/next arrows appear around the animation icon. Click on a highlighted "<" or ">" to move to the previous or next key.
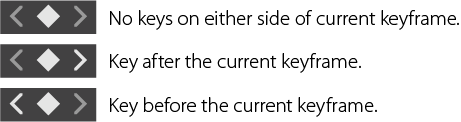
A grey arrow means there is no key on that side of the key. A highlighted arrow on either side of the diamond means a keyframe is in that direction. Clicking on either highlighted arrow moves to the next frame with a key in that direction.
Animation in the Timeline
Change the clip to a simple animation curve editor by clicking the animation icon to the right of the clip name in the upper left corner of the clip.
Selected clip with animation button off:
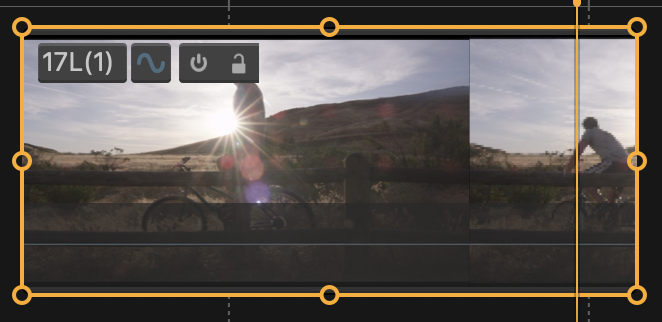
Click the animation button on:
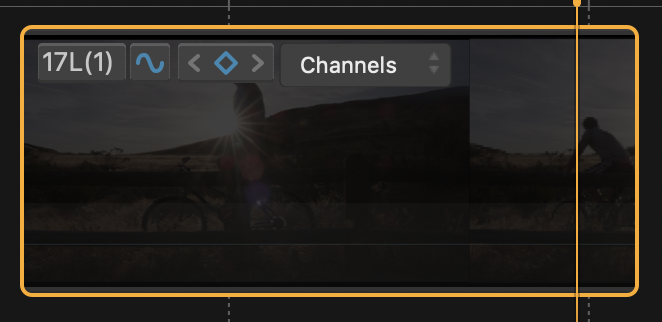
Click and hold the Channels button to select a parameter to view in the curve editor:
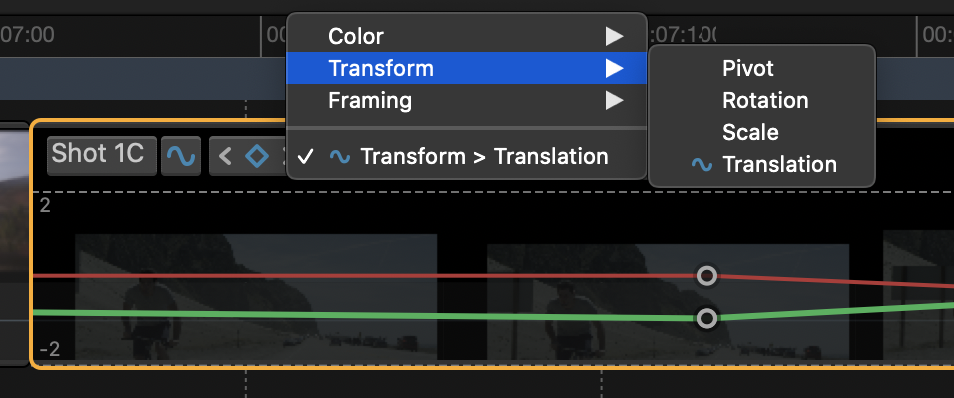
Animated parameters in the menu have a squiggle icon before the parameter.
Clip with animation button on with animated Rotation parameter selected:

The three most recently modified curves appear at the bottom of the parameter list for quick selection.
The animation controls in the clip (arrow icons around the diamond icon) work the same as in the inspector (see the previous section on animation in the inspector).
Add, delete or modify keyframes
To add a key, double-click anywhere on the curve. You can also go to a new frame and change the parameter value in the inspector. Or click the grey diamond in the animation control to add a key. Finally, right-click on a point on the curve and choose Add Keyframe to add a key.
To delete a key in the clip, double-click the keyframe on the curve or right-click to choose Delete Keyframe. You can also click the animation button to delete a selected keyframe.
To delete a keyframe in the inspector, click and hold the animation button, then select No Keyframe from the animation menu.
Drag a keyframe left or right to change the frame number. Drag up or down to change the key value. You can also use the left/right arrow keys to move the selected key 1 frame and the up/down arrow keys to increment the value.
You can modify only the keyframe value (up/down) by holding the Shift key down while dragging. You can modify only the keyframe time (left/right) by holding the Control key down while dragging.
Contextual animation menu in curve editor
Right-click the key to display the animation menu.
You can switch between Linear and Smooth interpolation for the selected keyframe, delete the keyframe, or pop up a text box to manually change the key's frame number or value.
Make the curve editor bigger
For more room to tweak your animation curves, you can increase the size of the curve editing area in the clip. To make it bigger horizontally, zoom in on the clip or select it, then hit F to fit the clip to the width of the timeline. Drag the bottom of the track header to increase the clip's height.
Note that you can't open a group with a double-click while in animation mode so you would need to toggle animation off in the clip first.
In & Out
Getting things in and out of Pretend
This section looks at how to import items and which items you can import. We'll also look at exporting your screenplay or finished piece.
Importing
There are four ways to import files into Pretend. You can import from any macOS Finder window, Pretend’s main menu, the library menu or the Import button in the library.
1. From Finder
An easy way to import things is to drag items from the macOS Finder into Pretend.
Drag the media files(s) into the library's Item panel or over a group in the Story Structure panel. You could also add the media files to the Media folder first, then place them in the desired scene or shot later. Note that you can always see all of your media in the Media folder even when the media is also in a story group.
You can also drag the files directly into the timeline. The files will also appear in the library under the story group of the current timeline.
2. From Pretend’s Main Menu
File > Import... > Import Media...
Opens a file browser to select and import video, audio and still images.
File > Import... > Import Fountain Screenplay...
Pretend can import screenplays in the Fountain format. This opens a browser to select the fountain screenplay.
3. The Library Menu
Select Import File from the library menu, lower left in the library, to open a file browser. You can then import media into the selected story group.
4. Import button in Library
The Import button to the right of the Library Menu button also opens a browser for import.
Supported File Formats
Pretend supports a wide range of audio and video file formats which can be added to its timeline and played in the viewer. Pretend can also import other file formats which can be kept as a reference in the library. For example, a PSD file can be imported into Pretend, double-clicking this item in the library will open the file in Adobe Photoshop. This is useful in organizing reference material with scenes or shots.
Video Import Formats
Format Extension |
Notes |
|
mov |
Quicktime movie |
|
m4v |
iTunes Video |
|
mp4 |
MPEG-4 video |
Audio Import Formats
Format Extension |
Notes |
|
3g2 |
Third Generation Partnership Project |
|
3gp |
Third Generation Partnership Project |
|
aac |
Advanced Audio Coding (AAC) |
|
ac3 |
Audio Codec 3 |
|
adts |
Audio Data Transport Stream |
|
aif |
Audio Interchange File Format |
|
aifc |
Compressed Audio Interchange File |
|
aiff |
Audio Interchange File Format (AIFF) |
|
amr |
Adaptive multi-rate |
|
au |
Sun/NeXT |
|
caf |
Core Audio |
|
ec3 |
Dolby Digital AC3 Sound |
|
m4a |
Apple MPEG-4 Audio |
|
m4b |
Apple MPEG-4 iTunes Book |
|
m4r |
Apple MPEG-4 iTunes Ringtone |
|
mp1 |
MPEG-1 or MPEG-2 Audio Layer III (MP3) |
|
mp2 |
MPEG-1 or MPEG-2 Audio Layer III (MP3) |
|
mp3 |
MPEG-1 or MPEG-2 Audio Layer III (MP3) |
|
mp4 |
MPEG-4 Audio |
|
mpa |
MPEG Audio Stream |
|
mpeg |
Motion Picture Experts Group |
|
qt |
Apple QuickTime Movie |
|
sd2 |
Sound Designer OO |
|
snd |
Sun/NeXT |
|
wav |
Waveform Audio File Format (WAVE) |
Image Import Formats
Format Extension |
Notes |
|
bmp |
Bitmap Image File |
|
dng |
Adobe RAW |
|
exr |
OpenExr |
|
jp2 |
JPEG 2000 |
|
jpeg |
JPEG |
|
jpg |
JPEG |
|
png |
Portable Network Graphics |
|
psd |
Photoshop document |
|
sgi |
Silicon Graphic Image |
|
tga |
Targa or Truevision TGA |
|
tif |
TIFF |
|
tiff |
TIFF |
Screenplays
Format |
Notes |
|
.fountain |
Fountain |
Exporting
First, select something to export from the timeline or library. This could be a clip in the timeline, a story group, or any video clip in the library.
If nothing is selected, the current timeline open in the timeline panel is exported.
There are three ways to export your selection. All three ways open the currently selected items in the Export Window.
1. From Pretend’s Main Menu
File > Export... > Export Selection opens the Export panel.
2. The Library Menu

Export (Selected) opens the Export panel to export the selection. So if you have "Big Scene" selected, you will see Export "Big Scene" in the menu.
3. Export button in Library
To the right of the Library Menu button is the Export button. This is a shortcut to the export command in the story panel's library menu.
The Export Window
The top section shows various render destinations - File, Vimeo and YouTube. Click on the icon to export to the desired destination, then hit Export at the bottom of the window. A progress bar and a cancel button will appear under the selected icon while rendering.
Each export icon, when selected, reveals specific settings described below.
To upload to Vimeo or YouTube, and set the title and other data, you need to enable all the permissions on the Vimeo or YouTube login page to authorize Pretend to post to your account, and update the video and account accordingly.
File Export Settings
This option exports a QuickTime movie file to your local storage. You can fine tune the video and audio settings as shown below.

Basic
Function |
Description |
|
Name |
Enter a filename. |
|
Location |
Choose a location for the file. Click the blue folder icon on the right to bring up a browser. Uncheck "Include Story Structure in Name" if you want a custom filename. |
|
Video Checkbox |
Uncheck if you don't want the video included in the output. |
|
Video Resolution |
Choose the video resolution from a popup list. Or choose Custom to enter another resolution. |
|
Frame Rate |
Displays the frame rate. |
|
Codec |
Choose between H.264 (default), H.265, ProRes 422 HQ or ProRes 4444. |
|
Audio Checkbox |
Uncheck if you don't want the audio included in the output. |
|
Audio Channels |
Choose between Stereo (default) or Mono. |
|
Codec |
Choose between AAC (default), Apple Lossless or PCM. |
Video
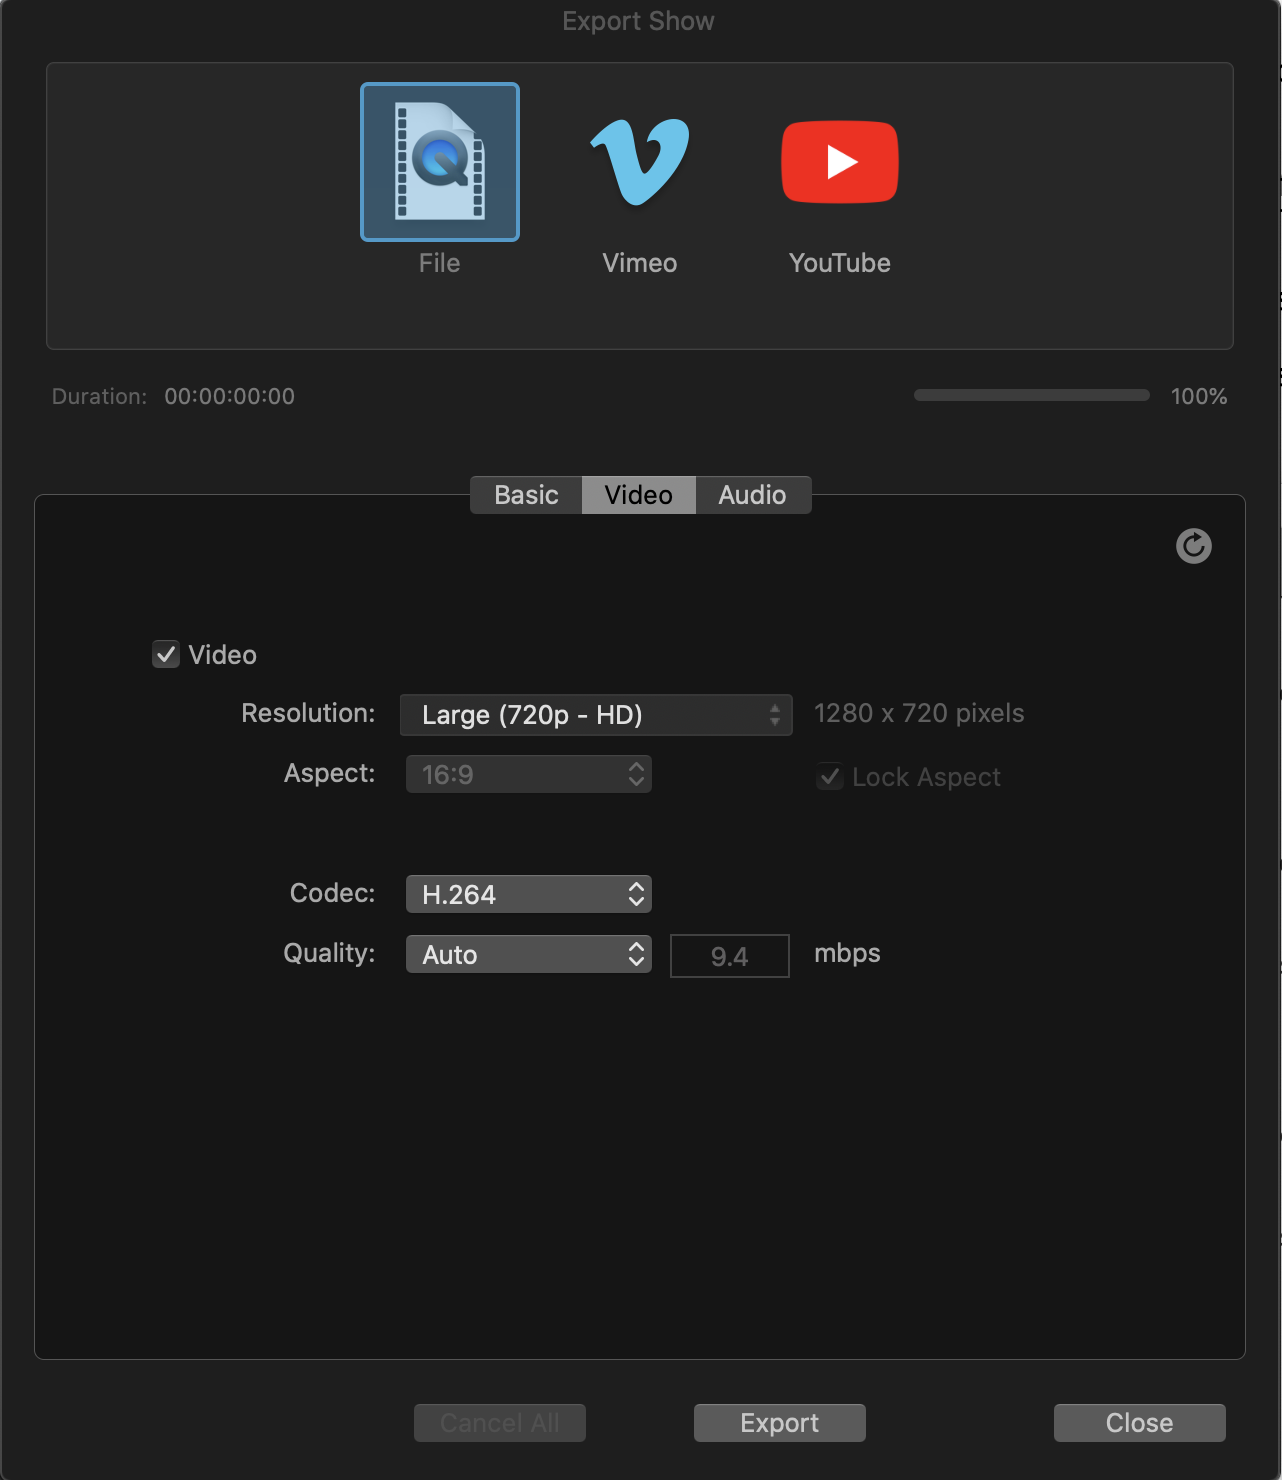
Function |
Description |
|
Video Checkbox |
Uncheck if you don't want the video included in the output. |
|
Resolution |
Choose the video resolution from a popup list. Or choose Custom to enter another resolution. |
|
Aspect |
This parameter becomes active if you choose Custom for the Format parameter above. Choose between 16:9 (default), 4:3, 1.85, and 1.33 ratios or a Custom aspect ratio. Lock Aspect is checked by default. |
|
Codec |
Choose between H.264 (default), H.265, ProRes 422 HQ or ProRes 4444. |
|
Quality |
Choose between Best, Better, Good, Auto or Custom (enter desired mbps). |
Audio
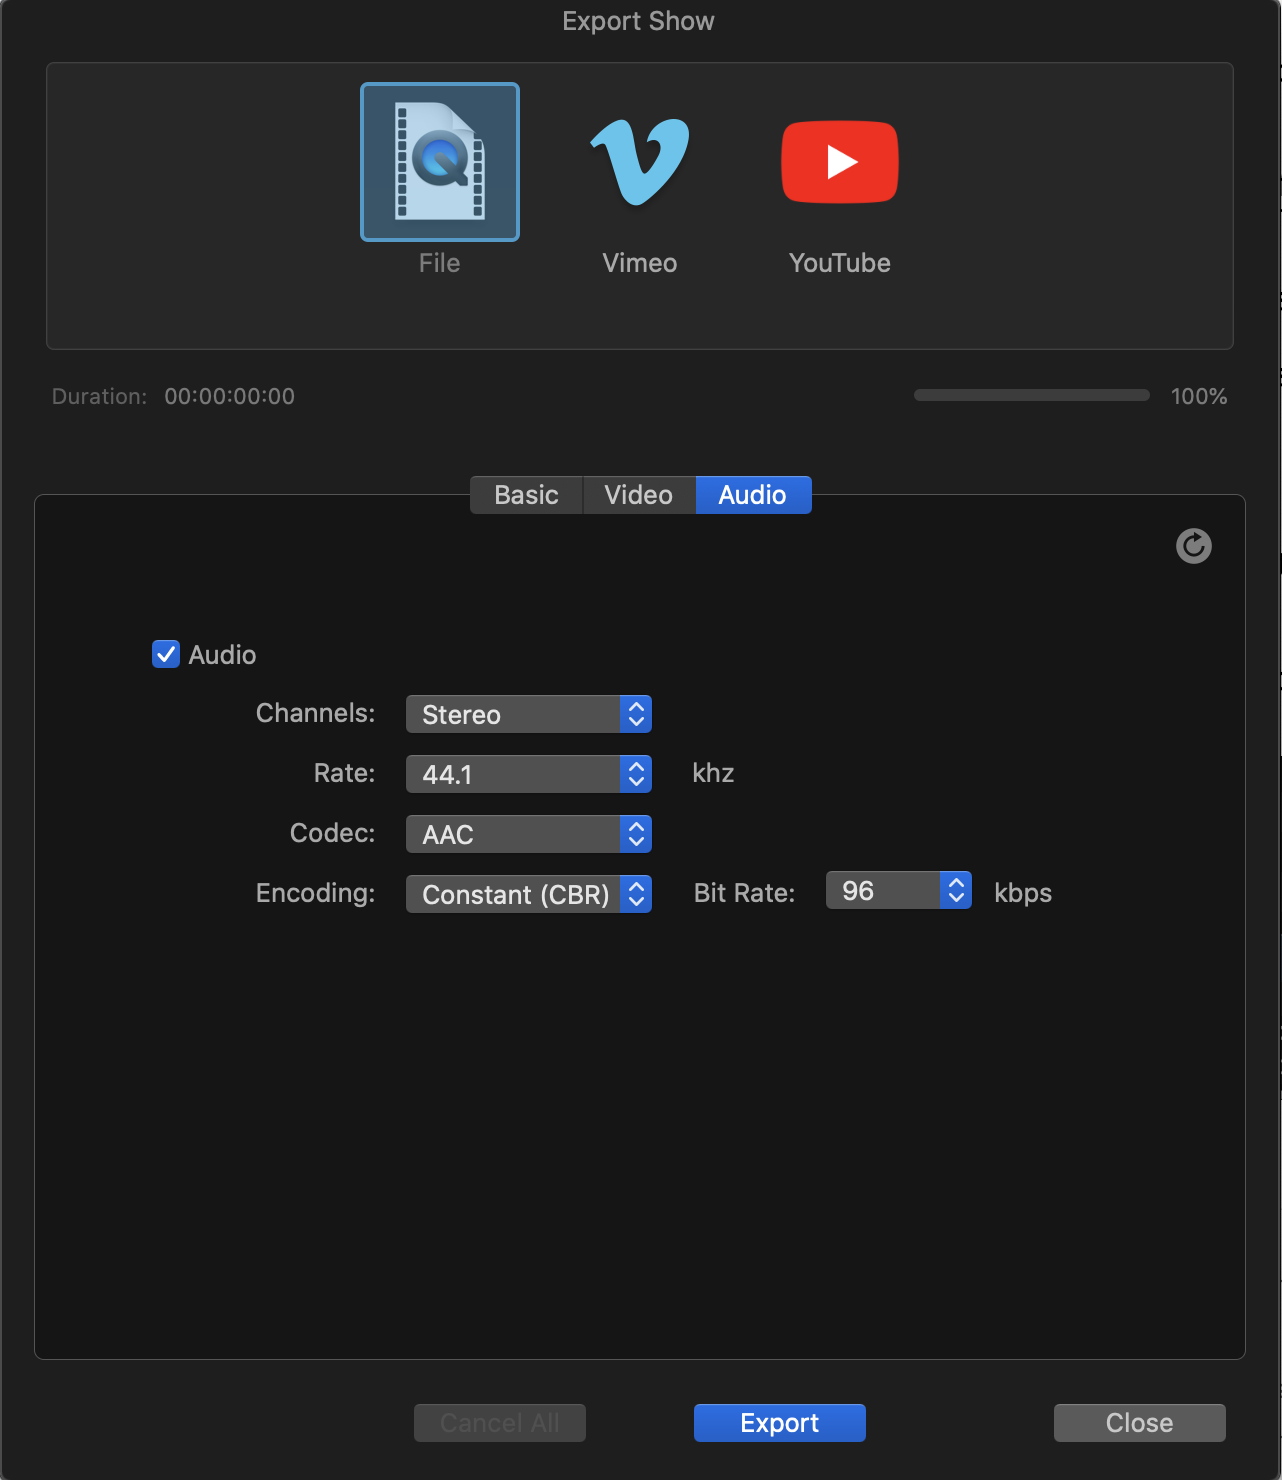
Function |
Description |
|
Audio Checkbox |
Uncheck if you don't want the audio included in the output. |
|
Channels |
Choose between Stereo (default) or Mono. |
|
Rate |
Choose between 96, 48 and 44.1 khz. |
|
Codec |
Choose between AAC (default), Apple Lossless or PCM. |
|
Encoding |
Choose between Average (ABR), Constant (CBR), Variable (VBR). Choose a Bit Rate between 96, 128, 160, 256 or 320 kbps. |
Vimeo Export Settings
Use this option to export a video to your Vimeo account and optionally save the video as a QuickTime movie file to your disk too.
Basic
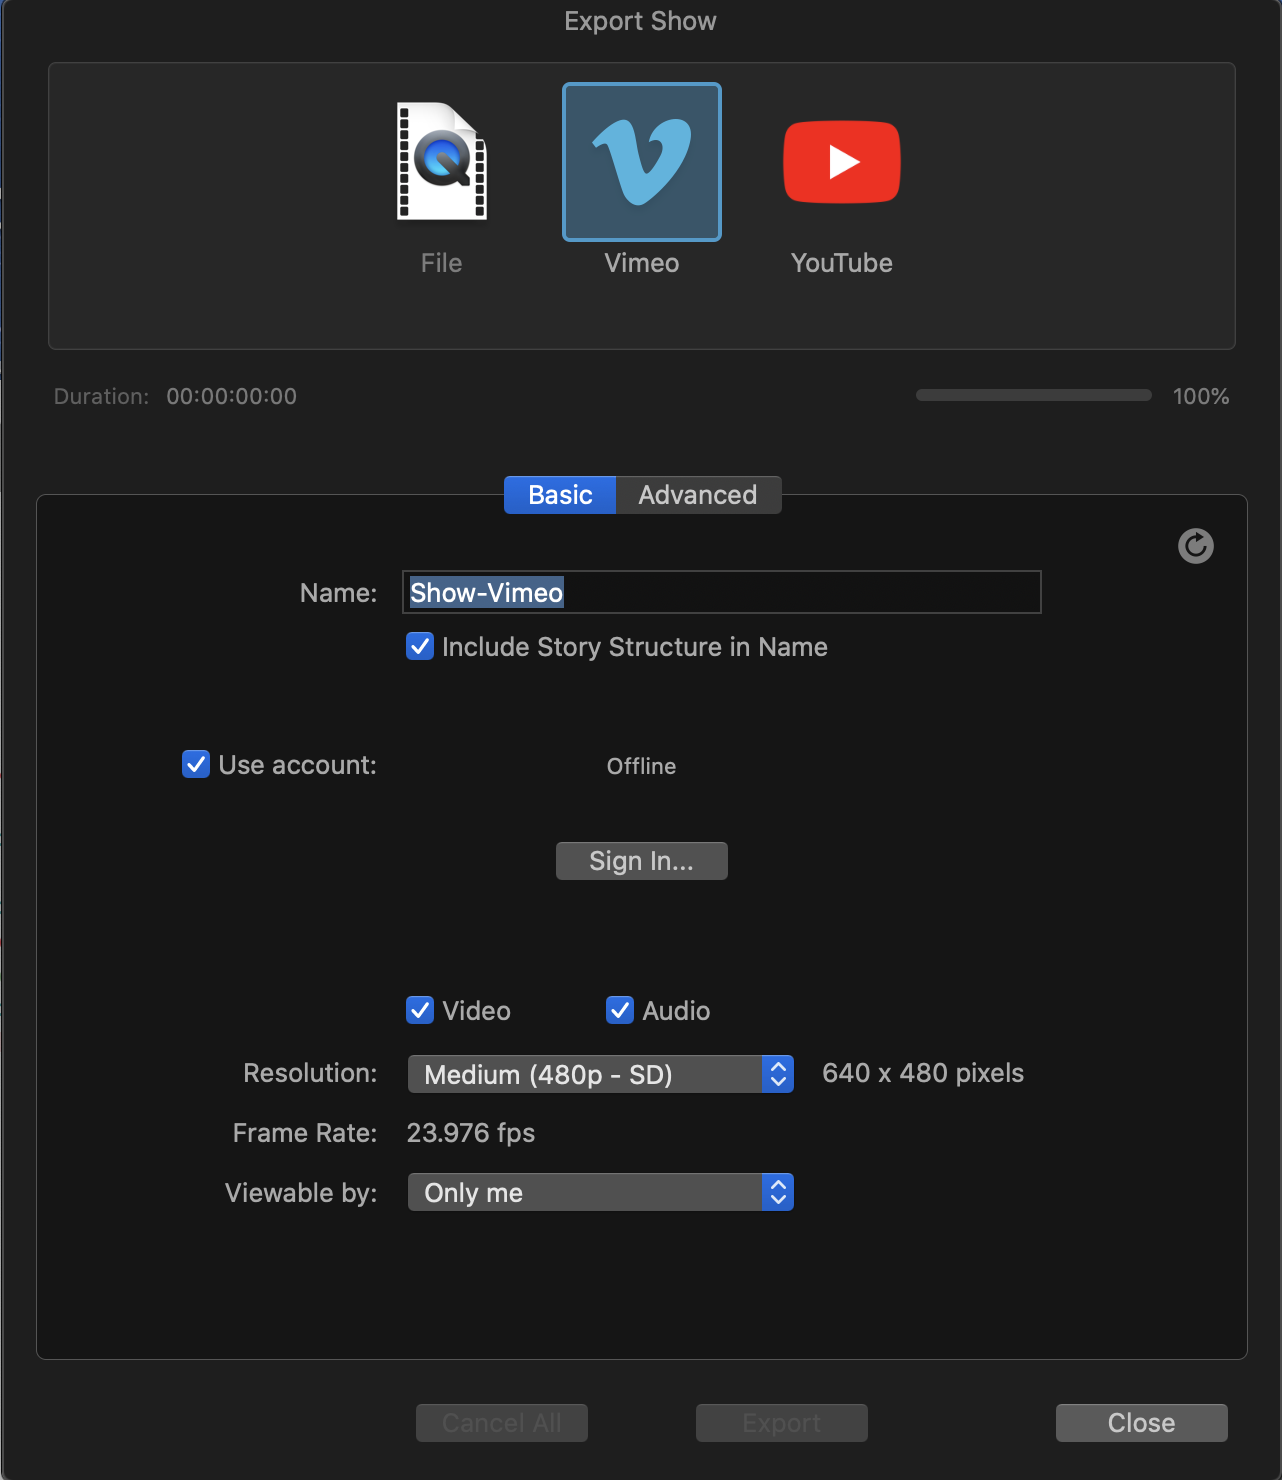
Function |
Description |
|
Name |
Enter the title of your video. Uncheck "Include Story Structure in Name" if you want a custom filename. |
|
Use Account |
Choose your account. If Offline, then Sign In. |
|
Enable Video and Audio |
Uncheck Video or Audio if you don't want one of them included in the output. |
|
Video Resolution |
Choose the video resolution from Larger (1080p - HD), Large (720p - HD), Medium (480p - SD) and Small (360p - SD). |
|
Frame Rate |
Displays the frame rate. |
|
Viewable By |
Choose between Anyone, People I follow on Vimeo, People with a password, People I choose, or Only me (default). |
Advanced
Function |
Description |
|
Video Checkbox |
Uncheck if you don't want the video included in the output. |
|
Video Resolution |
Choose the video resolution from Larger (1080p - HD), Large (720p - HD), Medium (480p - SD) and Small (360p - SD). |
|
Picture Quality |
Choose between Best (8 mbps), Better (4 mbps) or Good (2 mbps). |
|
Audio Checkbox |
Uncheck if you don't want the audio included in the output. |
|
Channels |
Choose between Stereo (default) or Mono. |
|
Sound Quality |
Choose between Better (256 kbps) and Best (256 kbps). |
|
Save movie file |
If checked, you can also save a file to disk while sending the render to Vimeo. Choose a location and name for the file. Click the blue folder icon on the right to bring up a browser. |
YouTube Export Settings
Use this option to export a video to your YouTube account and optionally save the video as a QuickTime movie file to your disk too.
Basic

Function |
Description |
|
Name |
Enter the title of your video. Uncheck "Include Story Structure in Name" if you want a custom filename. |
|
Use Account |
Choose your account. If Offline, then Sign In. |
|
Enable Video and Audio |
Uncheck Video or Audio if you don't want one of them included in the output. |
|
Video Resolution |
Choose the video resolution from Ultra (2160p - UHD 4k), Huge (1440p - QHD 2k), Larger (1080p - HD), Large (720p - HD), Medium (480p - SD), Small (360p - SD) and Tiny (240p). |
|
Frame Rate |
Displays the frame rate. |
|
Privacy |
Choose between Private and Public. |
|
Category |
Choose a category. |
Advanced
Function |
Description |
|
Video Checkbox |
Uncheck if you don't want the video included in the output. |
|
Video Resolution |
Choose the video resolution from Ultra (2160p - UHD 4k), Huge (1440p - QHD 2k), Larger (1080p - HD), Large (720p - HD), Medium (480p - SD),Small (360p - SD) and Tiny (240p). |
|
Picture Quality |
Choose between Best (8 mbps), Better (4 mbps) or Good (2 mbps). |
|
Audio Checkbox |
Uncheck if you don't want the audio included in the output. |
|
Channels |
Choose between Stereo (default) or Mono. |
|
Sound Quality |
Choose between Good (192 kbps), Better (256 kbps) and Best (320 kbps). |
|
Save movie file |
If checked, you can also save a file to disk while sending the render to YouTube. Choose a location and name for the file. Click the blue folder icon on the right to bring up a file browser. |
Exporting XML to other video editors
Exporting via XML to FCPX
If you need to export your project into Final Cut Pro X, select File > Export... > Export FCP X XML... and then save.
Animation and color correction, as well as some text parameters, are not transferred. Story arcs and other unique Pretend features are not included. Use this conversion as a base starting point for continuing your edit in FCPX.
Note that XML export is not included in the Pretend free version.
Exporting via XML to FCP 7, Adobe Premiere or Resolve
If you need to export your project into Final Cut Pro 7, Adobe Premiere or Resolve, select File > Export... > Export FCP 7 XML... and then save.
Animation color correction, and text are not transferred. Story arcs and other unique Pretend features are not included. Use this conversion as a base starting point for continuing your edit.
Note that XML export is not included in the Pretend free version.
Exporting Screenplays in Fountain or PDF formats
If you need to export your screenplay, select File > Export... > Export Fountain Screenplay... and then save. Fountain is an open source screenplay markup format that can be opened in any text editor and so is a very safe, future-proof way to save screenplays. Most screenplay editing software can read and write fountain format.
For a PDF export, select Print.. in the Screenplay Editor and then Save as PDF from the PDF dropdown menu in the lower left corner.
You can also export Fountain files from the screenplay editor menu.
The Global Bar

The Global Bar is the center bar in the app. It is visible even when you close all the other panels and holds general controls and displays.
Update Pretend Button

When a new version of Pretend is available, the Update Pretend button becomes active and a green badge is drawn. Click the button to download the newest version. We strongly recommend updating so you are always working with the latest and greatest version.
Timecode Display
In the middle of the bar is the Timecode Display which shows the current time in the timeline and in the viewer. The hours, minutes, seconds and frame numbers are separated by colons. The frame rate of the current timeline is also displayed here.
Hide/Show Panel Buttons

You can show or hide each of the panels with these buttons. From left to right, are for the Screenplay Editor, Library, Inspector, Viewer or Timeline panels. The last Sparse View button is a toggle for showing or hiding less-used buttons in the interface for a cleaner look.
Hotkeys
Note that these hotkeys work with the current active panel. So pressing a key in the viewer or timeline may produce different results.
Modifier Key Symbols
Key |
Symbol |
|
⌘ |
Command |
|
⌥ |
Option |
|
⌃ |
Control |
|
⇥ |
Tab |
|
⇧ |
Shift |
|
↩ |
Return |
|
⌫ |
Delete |
|
⎋ |
ESC |
|
← |
Left Arrow |
|
→ |
Right Arrow |
|
↑ |
Up Arrow |
|
↓ |
Down Arrow |
Note that character keys are shown as upper case for clarity only. So, for an "F", you would just press the lower case "f" key.
Viewer
Function |
Shortcut |
|
Pan |
Click and drag inside the viewer. |
|
Zoom In |
⌘ - |
|
Zoom Out |
⌘ = |
|
Play/Pause |
Spacebar |
|
Show/Hide Viewer |
⌥ ⌘ 1 |
Screenplay Editor
Function |
Shortcut |
|
Select All |
⌘ A |
|
Cut/Copy/Paste |
⌘ X / ⌘ C / ⌘ V |
|
Undo |
⌘ Z |
|
Redo |
⇧ + ⌘ + Z |
|
Insert Character |
Click Once (insert point), Twice (selects word), Three (selects the paragraph). |
|
Bold |
⌘ B |
|
Italic |
⌘ I |
|
Underline |
⌘ U |
|
Toggle between |
⌘ ~ |
|
Find |
⌘ F |
|
Insert Note |
⌘ Y |
|
Insert Comment |
⌘ / |
|
Insert Page Break |
⌘ ↩ |
|
Force Action |
⌥ ⌘ A |
|
Force Character |
⌥ ⌘ C |
|
Force Scene Header |
⌥ ⌘ S |
|
Force Transition |
⌥ ⌘ T |
|
Force Center |
⌥ ⌘ M |
|
Add Show |
⌘ 1 |
|
Add Scene |
⌘ 2 |
|
Add Shot |
⌘ 3 |
|
Add Story Group |
⌘ 4 |
|
Export Fountain Screenplay |
⇧ ⌘ E |
|
|
⌘ P |
|
Show/Hide |
⌥ ⌘ 5 |
Library
Function |
Shortcut |
|
Add Show |
⌘ 1 |
|
Add Scene |
⌘ 2 |
|
Add Shot |
⌘ 3 |
|
Add Story Group |
⌘ 4 |
|
Add Group |
⌘ 5 |
|
Duplicate Selection |
⌘ D |
|
Import File |
⌘ I |
|
Export Selection |
⌘ E |
|
Show/Hide Library |
⌥ ⌘ 2 |
|
Play/Pause of |
Spacebar |
Timeline
Function |
Shortcut |
|
Delete |
⌫ |
|
Delete with Gap |
⌘ + ⌫ |
|
Razor tool |
X |
|
Play/Pause |
Spacebar |
|
Next Edit |
↑ |
|
Previous Edit |
↓ |
|
Fit |
F (fits selection; if no selection, fits all) |
|
Zoom Out |
- |
|
Zoom In Around |
Z |
|
Zoom In |
= |
|
Zoom Out Around |
⌥ Z |
|
Enable Scrubbing |
S |
|
Jump to Playhead |
G |
|
Move Playhead to Point |
M |
|
Show/Hide Timeline |
⌥ + ⌘ 3 |
Inspector
Function |
Shortcut |
|
Show/Hide |
⌥ + ⌘ 4 |
General
Function |
Shortcut |
|
Save |
⌘ S |
|
Quit |
⌘ Q |
|
Full-screen View |
⌘ F |
|
Hide |
⌘ H |
|
Select |
Click |
|
Select All |
⌘ A |
|
Add to Selection |
⇧ + click or drag box |
|
Select Multiple |
⌘ + click |
|
Confirm |
↩ (fields in Inspector confirm automatically) |
|
Cancel |
⎋ Esc |
|
Preferences |
⌘ , |
Pretend Main Menu
Below is a handy table of the top menu items with descriptions and shortcuts.
Pretend
File
Command |
Description |
Shortcut |
|
New |
Makes a new Pretend project. |
⌘ N |
|
Open... |
Open an existing Pretend project from the file browser. |
⌘ O |
|
Open Recent |
Open from a list of recent projects. "Clear Menu" removes all recent projects from the list. |
|
|
Import... > Import Media... |
Loads media files from a file browser into the library under the selected group. |
|
|
Import... > Import Fountain Screenplay... |
Loads an existing Fountain-format screenplay into Pretend as a new screenplay in your project under a new show. |
|
|
Export... > Export Selection... |
Brings up an Export window to output all or a part of the rendered project. See Export section for full description. |
⌘ E |
|
Export... > Fountain Screenplay... |
Brings up a file browser to export a Fountain file of your currently selected Show's screenplay. |
⇧ ⌘ E |
|
Export... > Export FCP 7 XML... |
Brings up a file browser to export the current timeline selection as a Final Cut Pro 7 XML file. Use this XML file to import your project into Adobe Premiere or Black Magic Resolve. Transfers are approximate and some features like animation and color correction are not supported. Use as a base starting point. |
|
|
Export... > Export FCPX XML... |
Brings up a file browser to export the current timeline selection as a Final Cut Pro X XML file. Transfers are approximate and some features like animation and color correction are not supported. Use as a base starting point. |
|
|
Close |
Close the current project. |
⌘ W |
|
Save |
Opens a file browser to save the current project. |
⌘ S |
|
Duplicate |
Copies the current project. |
⇧ ⌘ S |
|
Rename... |
Renames the current project. |
|
|
Move to... |
Moves the project to a new location in the file system. |
|
|
Revert to |
Reopens the last saved, last opened or opens a file browser to pick another version. |
|
|
Reconnect Media... |
Opens the Reconnect Media panel. Use this if you still have any missing media that needs to be reconnected to the project. Otherwise, it is inactive if no media is missing. |
Edit
Command |
Description |
Shortcut |
|
Undo |
Undo the last action. |
⌘ Z |
|
Undo Closed Tab |
Restores the last closed tab as open. |
⇧ ⌘ T |
|
Redo |
Redo the last action. |
⇧ ⌘ Z |
|
Cut |
Cuts the selected item. |
⌘ X |
|
Copy |
Copies the selected item. |
⌘ C |
|
Paste |
Pastes the selected item. |
⌘ V |
|
Delete |
Removes the current selection. |
⌫ |
|
Select All |
Selects all in the current location. |
⌘ A |
|
Find |
Search in the current location. |
⌘ F |
|
Screenplay.../Insert... |
Inserts a note, comment, page break, synopsis, or title page into the screenplay text. See the Write section for more details. |
|
|
Screenplay.../Force... |
Forces an element in the screenplay to be a scene header, action, character, dialogue, parenthetical or transition. Use if the element is not automatically being formatted. See the Write section for more details. |
View
Command |
Description |
Shortcut |
|
Hide > Player |
Toggle to show/hide the Player. |
⌥ ⌘ 1 |
|
Hide > Timeline |
Toggle to show/hide the Timeline. |
⌥ ⌘ 2 |
|
Hide > Library |
Toggle to show/hide the Library. |
⌥ ⌘ 3 |
|
Hide > Inspector |
Toggle to show/hide the Inspector. |
⌥ ⌘ 4 |
|
Enable Scrubbing |
Toggle to scrub in the timeline. |
|
|
Hide > Screenplay Editor |
Toggle to show/hide the Screenplay Editor. |
⌥ ⌘ 5 |
|
Hide > Project Editor |
Toggle to show/hide the Project Editor. |
|
|
Reset Default Layout |
Return to default window layout. |
|
|
Enter Full Screen |
Enlarge the window to full screen. Hit Esc to return. |
Window
Command |
Description |
Shortcut |
|
Minimize |
Minimizes the active window. |
⌘ M |
|
Minimize All |
Minimizes all active windows. |
|
|
Zoom |
Zooms the active window to fill the screen. Choose again to revert to previous window size. |
|
|
Tile Window to Left of Screeen |
As it says. |
|
|
Tile Window to Right of Screeen |
As it says. |
|
|
Bring All to Front |
Brings all Pretend windows to the front. |
|
|
Project Browser |
Opens the Project Browser. You normally see this window when starting Pretend. |
|
|
Windows Currently Open |
Shows a list of currently open Pretend windows. Select one to bring to front. |
Help
Command |
Description |
Shortcut |
|
User Guide |
Opens the Pretend User Guide in the default web browser. |
|
|
Contact Us |
Opens a new email to Pretend Support. Let us know if you have any suggestions or run into a bug. |
Preferences
General Preferences
Time Display |
Choose Timecode (default) or Frames. |
Still Images |
Set the default still image length in seconds or frames. |
Sparse View |
When checked, displays fewer buttons on the screen unless the cursor is nearby. |
Use highest rated or 1st clip in when adding shot to timeline |
When checked, dragging a shot into the timeline will automatically add a clip if one is found in the shot in the library. This is to speed up shot setup. It will take the highest rated visual clip, or if nothing is rated, the first clip added to the shot. |
Screenplay Editor Preferences
Font Family |
Choose between Andale Mono, Courier (default), Courier New, Menlo, and Monaco for the screenplay font. |
Font Size |
Choose a font size 9-18 (default is 12). |
Scene Headers |
To more easily spot scenes, you can make all scene headers bold or underlined. Choose Double-Spaced to have two blank lines before all scene headers. |
Appendix A
License Acknowledgement
In addition to names listed below, any other names of other companies or products mentioned in the Pretend User Guide (including, but not limited to, those listed below) are the trademarks or service marks, or registered trademarks or service marks, of their respective owners. No association between their respective companies and Pretend LLC is inferred by their use.
Adobe®, Premiere® and Photoshop® are trademarks of Adobe Systems Incorporated.
Mac®, Mac OS®, Final Cut Pro®, Motion® and QuickTime® are trademarks of Apple, Inc.
Highland® is a trademark of The Quote-Unquote Company.
Resolve® is a trademark of Blackmagic Design Pty. Ltd.
RED® and R3D® are trademarks of Red.com, Inc.